
Last Updated on August 28, 2024
Installing solar panels on your RV is a game-changer for off-grid travel. Start by evaluating your RV’s roof for structural integrity and space, then choose high-efficiency panels, like monocrystalline, to maximize power generation. You can opt for portable or permanent installations based on your needs. Secure your panels using the right mounting hardware and guarantee ideal orientation to capture sunlight.
Properly integrating a battery system enables effective energy storage. Regular monitoring and maintenance are key to maximizing performance and extending lifespan. There’s much more involved in this efficient setup that can greatly enhance your RV experience.
- Key Takeaways
- Selecting Your RV and Solar Panels
- Installing Solar Panels and Mounting
- Configuring the Electrical System
- Integrating the Battery System
- Monitoring and Management Setup
- Types of RV Solar Panel Systems
- Essential Components for Solar Systems
- Calculating Energy Needs
- Installation and Maintenance Tips
- Frequently Asked Questions
- Power Your Adventures: Charge Devices and More with Solar Energy
Key Takeaways
- Assess your RV’s roof space and structural integrity to determine the suitable solar panel system for installation.
- Choose between portable and permanent solar panel systems based on your camping frequency and energy needs.
- Optimize panel orientation with adjustable brackets to maximize sunlight capture throughout the year.
- Ensure proper installation techniques, including secure mounting and moisture management, to enhance durability.
- Incorporate a battery bank and inverter for effective energy storage and power management within your RV.
Selecting Your RV and Solar Panels
When you’re gearing up to install solar panels on your RV, it’s crucial to narrow down your options carefully.
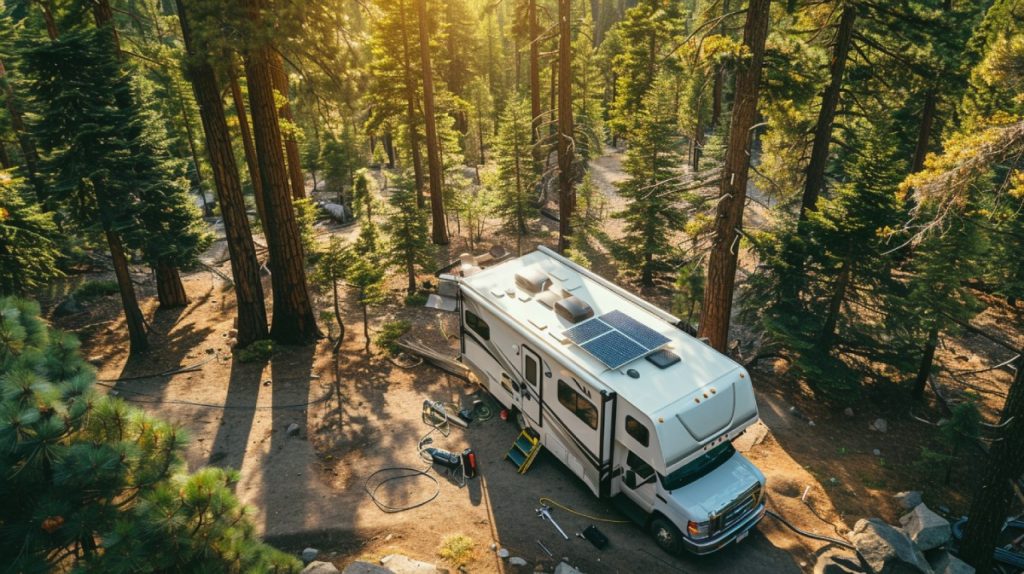
First, consider the RV model you choose. A Class A motorhome usually offers ample roof space, making it easier to mount your solar panels compared to Class C models. Additionally, high-efficiency solar panels, particularly monocrystalline options, are ideal for maximizing power generation in limited RV space.
Next, focus on selecting high-efficiency solar panels, like the SunPower 435-watt panels. These are known for their durability and performance, particularly when sourced from reputable providers.
Don’t forget to evaluate your RV’s roof. Verify its structural integrity and weight capacity can support the additional weight of solar panels and mounting hardware.
You’ll also need to decide between rigid and flexible panels. Rigid panels often allow for tilt adjustments, which can greatly enhance sunlight exposure.
Installing Solar Panels and Mounting
When you install solar panels on your RV, selecting the right mounting hardware is essential for stability and performance.
You’ll want to secure the panels effectively while optimizing their orientation to capture maximum sunlight throughout the year.
Proper installation techniques guarantee not only a durable setup but also enhanced energy efficiency, making your solar investment worthwhile.
Choosing Mounting Hardware
Selecting the right mounting hardware for your RV solar panels is essential for ensuring ideal performance and longevity. You’ll need to evaluate various options based on your needs and roof type. Z brackets offer a cost-effective solution that requires drilling, while tiltable mounting brackets allow you to adjust the angle for optimal solar exposure, typically ranging from $30 to $50.
Here’s a quick comparison of mounting options:
| Mounting Type | Installation Method | Compatibility |
|---|---|---|
| Z Brackets | Requires drilling | Compatible with most roofs |
| Tiltable Brackets | Requires drilling | Compatible with most roofs |
| Adhesive Mounting | No drilling needed | Best for flexible panels |
Ensure that the selected brackets are compatible with your roof material and can securely hold the weight of the solar panels. Don’t forget to use sealant under the brackets to prevent water intrusion. For flexible panels, adhesive mounting simplifies installation without drilling, while rigid panels need screws. Always check the manufacturer’s specifications for recommended techniques and weight limits to maintain structural integrity during transit.
Securing Solar Panels
Securing solar panels effectively is fundamental for maximizing their performance and guaranteeing they withstand the rigors of travel. Start by using heavy-duty VHB tape to attach the panels to your RV roof. Clean the surface with acetone beforehand for ideal adhesion.
To distribute weight evenly and allow flexibility in panel positioning, employ galvanized metal strut channels. For robust security, install stainless steel brackets to replace any existing ones, enhancing both tilt and ventilation capabilities.
Carefully mark the panel placement on the roof to avoid shading and guarantee optimal sun exposure. Use self-leveling sealant and bolts for additional security against lift.
Consider these vital aspects for a successful installation:
- Moisture management: Seal connections and guarantee proper drainage to protect adhesive.
- Panel orientation: Position panels to maximize sun exposure and minimize shading.
- Durability: Select materials that can withstand weather changes and travel stresses.
Optimizing Panel Orientation
After ensuring your solar panels are securely attached, focusing on their orientation can greatly enhance energy capture. Aim for a tilt angle between 30 to 45 degrees facing true south. This positioning maximizes sunlight exposure throughout the day, greatly improving energy efficiency.
To further optimize your setup, consider using adjustable mounting brackets. These allow for seasonal adjustments, ensuring your panels capture the sun’s rays effectively during both winter and summer months. Additionally, eliminate any shading from roof vents, air conditioning units, or nearby trees, as even small obstructions can hinder energy production.
Here’s a quick reference table to help you remember key orientation tips:
| Orientation Tip | Benefit |
|---|---|
| Tilt Angle: 30-45° | Maximizes sunlight exposure |
| Adjustable Brackets | Allows seasonal adjustments |
| No Shading | Maintains peak energy production |
| Galvanized Strut Channels | Offers flexibility and durability |
For securing your panels, use heavy-duty VHB tape along with bolts and self-leveling sealant. This combination enhances durability and prevents lift from wind during travel.
Configuring the Electrical System
Configuring the electrical system for your RV solar installation is essential to guarantee efficient energy management and reliable power supply. Start by incorporating a 50 amp inverter, like the MultiPlus 2, to effectively manage both shore power and generator inputs. This inverter should connect to a transfer switch that prioritizes generator power when available, ensuring seamless shifts between power sources.
Additionally, selecting the right battery type is vital for enhancing performance and longevity; for instance, types and features of RV batteries can greatly impact your energy independence while on the road.
To enhance your setup, consider the following:
- Use 6×3 gauge copper cable for wiring to guarantee top-notch connections and facilitate battery charging when AC power is supplied.
- Implement four separate solar charge controllers for independent operation of each panel, adapting to varying sunlight conditions and boosting overall efficiency.
- Position your charge controller and batteries close together to minimize voltage drop, maintaining system integrity during operation.
Integrating the Battery System
Integrating the battery system into your RV solar setup is essential for maximizing energy storage and ensuring uninterrupted power supply. Quality batteries for teardrop trailers can greatly enhance your energy management, so aim for around 800 amp hours of lithium batteries to effectively store energy, especially during low sunlight periods.
Connecting these batteries in parallel is important to achieve the desired capacity. A custom bus bar setup will help balance the batteries after connection, promoting efficiency.
Securing the battery bank inside your RV is critical for safety. Use threaded rods and metal plates to prevent any movement during transit, ensuring that your batteries remain stable and reliable.
Additionally, consider the aesthetics of your installation. Cover exposed areas with materials like carpet to maintain a clean and organized appearance in your storage compartments.
To enhance the longevity and efficiency of your battery system, monitor its health with a charge controller and temperature sensors. These tools will help you keep track of performance and prevent potential issues.
Monitoring and Management Setup
Effective monitoring and management of your RV solar system is essential for optimizing performance and guaranteeing reliable power supply. The Cerbo GX acts as your central hub, featuring a touchscreen display and Wi-Fi connectivity that lets you access system data remotely through the Victron app. This connectivity allows you to stay informed about your system’s health anytime, anywhere.
Additionally, integrating a high-quality lithium battery can enhance energy efficiency and prolong the lifespan of your solar setup.
To maximize your solar system’s efficiency, consider these key features:
- Real-time Performance Tracking: Utilize Victron communication gear like VE Connect and V USB cables for seamless integration and diagnostics.
- Cloud Connectivity: The Victron Remote Management (VRM) system enables you to monitor battery state of charge and overall system performance globally.
- Historical Data Analysis: Access historical data via the web interface to analyze energy production and consumption trends for improved management.
With a focus on balancing power consumption with battery capacity, you can efficiently utilize AC power during peak solar generation hours.
Types of RV Solar Panel Systems
When choosing an RV solar panel system, you’ll want to contemplate both portable and permanent options.
Portable solar panels are budget-friendly and quick to set up, making them perfect for occasional use or low power needs.
On the other hand, a permanent installation maximizes efficiency and harnesses solar energy even while you’re on the move, making it a smart investment for full-time RVers.
Portable Solar Panel Options
Portable solar panel options offer a convenient way to harness solar energy while you’re on the road. These systems are typically easy to set up, often utilizing 100-watt panels. They’re perfect for users with low power needs and represent a low-cost entry point into solar energy.
You can quickly plug them into your RV’s dedicated solar port, allowing for fast deployment and removal. This flexibility is a major advantage for those who prefer temporary setups.
Consider these key benefits of portable solar panels:
- Mobility: Easily transportable, they allow you to take solar energy wherever you go.
- Optimized Sunlight Exposure: Lightweight design means you can move them around to capture sunlight, especially in shaded camping spots.
- Affordability: While they may have a higher per-watt cost, their initial investment is lower compared to permanent installations.
Keep in mind that the efficiency of portable systems can fluctuate based on weather conditions and sunlight exposure.
They’re best suited for casual or infrequent camping trips, making them a smart choice for occasional travelers.
Permanent Installation Benefits
Permanent RV solar panel systems provide a robust solution for those seeking to maximize their energy independence while on the road. Unlike portable systems, these setups offer higher efficiency for power generation, making them ideal for users with significant energy needs. By utilizing your RV’s roof space, you can continuously collect sunlight—even while driving—something portable options can’t achieve.
Though permanent installations often require a higher upfront investment, the long-term savings on fuel and generator usage can be substantial. This translates to enhanced off-grid capabilities, allowing you to camp longer without relying on traditional power sources.
Additionally, monocrystalline panels, commonly used in these systems, are celebrated for their high efficiency and compact design, producing more power per square foot than their counterparts.
Moreover, installing a permanent solar system can increase your RV’s resale value, as many buyers now seek out solar-equipped vehicles. Embracing this technology not only enhances your travel experience but also makes your RV a more attractive investment.
If you’re serious about sustainable travel, a permanent solar panel installation is a wise choice.
Essential Components for Solar Systems
Understanding the essential components of solar systems is critical for maximizing the efficiency and reliability of your RV’s solar setup. Each component plays a significant role in harnessing solar energy effectively, guaranteeing you have power when you need it most.
Here are the key components you should know about:
- Solar Panels: These are your primary energy converters, with monocrystalline panels offering high efficiency while polycrystalline panels provide a more budget-friendly option.
- Battery Bank: This stores the electricity generated, typically ranging from 12 to 24 volts, and is fundamental for powering your RV during low sunlight or nighttime.
- Inverter: This device converts the direct current (DC) from your solar panels and batteries into alternating current (AC) for your RV appliances, with proper sizing based on your wattage needs.
Don’t overlook the Charge Controller and Mounting Hardware, as they guarantee your system operates smoothly and safely.
Investing in quality components will enhance your RV solar setup’s performance, making it a reliable power source for all your adventures.
Calculating Energy Needs
Maximizing the efficiency of your RV solar system starts with calculating your energy needs accurately. Begin by identifying the wattage of all devices and appliances you plan to use. Sum their total daily consumption in watt-hours to get a clear picture of your energy requirements.
To convert the amperage of your devices into wattage, use the formula: watts = volts x amps. This step guarantees you’re making precise calculations.
For a rough estimate, remember that a 100-watt solar panel typically produces around 350 watts daily. Factor this into your planning to determine how many panels you’ll need based on your energy needs.
It’s wise to assess your energy demand conservatively—consider weather conditions and sunlight exposure. Oversizing your system can lead to inefficiencies and unnecessary costs.
Utilizing tools like NREL’s solar resource map and PVWatts can greatly assist in accurately estimating your energy needs and corresponding solar panel requirements for your specific location.
Installation and Maintenance Tips
Proper installation and ongoing maintenance are key to guaranteeing your RV solar panel system operates at peak efficiency. To maximize energy production and extend your system’s lifespan, follow these essential tips:
- Regularly clean solar panels to remove dirt and debris. This guarantees ideal performance and efficiency.
- Inspect all electrical connections frequently for signs of corrosion or looseness. Secure connections are vital for system reliability.
- Monitor battery health and state of charge using integrated management systems like the Cerbo GX for real-time data and improved longevity.
Additionally, consider utilizing a tilt angle kit during installation to enhance solar panel positioning, especially in winter months when the sun is lower in the sky. This adjustment can greatly boost energy capture.
Frequently Asked Questions
How Long Do RV Solar Panels Typically Last?
RV solar panels typically last 20 to 25 years, depending on quality and maintenance. By choosing high-efficiency panels and performing regular upkeep, you can maximize their lifespan and performance, ensuring reliable energy for your travels.
Can I Install Solar Panels on a Rental RV?
You can’t usually install solar panels on a rental RV without permission. Check your rental agreement first. If modifications aren’t allowed, consider portable solar systems that provide flexibility without altering the RV’s structure.
What Weather Conditions Affect Solar Panel Efficiency?
Weather woes weigh on your solar panel performance. Heat hinders efficiency; clouds cover output; snow stifles sunlight; dust diminishes delivery; and winds can either cool or complicate. Regular maintenance guarantees ideal energy extraction under varying conditions.
Are Solar Panels Worth the Investment for Occasional RV Users?
Yes, solar panels are worth the investment for occasional RV users. They provide renewable energy, reduce fuel costs, enhance off-grid capabilities, and increase your RV’s resale value, making your trips more enjoyable and sustainable.
How Do I Clean and Maintain My RV Solar Panels?
Cleaning your RV solar panels is like polishing a gem; it keeps them shining bright. Use a soft brush and mild soap, check connections for wear, and monitor performance regularly to guarantee peak energy efficiency.
Power Your Adventures: Charge Devices and More with Solar Energy
By installing solar panels on your RV, you’re embracing sustainability, enhancing freedom, and ensuring reliability. You gain energy independence, reduce your carbon footprint, and enjoy the convenience of off-grid living. With the right components and a solid installation process, you’ll power your adventures, charge your devices, and create lasting memories.
Don’t wait—take the leap into solar energy, maximize your RV’s potential, and experience the joy of exploring the great outdoors with confidence and power at your fingertips.

