
Last Updated on October 20, 2024
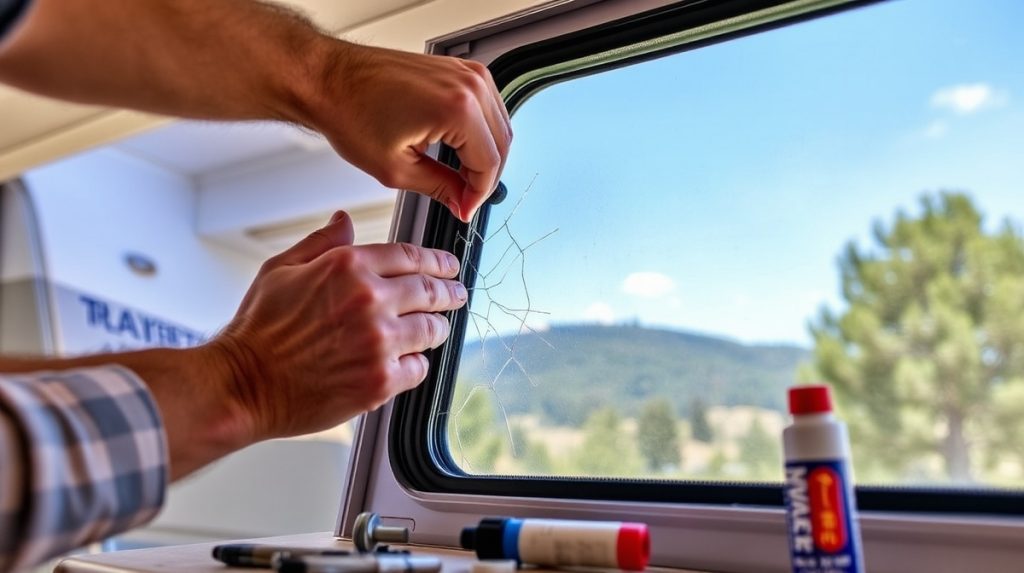
To repair travel trailer replacement windows, start by gathering necessary tools and materials. Remove the screws from the interior clamp ring to detach the window. Clean any old sealant thoroughly. Apply a foam core tape, ensuring there are no gaps around the frame.
For a watertight seal, use Dyna Flex 2 30 sealant, applying it from the top down. Tool the sealant with water for a smooth finish. Finally, check for rusted staples around the window and replace as needed. By following these steps, you’ll enhance the longevity of your windows and prevent leaks, among other repair tips ahead.
Key Takeaways
- Inspect the window for leaks or deterioration and gather necessary tools and materials for the repair process.
- Remove screws from the interior clamp ring to detach and clean the window and surrounding surfaces.
- Apply foam core tape around the window frame, ensuring there are no gaps for a proper seal.
- Use Dyna Flex 2 30 sealant, applying from top to bottom for a waterproof finish, and tool with water for a smooth look.
- Check window weep holes for drainage and replace any rusted staples before reattaching the window.
Exploring RV Vent Maintenance
Understanding RV window repairs is vital for maintaining the integrity of your travel trailer. When you notice leaks or deterioration around your windows, it’s important to address these issues promptly. Most repairs involve resealing or replacing windows, and while some owners opt for DIY, many prefer service facilities for professional assistance.
To begin your repair, you’ll need a quality seal type foam core window kit, which typically includes two rolls of 5/16 inch round tape, measuring 44 feet each. This gives you a total of 88 feet, adequate for multiple windows. When applying the new foam core tape, make sure there are no gaps for ideal sealing.
Utilizing Dyna Flex 2 30 sealant can enhance your repair process. Its color-changing properties allow you to see where you’ve applied it, and it dries to a clear finish, maintaining your RV’s exterior aesthetics. The resealing process involves cleaning the old sealant thoroughly, applying the new tape, and carefully reinstalling the window with screws in an alternating pattern.
Choosing the Right Seal Kit
Selecting the right seal kit for your travel trailer windows is vital for effective repairs and long-lasting performance. Start by considering a Seal Type Foam Core Window Kit, which typically includes 88 feet of hybrid seal material. This quantity is generally sufficient for multiple windows, ensuring you’ve got what you need for all your repairs.
When choosing your kit, make sure it contains foam core tape that’s 5/16 inch round. This size fits standard window frames perfectly, eliminating the need for trimming and simplifying installation.
You’ll also want a sealant like Dyna Flex 2 30, known for its 100% waterproof properties. It dries clear, enhancing the aesthetic appeal of your windows. Look for kits that offer easy application features, such as water cleanup and a color change during application for better visibility. This can greatly streamline your repair process.
Essential Sealant Properties
A reliable sealant is essential for maintaining the integrity of your travel trailer windows. When selecting a sealant, consider Dyna Flex 2 30, known for its 100% waterproof properties. This guarantees a robust barrier against moisture, preventing leaks that could compromise your trailer’s interior.
One unique feature of Dyna Flex 2 30 is its color-changing property; it shifts from white to clear during application. This allows you to see where you’ve applied the sealant, guaranteeing even coverage and eliminating guesswork. Once dry, it presents a clean, clear finish, enhancing the aesthetic appeal of your RV’s exterior.
Another advantage is its ease of use. You can clean the sealant with water before it dries, minimizing mess during the application process. This makes it user-friendly, especially for DIYers. Furthermore, Dyna Flex 2 30 boasts excellent adhesion properties, making it suitable for various surfaces. This versatility guarantees a long-lasting seal around your replacement windows, providing peace of mind during your travels.
Resealing Windows: Step-by-Step
Before you plunge into resealing your travel trailer windows, make certain you have the right tools and materials ready. Start by removing the screws from the interior clamp ring with the help of a second person to safely detach the window. Carefully set the window aside to avoid damage.
Next, thoroughly clean the old sealant from both the window and the exterior surfaces. This step is essential for ensuring proper adhesion of the new materials. Once cleaned, apply a new foam core tape around the window frame, ensuring there are no gaps that could lead to leaks.
Now, grab your Dyna Flex 2 30 sealant. Start applying it at the top of the frame and work your way down, tooling it with water for a smooth, professional finish. This will guarantee a waterproof seal. After you’ve resealed the window, reinstall it carefully. Inspect the area for any rusted staples around the opening and replace them as needed.
Completing the Repair Process
Having securely reinstalled the window, finalizing the repair process is crucial to guarantee long-lasting performance.
Start by applying Dyna Flex 2 30 sealant. Begin at the top of the frame, working your way down to guarantee a watertight seal. After application, tool the sealant with water for a smooth finish, which will enhance the repair’s appearance and functionality.
Next, check the window weep holes. Verify they’re positioned correctly to allow for proper drainage and prevent water buildup, which could lead to further issues down the line. Don’t overlook inspecting the area for any rusted staples around the window opening. Replace any that you find to maintain structural integrity and prevent further damage.
Finally, if you suspect you’ll need more materials later, order additional sealant or foam core tape kits online now. This foresight will save you time and guarantee you’re prepared for any follow-up repairs.
- Apply sealant from the top down.
- Tool sealant for a smooth finish.
- Verify weep hole positioning.
- Replace rusted staples.
- Order extra materials if needed.
Frequently Asked Questions
Can You Replace Just the Glass in a Camper Window?
Yes, you can certainly substitute shattered glass in a camper window! Start by safely securing the frame and ensuring the seals are sound. Carefully extract the old glass and measure its dimensions precisely.
Next, procure a replacement that fits snugly. When reassembling, apply a superior sealant like Dyna Flex 2 30 to guarantee a watertight finish. Don’t forget your gloves and goggles; safety’s essential when handling glass. Happy repairing!
How to Fix a Leaking Camper Window?
To fix a leaking camper window, start by removing the screws from the interior clamp ring with a helper. Detach the window and clean the old sealant thoroughly from both surfaces.
Apply foam core tape around the frame, ensuring no gaps. Reinstall the window, then use Dyna Flex 2 30 sealant around the frame, tooling it with water for a smooth finish.
What Do You Use to Seal RV Windows?
To seal RV windows effectively, use a seal type foam core window kit that offers 88 feet of hybrid seal material for easy application. Pair it with Dyna Flex 2 30 sealant, which is 100% waterproof and dries clear for an appealing finish.
Before applying, clean old sealant thoroughly, then apply foam core tape around the frame to prevent gaps. Don’t forget to check that weep holes are positioned correctly for drainage.
Can RV Windows Be Resealed?
They say, “A stitch in time saves nine,” and that’s especially true for RV windows. Yes, you can reseal them to prevent leaks. Start by removing the window and cleaning off the old sealant. Use foam core tape around the frame, which doesn’t need trimming.
Once that’s done, apply Dyna Flex 2 30 sealant for a waterproof finish. Proper resealing not only maintains your RV’s integrity but also enhances its overall look.
Importance of Choosing the Right Seal Kit for Your Travel Trailer Windows
In summary, successfully repairing your travel trailer’s replacement windows hinges on using the right seal kit and sealant. While some might believe all sealants are created equal, in reality, their properties can greatly affect durability and performance.
By following the step-by-step resealing process, you guarantee a watertight seal that can withstand the rigors of travel. Remember, regular maintenance and timely repairs can prolong your trailer’s lifespan, making your adventures more enjoyable and worry-free.

