
Last Updated on February 6, 2025
Enjoying a refreshing shower in your RV can be challenging if the water pressure is too low. Fortunately, there are several simple steps you can take to improve it. From checking for kinks in the hose to adjusting your water pressure regulator, small tweaks can make a big difference.
To increase water pressure in your RV shower, first inspect the hose for kinks and blockages. Check your water pressure regulator and adjust it to 40-55 PSI for peak performance. Consider upgrading to an Oxygenics shower head, which uses less water while boosting pressure.
Regularly clean filters and verify you’re not sharing water supply lines with others. If issues persist, consulting a professional might be necessary for a thorough assessment and effective solutions. More tips await.
Key Takeaways
- Inspect and clean water filters regularly to maintain optimal flow and pressure in the shower.
- Evaluate and adjust the water pressure regulator settings to ensure it operates between 40-55 PSI.
- Upgrade to an Oxygenics shower head for enhanced pressure and water efficiency.
- Regularly maintain and test the water pump for reliable water flow during peak usage.
- Avoid shared water supply lines, and use a pressure gauge to monitor and manage water pressure.
Inspect the Hose for Kinks and Blockages
Before you can effectively increase water pressure in your RV shower, it’s important to inspect the hose for kinks and blockages.
Start by checking the hose for visible kinks, cuts, or damage that could impede water flow. Verify it’s properly connected to both the showerhead and the water supply line. Look for signs of wear or corrosion on the hose and fittings. It’s also essential to be aware that a kinked flex pipe can significantly restrict water flow.
Use a flashlight to inspect hard-to-reach areas. Run water through the hose to identify leaks. Tighten any loose fittings and consider using a hose with a built-in kink resistor.
Regular cleaning and proper storage can prevent future blockages, while a flexible hose designed to resist kinking enhances performance.
Evaluate the Water Pressure Regulator
To guarantee ideal water pressure in your RV shower, start by checking the functionality of your water pressure regulator. Make certain it’s installed correctly and that you’re following the proper guidelines to prevent damage.
Adjust the pressure settings between 40-55 PSI to enhance your shower experience. Additionally, consider upgrading to a high flow shower fixture to further improve your water pressure.
Regulator Functionality Check
When you encounter low water pressure in your RV shower, evaluating the water pressure regulator is essential to identifying the problem. Start by checking for symptoms of a bad regulator, like low pressure or leaks.
Common causes include clogged hoses or dirty filters. It’s important to note that maintaining proper water pressure regulation can prevent damage to your RV plumbing system.
| Symptoms | Common Causes | Performance Indicators |
|---|---|---|
| Low or no water pressure | Clogged or kinked hose | Ideal range: 40-55 PSI |
| Inconsistent flow | Dirty water filter | Regulators may lack force |
| Leaks in plumbing | Clogged regulator | Check presets if non-adjustable |
Troubleshoot by inspecting settings, measuring pressure with a gauge, and cleaning components. Replace the regulator if it’s faulty to restore peak water flow.
Proper Installation Guidelines
After checking the water pressure regulator’s functionality, proper installation is key to ensuring ideal performance. Follow these guidelines to optimize your setup:
- Location: Install the regulator directly to the city water supply spigot.
- Accessibility: Make sure it’s easy to access for servicing and adjustments.
- Arrow Direction: Position the valve body’s arrow to point in the direction of water flow.
- Clearance: Allow sufficient space around the regulator for cleaning and servicing.
- Flush Line: Flush the line before installation to eliminate dirt and scale. Additionally, it is important to regularly check the regulator for leaks and wear to maintain optimal pressure.
Adjusting Pressure Settings
While evaluating your RV’s water pressure regulator, it’s crucial to understand how to adjust its settings for best performance. Most standard regulators maintain a safe pressure between 40 to 50 PSI, but adjustable types offer flexibility from 40 to 60 PSI.
To make adjustments, use a flathead screwdriver to turn the screw on the regulator’s side. Monitor the gauge to confirm you’re setting the output pressure correctly; aim for around 45 PSI for ideal flow. Remember, never exceed recommended levels, as excessive pressure can damage your RV’s water lines.
High water pressure can lead to leaks, so it’s important to regularly check your regulator’s performance. If you encounter issues, check for clogs, verify all connections are secure, and replace any faulty regulators.
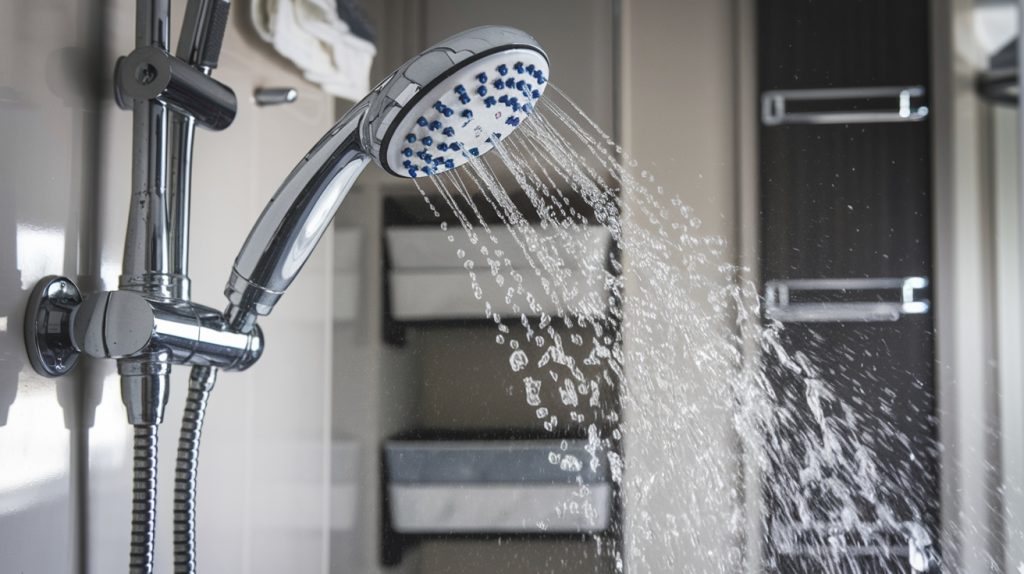
Upgrade to an Oxygenics Shower Head
Upgrading to an Oxygenics shower head can greatly enhance your RV shower experience, especially if you’re facing low water pressure. This innovative shower head combines water conservation with high-performance features, ensuring you enjoy a satisfying shower.
- Uses up to 30% less water while boosting pressure
- Patented technology infuses oxygen for a fuller spray
- Five spray settings for customizable comfort
- Durable design prevents clogging and corrosion
- Easy installation in about 20 minutes
To install, simply remove your old shower head, apply plumber’s tape, and secure the new one. The new model features a ball joint that allows for greater pivoting flexibility, making it easier to adjust the shower head to your preferred angle.
With its high-pressure design, the Oxygenics shower head provides strong sprays while maintaining low flow rates, maximizing efficiency without wasting water.
Models like the Fury RV Handheld and Oxygenics BodySpa are available and you can find the perfect match for your RV’s style and needs. Enjoy a revitalizing, efficient shower every time.
Use Your RV’s Water Pump
To boost your RV shower’s water pressure, start by activating the water pump, which can greatly enhance flow. Regular maintenance, such as cleaning the strainer and checking connections, guarantees peak performance and longevity of the pump.
Understanding how to properly adjust the pump can further maximize pressure benefits for a better shower experience, especially when utilizing alternative water supply solutions.
Additionally, ensuring that your water system is equipped with a heated water hose can help maintain optimal flow even in cold conditions.
Pump Activation Process
Activate your RV’s water pump by confirming the system is properly set up and ready for operation. Follow these steps to verify everything’s in order:
- Check Fresh Water Tank Level: Make sure there’s enough water for the pump to function.
- Verify Pump Switch: Confirm the water pump switch is on and the indicator light is lit.
- Inspect Fuse Panel: Examine the fuse for the pump and replace it if it’s blown.
- Check Water Line: Loosen the water line to the pump to confirm water flow.
- Examine Pump Connections: Confirm all connections are secure and leak-free. If the pump is not operational, check for common issues that may be affecting its performance.
Pressure Increase Benefits
Boosting water pressure in your RV shower not only transforms your daily routines but also enhances the overall functionality of your water system.
By utilizing your RV’s water pump, you gain consistent water pressure throughout, reducing reliance on external sources. This stability allows for better control and guarantees ideal flow for appliances, preventing sudden drops that disrupt your experience.
Also, addressing low water pressure issues can ensure that your water flow remains steady during peak usage times. A well-functioning pump typically features self-priming capabilities, which further contributes to its reliability.
A more powerful shower experience means efficient lathering and rinsing, ultimately reducing your shower time. Plus, you maintain independence from fluctuating campground water conditions, guaranteeing a reliable supply regardless of location.
Additionally, the pump safeguards your plumbing system from high-pressure damage, prolonging the lifespan of components while allowing your appliances to operate efficiently. Regular maintenance is essential, as it helps prevent issues that can affect overall performance.
Maintenance Tips for Pump
While maintaining your RV’s water pump might seem tedious, it’s essential for guaranteeing ideal water pressure in your shower. Follow these maintenance tips to keep your pump operating efficiently:
- Cleaning the Strainer: Regularly inspect and clean the water pump strainer to prevent scale buildup. This step is crucial because a contaminated strainer can lead to reduced flow rates and inadequate pressure.
- Sanitizing the System: Periodically sanitize the water system to avoid premature pump failure.
- Inspecting for Leaks: Check water lines and connections for leaks that could affect pressure. Ensuring that water can flow from the fresh water tank to the pump is also critical for maintaining optimal performance.
- Checking Valves: Ensure all shut-off valves are open and functioning properly.
- Testing the Pump: Regularly test the water pump to confirm it’s working correctly.
Check and Clean Filters Regularly
Regularly checking and cleaning your RV’s water filters is vital for maintaining ideal water pressure in your shower. Clogged filters restrict water flow, leading to decreased performance and potential low pressure issues.
Inspect filters frequently, especially if you notice visible sediment or a drop in water flow rate. Follow the manufacturer’s guidelines for cleaning frequency, and clean filters by removing them and rinsing with a garden hose. For heavily soiled filters, soak them in soapy water before rinsing. Replace them every six months to a year, or as recommended.
Opt for filters with higher GPM ratings to minimize pressure impact and select those suited to your water quality and usage patterns. Regular cleaning ensures that your filters do not become a bottleneck in your water system.
Don’t overlook filter maintenance—it’s essential for peak shower performance.
Avoid Shared Water Supply Lines
Maintaining ideal water pressure in your RV shower goes beyond just keeping filters clean; it also involves understanding your water supply setup.
Avoiding shared water supply lines is essential, as they can greatly reduce the available pressure. When multiple RVs tap into the same line, the pressure is spread thin, leading to inconsistent flow.
To mitigate these issues, consider the following:
- Check campground setup for shared spigots and lines.
- Assess spigot layout to identify multiple connections.
- Understand pressure dynamics, noting fluctuations.
- Use a pressure gauge to monitor levels.
- Invest in an adjustable regulator to manage pressures.
Consult a Professional if Issues Persist
When low water pressure issues persist despite your best troubleshooting efforts, it’s time to consult a professional. Attempting to fix complex problems without the right expertise can lead to further complications.
A qualified RV technician can provide the following benefits:
- Accurate diagnosis using specialized tools.
- Identification of underlying issues not visible to the untrained eye.
- Effective repairs that guarantee peak water system performance.
- Guidance and advice tailored to your specific situation.
- Prevention of additional damage that DIY attempts might cause.
A professional can also help determine if a failing water pressure regulator is contributing to your low pressure issue. Reach out to RV dealers or service centers for assistance.
Prepare a detailed description of the problem and your troubleshooting steps to facilitate a swift and effective resolution.
Frequently Asked Questions
What Are Common Signs of Low Water Pressure in RV Showers?
Common signs of low water pressure in RV showers include a trickle of water from the showerhead and slow filling of sinks and tanks. You might notice longer shower times due to insufficient flow and difficulty rinsing soap off.
If you’re having trouble with improper cleaning, it’s likely linked to inadequate pressure. Pay attention to these signs to identify potential issues that need addressing in your RV’s water system.
Can Low Water Pressure Affect My Rv’s Appliances?
Low water pressure can considerably stymie your RV’s appliances, causing frustrating failures. If pressure’s lacking, your shower heads and faucets won’t function efficiently, and your water heater may struggle to supply hot water.
Toilets could falter in flushing, while dishwashers and washing machines mightn’t operate at all. To guarantee peak performance, you should regularly inspect your plumbing, check for kinks, and maintain adequate water levels in your tank.
How Often Should I Replace My Shower Head?
You should replace your shower head every 6 to 8 months. This timeline helps prevent issues like sediment buildup and bacterial growth, which can pose health risks.
Regularly inspect for visible buildup or changes in water pressure, as these are signs that replacement is necessary. While cleaning can extend the life of your shower head, if it’s ineffective, don’t hesitate to swap it out for a new one to guarantee peak performance.
What Is the Best Water Filter for RV Use?
For RV use, consider the ClearSource RV Water Filter, which offers 0.2-micron protection and a substantial 2,000-gallon capacity. Its design guarantees easy installation and maintenance, making it user-friendly.
If you’re looking for something compact, the Camco TastePure Inline Water Filter effectively removes sediment and chlorine while being budget-friendly. Always check for certifications to verify safety and effectiveness in your RV adventures.
Are There Specific Brands Known for High-Quality RV Plumbing Parts?
When you’re looking for high-quality RV plumbing parts, consider brands like Empire Faucets, Dura Faucet, and RecPro. Empire’s been a trusted name since 1950, providing specialized faucets and accessories.
Dura Faucet has quickly gained a reputation for reliable products, catering to both manufacturers and individual owners. RecPro focuses on durable plumbing fittings designed to prevent issues like leaks. These brands guarantee you get the performance and reliability you need for your RV plumbing system.
Preventative Maintenance: Secret to a Reliable Shower
Increased water pressure in your RV shower can transform your experience, much like turning a trickle into a revitalizing waterfall. By inspecting hoses, upgrading fixtures, and maintaining your plumbing, you can guarantee a steady flow.
Remember, “an ounce of prevention is worth a pound of cure.” If you encounter persistent issues, don’t hesitate to consult a professional. Taking these steps not only enhances your shower but also prolongs the life of your RV’s plumbing system.

