
Last Updated on April 20, 2025
To remove decals from your motorhome, start by thoroughly cleaning the surface and covering nearby areas to protect them. Use a heat gun or hairdryer to soften the decal and adhesive, then gently peel the decal off using plastic tools or a credit card.
Apply a suitable solvent like orange peel remover to remove residual glue, then clean the surface with alcohol and water. Proper preparation guarantees a smooth finish, and if you want detailed steps, there’s more to explore.
Key Takeaways
- Thoroughly clean the surface and protect surrounding areas before decal removal.
- Use heat tools like a heat gun or hairdryer to soften decals and adhesives gently.
- Carefully lift edges with plastic scrapers or credit cards, applying heat as needed for easier peeling.
- Apply appropriate solvents to remove residual adhesive, then wipe and scrape gently.
- Clean, sand, and degrease the surface before applying new decals for optimal adhesion.
Preparing Your Motorhome for Decal Removal
Before working, thoroughly clean the surface to remove dirt and grime, which could interfere with decal removal. Cover surrounding areas with painter’s tape, drop cloths, or plastic sheets to shield windows, trim, and floors from chemicals and debris.
Confirm all tools and materials are within reach, and inspect the surface for any damage or residual adhesive to address before proceeding. Utilizing an enzyme-based solution can help loosen stubborn adhesive residues and make the removal process easier.
Softening the Decal Adhesive With Heat
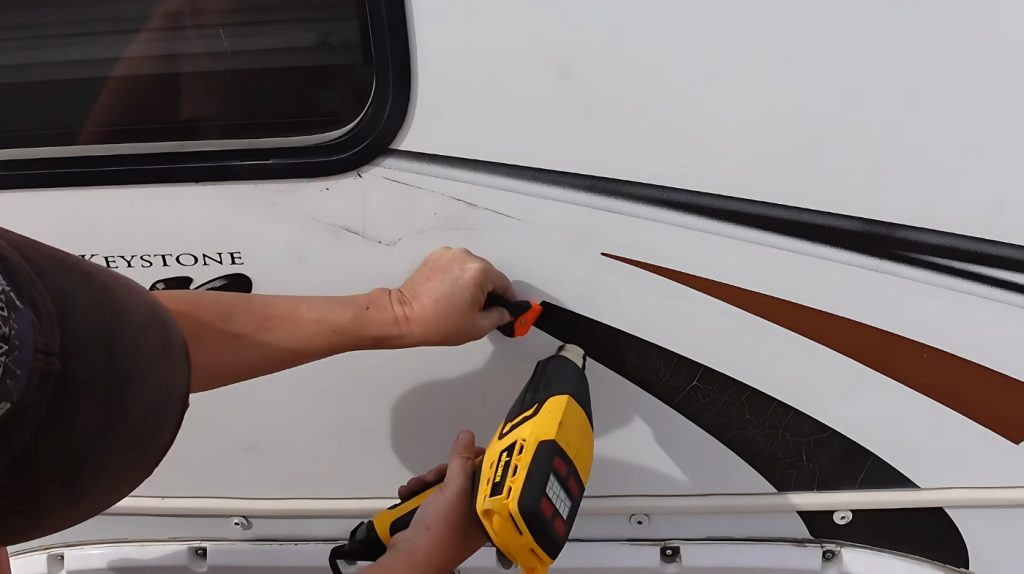
To soften the decal adhesive effectively, choose an appropriate heat device such as a heat gun, hairdryer, or sunlight. Keep the tool at a safe distance about 8 inches to prevent surface damage while applying consistent, gentle heat.
Regularly monitor the adhesive until it becomes pliable enough for removal without melting or harming the surface.
Durability and weather resistance are essential factors in selecting the right repair method, as they influence how well the decal and underlying surface respond to heat. Understanding the specific materials involved can help determine the best heat setting and technique for each decal.
Use Appropriate Heat Device
Using heat effectively is essential for softening decal adhesive without causing damage to your motorhome’s surface. Start by selecting the appropriate heat device: a hair dryer for smaller, less stubborn decals, or a professional-grade heat gun for larger or tougher adhesives.
Make certain the device has adjustable temperature settings to control heat output precisely. Proper temperature control helps prevent accidental surface damage. Maintain a safe distance, usually a few inches from the surface, and apply heat evenly in slow, circular motions.
Avoid overheating, which can damage fiberglass or paint. Keep the heat moving to prevent concentrated heat spots. Use a moderate temperature to soften the adhesive without risking surface damage.
This method allows you to loosen the decal adhesive efficiently, making peeling easier and reducing residue. Additionally, understanding generator specifications can help ensure you have the right power source if you need to use electrical tools during removal.
Maintain Safe Distance
Maintaining a safe distance while applying heat is essential to guarantee your safety and prevent damage to the motorhome’s surface. Proper distancing minimizes exposure to heat, debris, and fumes, reducing injury risks.
Always position your heat device away from flammable materials and nearby objects. Keep bystanders at a safe distance to avoid accidental burns or injuries.
Ensure adequate ventilation to prevent inhalation of fumes from softened adhesive. Use a heat-resistant barrier when necessary to protect surrounding surfaces.
Additionally, all individuals in the area should wear protective eyewear to prevent injury from flying debris or heat emissions.
Maintaining a safe distance also helps prevent accidental damage to the gel coat or paint underneath the decal. Proper heat application techniques are crucial for effective decal removal without harming your motorhome.
Monitor Adhesive Softness
Monitoring the adhesive’s softness by Properly monitoring the adhesive ensures you don’t overheat or damage the surface. Use a heat gun or hairdryer on a low setting to apply gentle, even warmth. As you do, monitor the adhesive’s softness by testing its flexibility.
When it begins to loosen, it’s ready for removal. Applying heat carefully is essential for softening decal adhesive without damaging your motorhome’s surface. Consistent, controlled heat minimizes risk and ensures effective decal removal.
| Tool | Tip |
|---|---|
| Heat Gun | Use low temperature, move steadily across decal |
| Hairdryer | Hold at a safe distance, avoid overheating |
| Scraper | Plastic blade for gentle removal |
| Test | Gently flex decal to evaluate adhesive softness |
| Caution | Never overheat to prevent surface damage |
Carefully Lifting and Peeling the Decals
Begin lifting the decal from the edges, using gentle tugs to prevent tearing or damaging the surface. Work slowly, gradually increasing your grip as the decal begins to loosen. Using heat can help soften the adhesive, making the decal easier to lift.
Maintain steady, controlled movements to guarantee a clean removal without leaving residue or causing scratches. Applying a proper removal technique minimizes damage to the underlying surface and ensures a smoother process.
Start From Edges
Starting at the edges of the decal provides better leverage and control during removal. Begin by carefully lifting a corner or edge using your fingers or a plastic scraper to avoid surface damage. Using a plastic scraper or card helps to gently pry up the edge without scratching the surface.
Make sure the motorhome’s surface is clean to prevent accidental scratches during peeling. Gradually peel back the decal, applying even pressure to avoid tearing. Work slowly and steadily, maintaining a consistent tension to prevent damage to the underlying paint or fiberglass.
Keeping a controlled, deliberate approach minimizes risks and ensures a cleaner removal process. Proper surface preparation before removal can make the process easier and prevent damage.
Use Gentle Tugs
Using gentle tugs is essential to avoid damaging the decal or the underlying surface. Begin by carefully lifting the edge of the decal with your fingernail, credit card, or plastic scraper. Apply steady, controlled pressure, peeling slowly to prevent tearing.
As you lift, use heat from a hairdryer or heat gun to soften the adhesive, making peeling easier and reducing the risk of damage. Keep the heat moving to avoid overheating any spot. If resistance occurs, pause and reapply heat before continuing.
For stubborn decals, repeat the heating and peeling process gradually. Always work carefully, maintaining a gentle, consistent force. This methodical approach minimizes damage while ensuring efficient removal of the decal without harming the motorhome’s surface.
Additionally, using low ash pellets can help prevent residual adhesive buildup during the removal process.
Using Chemical Solvents to Remove Residue
Chemical solvents are effective tools for removing stubborn vinyl graphic residue from your motorhome’s surface, but their proper use requires careful attention. First, select an appropriate solvent, such as orange peel or Q&E remover, based on safety and effectiveness.
Before application, wear gloves, safety glasses, and a mask, and ensure good ventilation. Apply the solvent directly to the adhesive residue, allowing it to sit for a few minutes to loosen the adhesive.
Use a clean cloth to gently wipe away the softened residue, avoiding excessive scrubbing that could damage the surface. Always dispose of used solvents responsibly, following environmental regulations.
The application process should be performed in a well-ventilated area to reduce inhalation risks.
- Choose a safe, compatible solvent for your surface
- Wear protective gear during application
- Apply solvent directly to residue, not the entire surface
- Wipe gently to prevent damage.
Proper surface preparation and understanding the tire specifications of your motorhome can also prevent damage during cleaning and maintenance.
Employing Specialized Tools for Easier Removal
Employing specialized tools can considerably simplify the decal removal process from your motorhome’s surface. Start with a heat gun or blow dryer to soften the adhesive, making decals easier to lift.
Use plastic scrapers or credit cards to gently pry up edges without scratching the surface. Applying heat effectively is crucial for loosening stubborn adhesives, and proper technique can prevent surface damage.
When heat alone isn’t effective, turn to eraser tools like the 3M Eraser for stubborn decals. For adhesive residue, utilize scraper tools designed for this purpose. Putty knives can aid in gently lifting decals, while high-speed polishing tools help restore the surface after removal.
Time tracking conducted during testing showed that a pressure washer can be faster but requires caution to avoid surface damage. Always work methodically, applying heat gradually and peeling slowly.
Keep a diverse toolkit ready, and guarantee you follow safety precautions, including wearing gloves and eye protection, to facilitate a clean, damage-free removal.
Addressing Common Challenges With Different Decal Types
Different decal types present unique removal challenges that demand tailored approaches. Vinyl decals are straightforward, softened with heat and removed with specialized tools. Multi-layer decals require careful, step-by-step techniques to prevent damaging underlying layers.
Faded or old decals tend to be brittle, so gentle patience and light tools are essential to avoid tearing. Clear protective layers can be stubborn, often needing stronger heat or specific solvents for effective removal.
Residual adhesive frequently remains after decal removal, necessitating additional cleaning to prevent surface damage or residue buildup. Understanding the specific materials involved can help choose the most effective removal method.
- Use heat cautiously to soften adhesives without overheating surfaces
- Employ gentle tools to prevent damage to fragile or layered decals
- Select appropriate chemical removers for stubborn clear layers
- Prepare the surface thoroughly to facilitate smooth removal
Final Cleaning and Preparing the Surface for New Decals
Before applying new decals, thoroughly clean and prepare the surface to guarantee ideal adhesion. Start by inspecting the area for any remaining debris or adhesive residue. Use isopropyl alcohol to degrease and remove wax or grease, ensuring a clean surface.
For stubborn spots, lightly sand the area with ultra-fine sandpaper to smooth out imperfections. Rinse the surface with water and a mild cleaner like Simple Green, then wipe dry with a microfiber cloth. Apply a final wipe with alcohol to eliminate any residual wax or oils.
Proper cleaning and preparation are crucial for decals to adhere properly and avoid peeling or bubbling over time. Confirm the surface is completely dry, uniform, and free of dirt or grease. Proper cleaning and preparation create an excellent surface, ensuring the new decals adhere securely and last longer.
Frequently Asked Questions
How Do I Prevent Scratches During Decal Removal?
To prevent scratches during decal removal, you should use gentle heating with a hairdryer to soften the decal and adhesive.
Peel slowly in one direction, applying light pressure to avoid tearing. Use soft tools like plastic scrapers or microfiber cloths instead of rough objects.
Apply adhesive removers carefully and avoid abrasive chemicals or tools. Taking your time and working methodically helps protect the surface from scratches, ensuring a smooth removal process.
Can I Remove Decals Without Using Heat?
You can remove decals without heat by carefully lifting their edges with a plastic scraper or putty knife. Gently pry under the decal, working slowly to avoid surface damage.
Use adhesive removers like acetone or Goo Gone to dissolve residue afterward. Always test a small area first, and protect surrounding surfaces with tape. Take your time, applying patience and precision to make certain a clean removal without heat.
What Safety Gear Is Recommended When Using Solvents?
Think of your safety gear as your armor against chemical hazards. You should wear chemical-resistant gloves to protect your skin, safety goggles to shield your eyes, and a respirator or face mask to guard against fumes.
Work in a well-ventilated area, and don long sleeves and pants to minimize skin contact. This careful approach keeps you safe from irritation, inhalation risks, and long-term health issues associated with solvent use.
How Long Does the Decal Removal Process Typically Take?
The decal removal process varies based on size, condition, and method. Typically, it takes anywhere from a few hours to a full day.
Using heat and specialized tools like a heat gun or Rapid Remover can speed things up, often reducing the time to about 90 minutes or less. Manual peeling is slower and may require multiple sessions, especially for larger or stubborn decals.
Are There Eco-Friendly Options for Decal Removal?
You’re asking about eco-friendly decal removal options. To do this, you can use steamers, which are safe and chemical-free. Park your vehicle in sunlight to naturally warm the decals, making them easier to peel off.
Reusable tools like plastic cards help prevent waste. Avoid harsh chemicals, and opt for natural adhesives when possible. These methods reduce environmental impact while effectively removing decals.
Strip Away the Years: Reveal Your RV’s True Potential
With patience and the right tools, you can transform your motorhome’s exterior, revealing a clean, smooth surface beneath. As you carefully heat, lift, and gently scrub away old decals, imagine uncovering a fresh canvas ready for new designs.
Each step clears the way for a sleek finish, ensuring your motorhome looks pristine and inviting. Follow these methodical steps, and you’ll restore your vehicle’s beauty, ready to hit the road with confidence and pride.

