
Last Updated on March 27, 2025
To adjust a slide-out on your RV, start by identifying the mechanism type and gathering the necessary tools like a socket wrench and screwdrivers.
Inspect for obstructions and guarantee proper alignment with the trailer. Clean tracks and seals, then check the motor’s voltage during operation. If adjustments are needed, make them carefully using the appropriate tools.
Testing its movement is vital. If you encounter issues, further troubleshooting can help resolve them effectively. Explore more methods to keep your slide-out functioning smoothly.
Key Takeaways
- Identify the slide-out type (electric, hydraulic, or manual) and inspect for obstructions along its path before making adjustments.
- Use appropriate tools, including socket wrenches and screwdrivers, to adjust bolts and screws for alignment.
- Check for proper alignment with the trailer wall, ensuring no gaps and that seals are in good condition.
- Test the slide-out’s operation after adjustments, ensuring smooth movement and that the motor receives around 12 volts.
- Schedule regular maintenance, including monthly inspections and biannual lubrication, to prevent issues and ensure optimal performance.
Slide-Out with Ease: Understanding the Mechanisms
When you’re looking to understand slide-out mechanisms in RVs, it’s essential to recognize the different types available and how they operate. Electric slide-outs, powered by motors, are common in smaller trailers, while hydraulic slide-outs cater to larger, heavier setups.
Cable slide-outs offer lightweight versatility, and rack and pinion systems provide reliable movement through gears and tracks. Schwintek slides feature a compact design using worm-like gears for efficient operation.
Each mechanism relies on distinct operational principles: electric slides convert rotational to linear motion, hydraulic systems utilize fluid pressure, cable systems depend on tension, and rack and pinion setups guarantee smooth movement.
Understanding the various types of slide outs will help you maintain and troubleshoot your RV’s slide-out effectively.
Tools Required for Adjustment
To successfully adjust a slide-out on your RV, you’ll need a specific set of tools tailored to the task. Having the right equipment at hand guarantees efficiency and precision during the adjustment process.
- Socket wrench set: For adjusting bolts and screws on the slide-out mechanism.
- Screwdrivers (flathead and Phillips): Essential for various adjustments and repairs.
- Measuring tape: Necessary for guaranteeing proper alignment and measuring gaps.
- Rubber mallet: Useful for tapping parts gently without causing damage.
In addition to these, consider safety glasses and gloves to protect yourself while working. Regular checks can help prevent misalignment issues during the adjustment process, ensuring your slide-out operates smoothly.
Having a work light can also improve visibility, making the adjustment process smoother and safer.
Inspecting the Slide-Out
Once you’ve gathered the necessary tools, inspecting the slide-out becomes the next essential step in ensuring peak performance.
Start by identifying the slide-out type—electric, hydraulic, or manual—to tailor your inspection. Check for obstructions along the slide-out’s path, ensuring debris or objects won’t hinder operation.
Additionally, ensure that you have performed regular checks for debris-free slides to prevent unnecessary damage. Inspect for signs of wear on tracks, seals, and components that could affect functionality.
Verify that the slide-out aligns properly with the trailer wall to prevent gaps. Assess the structural integrity, ensuring all components are secure and undamaged.
Finally, visually inspect the exterior for cracks or discoloration and check seals for any water damage. This thorough inspection helps maintain your slide-out’s efficiency and longevity.
Cleaning and Preparing the Slide-Out
Cleaning and preparing the slide-out is essential for its best performance and longevity. Start by using a mild soap or RV slide-out cleaner mixed with water.
Apply this solution with a soft bristle brush or sponge to remove dirt and grime, then rinse thoroughly and dry the surface to prevent water spots. Regularly clean and lubricate slide-outs at least twice a year to ensure optimal functioning.
Follow these key steps:
- Use compressed air to clear debris from gears and tracks.
- Pay special attention to corners and crevices.
- Clean rubber seals with a safe rubber cleaner; condition them afterward.
- Make certain the slide-out is fully extended before lubrication.
This thorough cleaning process will help maintain your slide-out, making it operate smoothly and last longer.
Adjusting Slide-Out Alignment
Maintaining your slide-out’s cleanliness sets the stage for effective adjustments. Begin by identifying alignment issues, such as uneven extension, strange noises, or visible gaps. Use a flashlight to inspect the slide-out and check for debris accumulation, worn seals, or bent tracks.
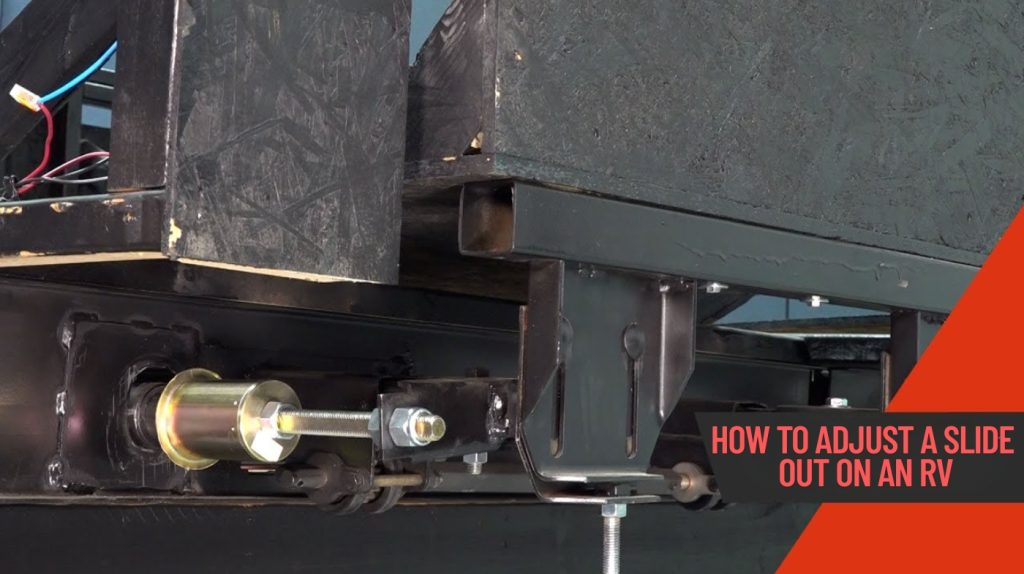
Common adjustment points are usually found on the underside near the rails. Consult your owner’s manual for specifics on your model. Tools like socket wrenches and screwdrivers will be essential.
To align, loosen the mounting bolts, adjust the slide-out into position, and retighten the bolts. For minor adjustments, gently push the slide-out. Always verify your RV is stable and wear safety gear before starting adjustments to avoid accidents.
Additionally, if you notice a slight gap on the rear bottom side of the slide, it may indicate that the alignment is off and requires adjustment. Ensuring your slide-out is protected with high-quality materials will help maintain its function and longevity.
Testing and Finalizing Adjustments
Now that you’ve adjusted the slide-out alignment, it’s essential to test the electric motor for functionality. Activate the slide-out and observe its operation, ensuring it extends and retracts smoothly without any unusual sounds.
Additionally, check for any mechanical obstructions that could hinder the slide-out’s movement. Finally, conduct a thorough operation check to confirm that everything is working as intended before finalizing your adjustments.
Electric Motor Testing
Testing the electric motor in your RV slide-out is an essential step in maintaining ideal functionality and performance.
Here’s how you can effectively test the motor:
- Use a multi-meter to check the voltage at the motor when the slide-out switch is activated.
- Confirm the motor receives approximately 12 volts for peak operation.
- Connect a battery directly to the motor to determine if the issue lies with the motor or the wiring.
- Inspect all wiring for frays or loose connections that could disrupt power. Additionally, monitor the voltage during the slide-out operation to ensure consistent performance.
Final Operation Check
Before finalizing adjustments to your RV slide-out, it’s crucial to conduct a thorough operation check to confirm everything is functioning correctly.
Start by verifying the type of slide-out mechanism—whether electric, hydraulic, or manual—so you can follow the right procedures. Clear the area of obstacles and people for safety.
Check alignment to verify the slide-out moves evenly and seals flush with the RV wall when retracted, preventing leaks. Test the slide-out for smooth operation, listening for any unusual noises. Remember that familiarity with the RV owner’s manual is essential for understanding the specific slide type and operation procedures.
Inspect the power source stability for electric systems, and don’t forget to test the manual override if applicable. Finally, recheck seals and lubrication to guarantee peak performance and longevity of your slide-out system.
Troubleshooting Common Issues
When your RV’s slide-out isn’t functioning as expected, it can be frustrating, but identifying the issue early can save you time and prevent further damage.
Here are some common issues to troubleshoot:
- Failure to Extend or Retract: Check battery, motor, and track alignment.
- Obstructions: Clear any debris from tracks.
- Uneven Extension: Inspect for worn gears or misaligned tracks. Regular maintenance can prevent uneven extensions.
- Electrical Problems: Test wiring and switches for faults.
Start by ensuring the slide-out motor is receiving power. If it’s not extending or retracting smoothly, look for misaligned tracks or obstructions. Regularly inspect seals to prevent leaks and consider lubrication to reduce noise.
Maintenance Tips for Slide-Outs
Maintaining your RV’s slide-out is essential for guaranteeing its longevity and performance. Follow these maintenance tips to keep your slide-out in prime shape:
| Maintenance Task | Frequency | Notes |
|---|---|---|
| Inspect Slide Seals | Monthly | Check for dryness or tears. |
| Clean Roof Cover | Before Use | Remove debris and check for holes. |
| Lubricate Moving Parts | Every 6 Months | Refer to the manufacturer’s specs. |
Additionally, verify tracks are clean and free of debris, and avoid partial closure of slides. Scheduling annual professional servicing will ensure thorough slide mechanism inspections and maintenance to maintain peak performance and inspect components for alignment and wear.
Frequently Asked Questions
How Often Should I Inspect My Rv’s Slide-Out?
You should inspect your RV’s slide-out regularly to catch minor issues early. Conduct pre-trip checks before every journey, and perform seasonal inspections at the start and end of camping seasons.
After each use, check for any wear or damage. Focus on the seals, mechanical components, movement smoothness, and electrical parts.
Always follow the manufacturer’s recommendations for the best maintenance schedule to guarantee your slide-out operates smoothly and lasts longer.
Can I Adjust the Slide-Out Myself, or Hire a Professional?
When it comes to adjusting your slide-out, you’ve got options. Sure, you can tackle it yourself and save some cash, especially for simple fixes.
But if you’re dealing with complex systems or feel out of your depth, hiring a professional might be wiser. They’ve got the right tools and know-how to prevent costly mistakes.
Weigh the risks and benefits carefully before deciding which route to take for your RV’s slide-out adjustments.
What Signs Indicate a Need for Slide-Out Adjustment?
You’ll notice several signs indicating your slide-out needs adjustment. Look for uneven extension or retraction, visible gaps between the slide-out and the RV wall, and strange noises like grinding.
You might also face difficulty opening or closing it. Check for leaks around the seals, as well as inconsistent depth on both sides. If you see these issues, it’s essential to address them promptly to prevent further complications.
What Should I Do if the Slide-Out Won’t Move?
If your slide-out won’t move, first check the power source, ensure it’s connected and the batteries are charged. Inspect the motor for any signs of failure and look for any foreign objects obstructing its path.
Verify that the slide-out switch functions correctly and check wiring connections. If these steps don’t resolve the issue, consult your RV manual for troubleshooting or consider contacting a professional technician for assistance.
Mastering Slide-Out Adjustments for a Smoother Journey
By mastering the art of slide-out adjustment, you’re not just enhancing your RV’s functionality; you’re ensuring a seamless journey through life’s winding roads.
With the right tools and a keen eye, you can navigate the intricacies of alignment and maintenance, transforming potential frustrations into smooth operations.
As you embrace these practices, remember that a well-tended slide-out is like a well-tuned instrument, each adjustment harmonizes your travel experience, allowing you to explore the open road with confidence and ease.

