
Last Updated on August 6, 2024
To charge your RV battery while driving, install a DC to DC battery charger. This device boosts voltage and amperage, guaranteeing efficient charging. Connect it to your vehicle’s alternator and the RV battery, securing all connections properly and grounding it to the RV chassis. Consider a dual-input charger if you have solar panels.
Regularly monitor the battery voltage and inspect wiring for wear. Guarantee a reliable power transfer by using large gauge wire and high-current connectors. Efficient use of a DC to DC charger keeps your RV battery healthy and ready for your adventures. Learn more for perfect installation and maintenance.
Key Takeaways
- Install a DC to DC Battery Charger to boost voltage and amperage for efficient on-the-go charging.
- Use large gauge wire and a high current connector like Anderson for reliable power transfer.
- Regularly monitor RV battery voltage before and after driving for charging efficiency.
- Ensure secure mounting and proper grounding of the charger to prevent vibrations and ensure functionality.
- Perform routine inspections of wiring connections to prevent wear, damage, and charging inefficiencies.
Challenges in Traditional Charging
One major challenge in traditional RV battery charging while driving is that the vehicle’s starting battery often doesn’t provide sufficient charging power. This problem arises because the starting battery is primarily designed to support the vehicle’s engine, not to supply a substantial charge to the RV battery.
Traditional methods usually involve a trickle charge through the 7-way connector. However, this method is limited in its power transfer capabilities, leading to slow and inefficient charging.
When you rely on a trickle charge, the voltage and amperage sent to the RV battery are minimal, resulting in inadequate charging. This method often leaves your RV battery undercharged, especially during long trips. The inefficiency of the 7-way connector in providing a strong charge means your RV’s battery mightn’t be fully charged by the time you reach your destination.
To address these issues, installing a DC to DC Battery Charger is essential. This device boosts charging efficiency by increasing both voltage and amperage, ensuring a more efficient and quicker charge.
With a DC to DC charger, you can substantially reduce charging time and enhance the overall effectiveness of your RV battery charging while on the road.
Benefits of DC to DC Chargers
Installing a DC to DC charger greatly enhances your RV’s battery charging efficiency by boosting both voltage and amperage from the vehicle’s starting battery. This method notably reduces charging time and increases the maximum amperage output to around 20 amps. By providing a direct and powerful charging mechanism, you can overcome the limitations of traditional charging methods.
A DC to DC charger is ideal for on-the-go charging, securing your RV battery remains well-maintained and ready for use. The installation process establishes a robust and reliable power source, enhancing the overall charging experience for your RV battery bank. These chargers are designed to be efficient and effective, making them a practical addition to your RV setup.
| Benefits | Description | Impact |
|---|---|---|
| Boosted Voltage | Increases voltage from starting battery | Faster charging |
| Increased Amperage | Outputs up to 20 amps | More efficient charging |
| On-the-Go Charging | Charges while driving | Convenience and reliability |
| Direct Power Source | Strong and reliable power connection | Enhanced battery health |
| Easy Maintenance | Simple to install and maintain | Long-term efficiency |
Incorporating a DC to DC charger into your RV system can make a notable difference in how efficiently you manage your battery charging needs, ensuring a smooth and enjoyable travel experience.
Selecting the Right Charger
Choosing the right DC to DC charger for your RV involves evaluating factors such as your towing vehicle’s specifications, the size of your RV, and the capacity of your battery bank.
Start by matching the charger to your power needs. For mid-sized SUVs, a 20A charger might suffice, while larger setups may require 40A or 60A options to guarantee peak charging performance.
Consider Dual Input DC to DC Battery Chargers if your system includes solar panels. These chargers often feature MPPT technology, maximizing the efficiency of solar energy conversion. This dual capability is especially beneficial for maintaining a consistent charge regardless of driving conditions.
Next, think about the installation location. Choose a spot that allows for secure mounting and easy access for wiring connections. Proper placement ensures the charger functions effectively and safely.
Additionally, verify that the charger is compatible with the electrical system of your towing vehicle to prevent any compatibility issues.
Installing the Charger
Once you’ve selected the perfect DC to DC charger for your RV, the next step is finding a suitable location near the battery bank for installation. This placement guarantees that your wiring connections are as short and direct as possible, which is essential for maintaining peak charging efficiency.
First, connect the charger’s positive wire to the positive terminal of the battery bank and the negative wire to the negative terminal. It’s crucial to make sure these connections are tight and well-insulated to prevent any electrical issues.
Next, securely ground the charger to a metal part of the RV’s chassis. Proper grounding is vital for the charger’s functionality and to avoid potential electrical failures.
To help you concentrate, remember to:
- Safely mount the charger to avoid vibrations or movement while driving.
- Double-check all wiring connections for tightness and insulation.
- Select a location where the charger is shielded from the elements and easily accessible.
Lastly, make sure to securely mount the charger to a stable surface to minimize vibrations. Vibrations can lead to loose connections over time, which would compromise the charger’s efficiency and reliability.
Monitoring and Maintenance
You should regularly monitor your RV battery voltage to ensure effective charging, noting increases from, say, 12.0V to 12.7V.
Perform routine wiring inspections to spot any wear or damage that might affect charging efficiency.
Additionally, maintain your charging system to keep your batteries in peak condition and maximize their lifespan.
Voltage Level Checks
Regularly monitoring the voltage of your RV battery is essential for maintaining its health and securing a dependable power supply during your travels. By keeping an eye on the voltage levels, you can gauge the efficiency of your charging process and guarantee the battery’s readiness for your next adventure.
To secure efficient operation, follow these practical tips:
- Check voltage levels before and after driving: This helps you assess the effectiveness of the charging process.
- Look for voltage around 12.7V: A well-charged battery typically shows this level, indicating it’s in good health.
- Consistently monitor voltage: Regular checks can prevent unexpected power failures and prolong battery life.
Before you start driving, take a baseline reading of your RV battery. After driving, check the voltage again. An increase in voltage is a positive sign that your battery is charging correctly. If levels remain low, it might indicate a problem with the charging mechanism or the battery itself.
Wiring Inspection Routine
Consistent and thorough examinations of your RV’s wiring connections are crucial for preventing charging inefficiencies and ensuring reliable power during your travels. Start your inspection routine by scrutinizing the wiring for any signs of wear or corrosion, which can impede the charging system’s performance.
Monitoring voltage drop along the wiring route is essential; significant drops indicate potential issues in the circuit that could hamper battery charging.
Ensure that the wire gauge is appropriate for your charging system requirements. Using the correct gauge minimizes resistance and maximizes efficient power transfer.
Proper grounding of all wires is another vital aspect. Inadequate grounding can lead to electrical issues, such as erratic charging or even complete failure of the system.
Regular inspections of the insulation integrity are crucial. Damaged insulation can lead to short circuits, posing serious safety hazards. Look for any cracks, frays, or exposed wires, and address these issues promptly to maintain a safe charging environment.
Charging System Upkeep
Keeping your RV’s charging system in prime condition requires attentive monitoring of battery voltage levels during drives. Guaranteeing your battery stays charged involves more than just plugging it in and forgetting about it. Regular maintenance and monitoring are key to a reliable power system.
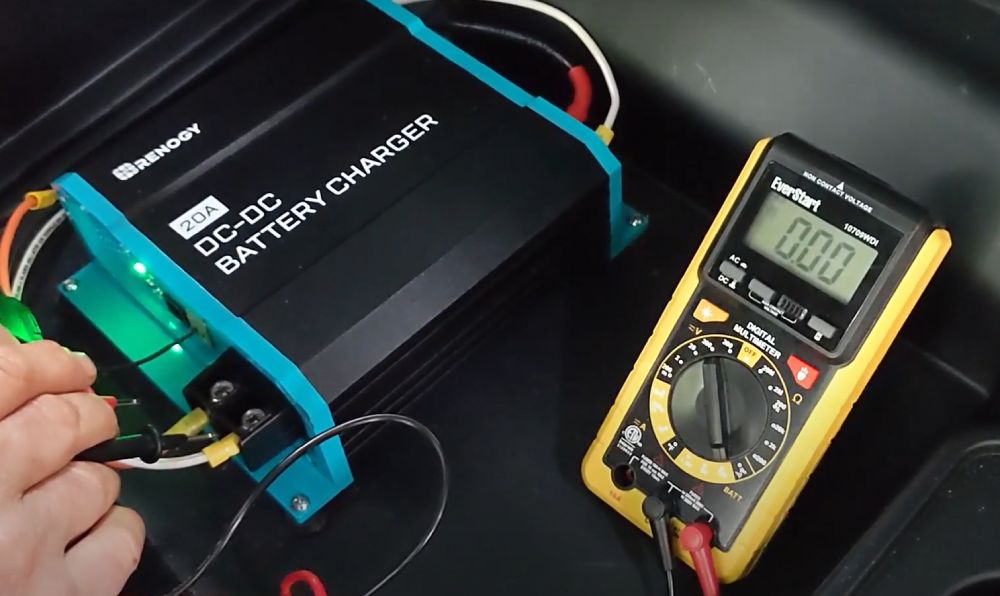
First, consistently check the voltage levels of your battery to confirm it’s charging correctly. Use a multimeter or a built-in battery monitor to keep track of the DC voltage. A fully charged battery typically shows around 12.6 to 12.8 volts when the engine is off and around 13.8 to 14.4 volts when the alternator is running.
Routine checks should include:
- Inspecting wiring: Look for any loose connections or damaged insulation that could hinder charging efficiency.
- Monitoring the alternator: Verify the alternator’s output matches the battery’s requirements.
- Maintaining a battery management system: This automated system can help with consistent monitoring and maintenance, securing your battery remains in top condition.
Proper upkeep of the RV’s charging system also involves checking the wiring connections between the alternator, battery, and trailer. Any issues here can lead to inefficiencies in your charging process. Regularly inspect and maintain these components to assure a smooth and reliable charge while driving.
Additional Charging Solutions
One effective way to secure your RV batteries stay charged while driving is by running a large gauge wire from your truck’s battery to the camper’s battery. Utilize a high current connector, like an Anderson connector, to secure a reliable power transfer.
To further optimize the charging process, install a DC to DC charger near the camper batteries. A DC to DC converter, such as the Renogy 40A, offers efficient charging and fast charging capabilities, securing your batteries remain robust throughout your journey.
These additional charging solutions not only provide efficient charging but also serve as a backup charging solution. In the event of generator or solar panel failures, having a DC to DC charger secures a continuous power supply.
By integrating a high current connector and a reliable DC to DC converter, you can optimize the charging process, securing that your RV’s power needs are consistently met.
Consider options like the Renogy 40A or 20A unit for effective, fast charging while on the road. This setup secures your RV batteries are always ready, providing peace of mind and uninterrupted power, no matter where your travels take you.
Frequently Asked Questions
Does the RV Battery Charge While Driving?
Yes, your RV battery charges while driving, but the rate is often limited. Juxtaposing efficiency and practicality, installing a DC to DC charger guarantees faster, effective charging compared to relying solely on the 7-way connector’s gradual trickle charge.
How to Charge RV Battery With Car?
You should use a 7-way connector from your car to the RV for a basic charge. For efficient charging, install a DC to DC battery charger. Verify proper wiring to avoid draining your car’s battery.
How Do I Keep My Trailer Battery Charged While Driving?
To maintain your trailer battery charged while driving, install a Redarc BCDC Charger. This device efficiently draws power from your vehicle’s alternator and solar panels. Secure proper installation with a fuse and wiring kit for peak performance.
Does RV Battery Switch Need to Be on to Charge Battery?
No, the RV battery switch doesn’t need to be on. However, activating it guarantees your battery powers the RV’s systems while driving and remains fully charged, providing a practical balance of convenience and efficiency.
Keep Your Adventure Rolling: The Benefits of Charging On the Go
To sum up, charging your RV battery while driving is both practical and efficient with the right tools and knowledge. Imagine you’re on a cross-country trip and your DC to DC charger keeps your refrigerator running smoothly, ensuring your food stays fresh.
By selecting the right charger, properly installing it, and maintaining your system, you’ll enjoy a hassle-free journey. Remember, investing time in understanding and implementing these solutions will pay off in reliability and convenience on the road.

