
Last Updated on September 7, 2024
To dump RV waste, start by locating a dump station using apps or online resources. Equip yourself with a 3-inch sewer hose, a clear elbow connector, disposable gloves, and a hose support. First, open the black tank valve to empty it completely, then close it and open the gray tank valve to rinse the hose.
Always dump the black tank first and aim to do so when it’s two-thirds full. After dumping, clean the hose thoroughly and store it separately. This process is essential for maintaining sanitation and efficiency; there’s plenty more to contemplate for a smooth experience.
Key Takeaways
- Locate a nearby RV dump station, checking availability and fees in advance using apps like Allstays for remote areas.
- Use essential equipment including a sewer hose, gloves, and a clear elbow connector for hygiene and visibility during dumping.
- Dump the black tank first, followed by the gray tank to rinse the hose and prevent contamination.
- Clean the sewer hose thoroughly after use and store it in a dedicated container to avoid cross-contamination with fresh water supplies.
- Regularly maintain your RV waste system with effective treatments and inspect hoses to prevent leaks and odors.
How RV Dump Stations Work?
When you hit the road in your RV, understanding how to navigate dump stations is vital for maintaining your sanitation system. RV dump stations are typically found at campgrounds, parks, and wastewater treatment facilities.
Be aware that fees may apply for non-registered guests at campground stations. In Texas, for instance, Loves Travel Stops charge approximately $5 to $10, while some state parks offer free RV dump access for registered guests.
To manage your waste effectively, adhere to the 2/3 rule: dump your black tank when it reaches two-thirds full to prevent overfilling. Before setting out, use apps like Allstays to find RV dump stations along your route, especially in remote areas.
It’s important to check the availability of dump stations in advance, as not all campgrounds guarantee them, and urban areas might offer more accessible options. Lastly, familiarize yourself with local laws regarding waste disposal to avoid fines.
Must-Have Equipments for Dumping
Proper equipment is vital for a successful RV waste dumping experience. You’ll want to guarantee you have the right tools at your disposal to maintain hygiene and efficiency. Here’s a quick checklist of essential equipment:
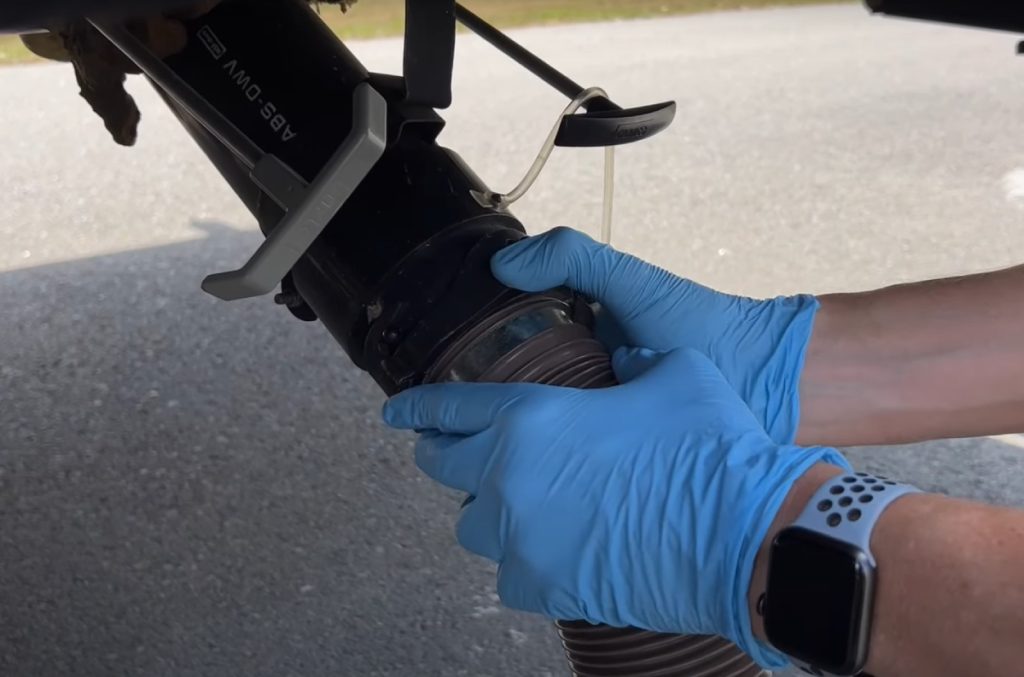
1. Sewer Hose: A quality sewer hose, typically 3 inches in diameter, is imperative for connecting your RV waste tank to the dump station. It must be durable and leak-proof to avoid spills, and opting for one with high material durability, such as those featuring polyolefin or thermoplastic elastomer (TPE), guarantees longevity and flexibility in various weather conditions.
For more information on the best options available, check out best RV sewer hoses.
2. Clear Elbow Connector: This allows you to see when the black tank has fully emptied, giving you visual confirmation that waste has been properly discharged.
3. Disposable Gloves: Always keep disposable gloves and disinfectant wipes handy. They’ll help maintain hygiene during the dumping process and facilitate easy cleanup afterward.
Additionally, consider using a sewer hose support to maintain a downward slope for efficient drainage while preventing kinks.
After use, store your sewer hose in a dedicated storage container to keep it clean and separate from other RV supplies. Finally, verify the valve on your black tank is functioning correctly to avoid any mishaps during the dumping process.
Step-by-Step Dumping Process
With the right equipment ready, it’s time to start the dumping process. Begin by identifying and retrieving your sewer hose, checking for any damage. Securely attach one end of the sewer hose to your RV’s waste outlet and the other end to the dump station’s drain, ensuring a tight fit to prevent leaks.
Follow this step-by-step process:
| Step | Action | Purpose |
|---|---|---|
| 1. Open black tank valve | Empty your black tank | Allows solid waste to flow out completely |
| 2. Close black tank valve | Seal the black tank | Prevents leaks after emptying |
| 3. Open gray tank valve | Drain gray water | Rinses the sewer hose, minimizes contamination |
| 4. Rinse sewer hose | Use non-potable rinse water | Maintains hygiene before storage |
After both tanks are emptied, rinse your sewer hose thoroughly, ensuring to clean the ends before storing it away. This careful process helps in safely dumping your RV waste while preventing cross-contamination.
Locations of Dump Stations
Finding the right dump station for your RV is essential to ensuring a smooth and hassle-free trip. Planning ahead can save you time and avoid unpleasant surprises. Here are three key locations to evaluate:
- RV Campgrounds: Many RV campgrounds offer dump stations, but check if there’s a fee to use them, especially for non-guests. Some may even allow you to find free options, but it’s best to confirm before arrival.
- Parks and Treatment Facilities: Urban areas often have accessible dump stations at wastewater treatment facilities. These locations are reliable but may charge a fee to use.
- Mobile Apps: Utilize the Allstays app to find dump stations near you. This tool helps filter results based on your current location, ensuring you can quickly locate RV dumps when you need to empty the tanks.
Always check the availability of dump stations in advance, especially in remote areas where facilities may be limited. Keeping it clean and following the rules at each location is highly recommended for a pleasant experience.
Guidelines for Efficient Tank Emptying
Efficient tank emptying is essential for maintaining a hassle-free RV experience, and following a systematic approach can make the process smoother. To guarantee clean and efficient tank emptying, keep these tips in mind:
- Dump the Black Tank First: Always start with the black tank to prevent gray water contamination. The gray water can help rinse out the hose afterward, making cleanup easier.
- Follow the 2/3 Rule: Dump your black tank when it reaches 2/3 full. This helps avoid overfilling and allows you to locate a dump station without stress.
- Allocate Sufficient Time: Set aside at least 30 minutes for the entire process. This includes setup, dumping through the black tank valve, and cleaning up afterward.
Make sure you use a reliable RV sewer hose with a clear elbow attachment to confirm waste flow and check for leaks. Also, keep disposable gloves and disinfecting wipes handy for hygiene. After you’re done, clean and store your hoses properly to maintain their longevity.
Community Experiences and Insights
Engaging with the RV community can greatly ease your concerns about dumping waste for the first time.
Many experienced RVers share valuable tips and resources in online forums, helping you navigate the process with confidence.
Sharing Dumping Tips
As you prepare to dump your RV waste, understanding the shared experiences and insights from the community can greatly enhance your process. Here are several key tips that many RVers recommend:
- Use Gloves: Always wear disposable gloves and keep disinfecting wipes handy. This maintains hygiene and prevents contamination of your hands and equipment during the dumping process.
- Follow the 2/3 Rule: Dump the black tank when it reaches two-thirds full. This helps avoid overfilling and provides ample time to locate a dumping station.
- Utilize a Clear Elbow: Attach a clear elbow to your sewer hose. This allows you to visually confirm when the black tank has fully emptied, helping prevent accidental spillage.
Many RVers emphasize the importance of sharing experiences in online forums. These platforms can guide you to the best local dumping stations and offer tips for managing the process smoothly.
Additionally, practicing the dumping process a few times can boost your efficiency and confidence, making it less intimidating, especially for first-timers.
First-Timer Concerns
When you’re new to RVing, the thought of dumping waste can feel intimidating. Many first-timers share concerns about odors and spills, which highlights the significance of proper preparation. It’s important to familiarize yourself with the dumping process, as practice makes it easier over time.
Here’s a quick guide to help you navigate your first dump:
| Tip | Description |
|---|---|
| Use High-Quality Sewer Hoses | Invest in durable hoses to prevent leaks. |
| Wear Disposable Gloves | Protect yourself from germs and odors. |
| Research Dump Stations | Know your options and fees in advance. |
| Watch Tutorial Videos | Gain confidence through visual learning. |
| Leverage Community Support | Connect with other RVers for tips and reassurance. |
Don’t forget to check your black tank’s water level before you dump your black. Engaging with the RV community can provide invaluable support, easing first-timer concerns.
Maintaining Your RV Waste System
To maintain your RV waste system, regularly treat your holding tank with effective products that break down waste and control odors.
Look for options with powerful enzyme formulas, as they can help prevent odor development and keep your system clean, such as 5 Best RV Toilet Chemicals for peak performance.
Additionally, inspect your sewer hose for any signs of wear and tear to prevent leaks during disposal.
Regular Tank Treatments
Proper maintenance of your RV’s waste system is essential for preventing odors and ensuring efficient operation. Regular tank treatments play a vital role in breaking down solid waste and managing odors in your black water tank and gray water tank. Using products that feature best RV black water tank treatments can greatly enhance your experience.
Here’s how to effectively incorporate regular treatments:
- Use Holding Tank Treatments: Regularly add treatments to your holding tank after each dump or at least once a week during extended trips. These treatments enhance the efficiency of your RV toilet by breaking down solids and controlling unpleasant smells.
- Opt for Eco-Friendly Options: Choose drop-in tank treatment packs that simplify the process and provide consistent dosing. Avoid harsh chemicals, as they can damage your tank and sensors. Eco-friendly options are safer for the environment and your RV.
- Keep Black Tank Valve Closed: Until you’re ready to dump your gray or black tank, keep the valve closed to prevent solid waste buildup. Regular treatments will help manage this buildup and upgrade tank performance.
Proper Hose Maintenance
Maintaining your RV’s waste system goes beyond just regular tank treatments; proper hose maintenance is equally important for guaranteeing a safe and efficient dumping process. Regularly inspect your sewer hose for cracks or leaks to prevent contamination during dumping time.
A damaged hose can lead to costly repairs and health hazards. Always store your sewer hose in a dedicated container, keeping it clean and separate from fresh water hoses to avoid cross-contamination.
To help keep your waste flow efficient, securely attach the sewer hose to both the RV and the dump station drain. This prevents disconnections that could cause messy accidents. After each use, clean your sewer hose thoroughly by rinsing it with a non-potable water hose and allowing it to dry completely before storage. This helps prevent mold and odors.
Frequently Asked Questions
How Do You Get Rid of Waste in an RV?
When you’re ready to deal with waste in your RV, think of it like handling a delicate balance. Start with the black tank, use quality equipment, and always prioritize hygiene and safety throughout the process.
How to Empty RV Sewage at Home?
To empty RV sewage at home, connect your RV’s sewer hose to the cleanout, dump the black tank first, then the gray tank, rinse the hose, and always wear appropriate protective gear for safety.
Can You Dump RV Waste in Toilet?
You can’t dump RV waste into a residential toilet in many areas due to legal restrictions and plumbing risks. Always check local regulations, as improper disposal can lead to clogs and environmental hazards.
How to Dump an RV Black Tank?
To dump an RV black tank, guarantee the RV’s level, wear gloves, and connect a quality sewer hose. Open the black tank valve, let it drain, then flush with fresh water until clear.
Effortless RV Waste Management for Cleaner, Greener Adventures
Now that you’ve learned the ins and outs of dumping RV waste, you’re ready to tackle the process with confidence. Coincidentally, understanding these steps not only makes your trips smoother but also keeps the environment safe.
Remember, maintaining your RV waste system is just as essential as emptying it. With the right equipment and tips in hand, you’ll find efficient tank emptying can lead to more enjoyable adventures. Happy travels.

