
Last Updated on March 11, 2023
Painting an RV stove is a great way to update and spruce up the look of your recreational vehicle. However, ensuring that the surface is adequately prepared for painting to achieve a professional finish is essential.
The following guide will provide step-by-step instructions on preparing the surface and applying paint and safety precautions when painting an RV stove. Read on to learn the details about successfully and safely painting your RV stove.
How Can I Paint My RV Stove: Application Process
Preparing the Surface
Before painting your RV stove, it is essential to prepare the surface to ensure a successful paint job. This includes cleaning and sanding the stove’s surface, degreasing with a liquid degreaser such as TSP (trisodium phosphate), and applying primer to fill any gaps or imperfections in the metal’s texture. Get the details on painting the RV stove below.
Cleaning and Sanding the Surface
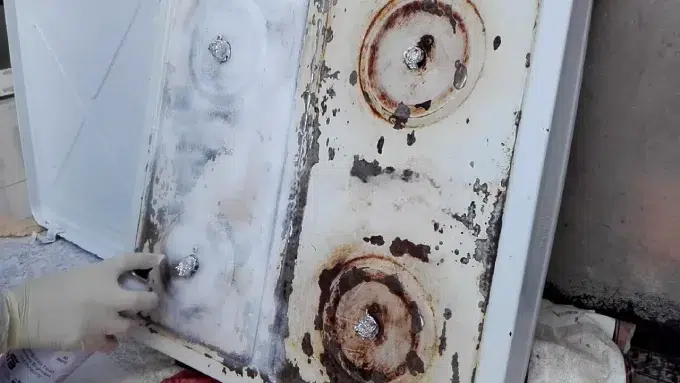
When preparing to paint your RV stove, the first step is to clean and sand the stove’s surface. Start using a dry rag or vacuum cleaner to remove dirt, dust, and debris from the surface.
Once you’ve removed all of these particles, it’s essential to sand down the surface with an abrasive pad or sponge so that it is entirely smooth. This will help create a better bond between the paint and the metal surface of the stove. After sanding, use a damp cloth to remove any remaining dust residue before applying primer.
Degreasing the Surface
Before painting your RV stove, it’s essential to degrease the surface with a liquid degreaser such as TSP (trisodium phosphate). This will help remove all grease, oil, and other contaminants from the surface before you begin painting.
To apply a degreaser, simply spray it onto the surface and let it sit for a few minutes before wiping it off with a damp cloth. Ensure all traces of degreaser have been wiped away before proceeding with priming.
Applying Primer to the Surface
Once you have finished cleaning and degreasing your RV stove’s surface, you can apply primer as part of your preparation process. Primer helps create a better bond between paint and metal surfaces by filling in any gaps or imperfections in the metal’s texture; this ensures that your paint job won’t chip or flake easily over time.
When applying primer, use even strokes while evenly coating every area of exposed metal. Allow each coat of primer to dry completely before adding additional coats if needed; once everything has dried thoroughly, you can begin painting your RV stove!
Step-by-Step Guide to Applying Paint
If you want the paint job to last, take your time and do it right. Use this guide to select the right paint type, apply thin coats evenly, let each coat dry completely between layers, and remove any masking tape without leaving residue. Let’s get started:
Selecting the Appropriate Paint Type
When selecting the appropriate paint type for painting an RV stove, it is essential to consider both the material of the stove and how it will be used. Oil-based paints are generally most suitable for metal surfaces due to their durability, while enamels or acrylics may be better for plastic surfaces.
Additionally, high-heat paint designed specifically for stoves should be used to ensure the paint will not discolor or flake off when exposed to extreme temperatures.
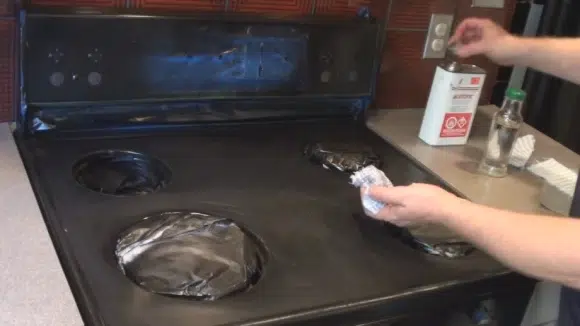
Applying a Thin Layer of Paint
When applying a thin layer of paint, it is best to begin with a brush or roller with firm bristles to ensure even surface coverage. Starting at one end and working towards the other, use gentle strokes in one direction and overlap each stroke slightly.
After finishing each section, check for no missed spots before continuing to the next section. Once finished, inspect all areas thoroughly for any missed spots and fill them in if needed before allowing 24 hours for drying.
Letting Coats Dry Completely
It is essential to allow coats to dry completely between layers of paint to adhere properly and ensure long-lasting results without peeling or chipping over time. For best results, wait at least 24 hours before applying another coat of paint over the same area.
This gives plenty of time for the first layer to dry fully so that subsequent coats can bond effectively with it and create an even finish without any visible lines from overlapping strokes.
Removing Masking Tape
Once all coats are dry and you are satisfied with your newly painted RV stove, carefully remove all masking tape by slowly pulling it away from the surface at a 45-degree angle with steady tension until it releases completely from both edges simultaneously.
If any adhesive residue remains on the surface after removing the tape, gently scrub it away with a cloth soaked in warm water mixed with dish soap until entirely removed.
Tips & Tricks For Getting A Professional Finish
Painting can be daunting, but if you follow the right tips and tricks, it can be done quickly and professionally. Read on to learn how to achieve the perfect finish when painting!
Using Even Strokes:
Using even strokes when the painting is important to get an optimal finish. This means applying an even amount of paint with each stroke, rather than making some spots thicker or thinner. Doing this will ensure that the finished product looks professional and neat.
Applying Too Thick of a Coat:
Applying too thick of a coat when painting can result in dripping or other imperfections, such as brush marks or visible ridges. To avoid this, apply several thin coats rather than one thick coat so that none of these issues appear in the finished product.
Sanding Between Coats:
If necessary, lightly sand between coats of paint with fine-grain sandpaper. This will help create a smooth surface and give your workpiece a more polished look once it has been sealed and dried.
Using Multiple Light Coats:
Using multiple light coats of paint is much better than using one thick coat. This way, you won’t have any areas where the color looks uneven or where there are visible brush strokes and other imperfections.
Sealing Your Work:
Finally, once painted, sealing your work with a clear sealant is essential for achieving a professional finish. The sealant will protect the paint from chipping or fading due to moisture or other environmental factors, so it is worth doing this step correctly.
Safety Precautions To Take When Painting An RV Stove
Painting an RV stove can be a tedious task if you don’t take the proper safety precautions. Knowing the risks associated with painting and planning is essential to ensure a successful project.
Gloves and Eyewear:
Before beginning any painting project, wearing protective gear such as gloves and eye protection is imperative. This will help protect your skin from being exposed to harsh chemicals or hazardous materials that may be present in the paint.
Wearing the appropriate protective gear will also ensure your eyes are safe from splashes or fumes from painting an RV stove.
Ventilation:
Working in a well-ventilated space is especially important when painting an RV stove due to the toxic fumes released using chemical products such as degreasers. Opening windows and having fans available can help reduce toxins in the air, ensuring your health and safety while undertaking this task.
Children:
It is highly recommended that children stay away from any area where the painting takes place, as there may be hazardous materials in use that can have serious consequences if ingested or inhaled. Keep young children out of the room until all the work is completed.
Clean Up:
Immediately after applying paint on an RV stove, cleaning up any excess material on surrounding surfaces with a damp cloth or towel is essential. This will help prevent any further messes from occurring and keep the area safe for future activities.
Cooling Period:
Before beginning any project involving painting an RV stove, ensure it has been completely cooled off. Fire hazards can arise if the paint is applied too close to hot surfaces, so take care not to start until enough time has passed for it to cool down properly.
Can you paint the outside of a stove?

A stove can be painted on the outside. The best paint type is epoxy or oil-based enamel or acrylic, designed for high-heat use. It’s essential to ensure the surface is clean and free of any grease before painting.
You can spray or brush on the paint, but it must be able to withstand high temperatures. Additionally, you should avoid painting the stovetop as it may be unsafe for electric ranges.
Does stove paint need primer?
It is necessary to prime stove paint. Primer helps to ensure that the paint adheres to the surface and provides additional protection from rust, scratches, and marring.
Stove Bright High-Temperature Paint Primer is a great option for painting metal chimneys and caps as it can withstand temperatures up to 1200 degrees Fahrenheit. It is essential to shake the can of paint very well before use to get an even coat.
Can I use Rustoleum paint on a stove?
You can use Rust-Oleum paint on a stove. It is designed to be tough and withstand high temperatures up to 1200°F. However, it’s not recommended for parts of the stove that are exposed to direct flames, like inside a barbeque grill or fireplace.
If you’re looking to paint those areas, getting a different type of paint that can stand up better against the heat is best. When using any paint on appliances, read the instructions carefully and prepare the surface before starting your project for the best results.
Is it safe to paint a stove?
Painting your stove is a great way to give it a new look without buying one. But you need to use the right type of paint and be sure to wear protective gear like gloves, goggles, and a face mask when doing so.
You should also ensure the area is well-ventilated and all surfaces are clean before painting. Electric range stoves should not be painted on their stovetops. If you take these precautions and use suitable materials, painting your stove can be done safely.

