Last Updated on April 13, 2023
Cleaning your RV awning is essential to maintain its appearance and prevent mold or mildew build-up. You can easily tackle this chore with the right tools and techniques, but have you ever wondered if using a pressure washer would be a good idea?
Pressure washing might seem like the perfect solution, but before you grab your pressure washer, there are some things you need to know. RV awnings are fragile and using a high-pressure washer can quickly damage them.
This post will discuss pressure washing an RV awning safely and effectively. We’ll also discuss the correct distance to keep between the pressure washer wand and your awning. In addition to discussing how pressure washing works, we will discuss how frequently you should pressure wash your RV awning.
How Can You Pressure Wash RV Awning: Easy Steps
To pressure wash your RV awning, there are a few steps you need to follow to ensure that you get the best results without causing any damage.
Step 1: Preparation for Pressure Washing RV Awning
Before pressure washing your RV awning, preparing properly for the task at hand is crucial. This will ensure you get the best results while preventing any damage to your awning.
The first step in preparing to pressure wash your RV awning is to gather all the necessary tools and equipment. You will need a pressure washer with a low-pressure setting, a cleaning solution specifically designed for awnings, a bucket, and a soft-bristled brush.
It is essential to use awning-safe cleaners, as other cleaners may cause damage.
Once you have gathered your tools and equipment, the next step is to remove any loose debris from the awning. This can be done by gently sweeping or brushing away any dirt, leaves, or other debris that may have accumulated on the surface of the awning.
This step is important as it will prevent debris from getting stuck in the fabric’s fibers during pressure washing.
Step 2: Test the Pressure Washer on a Small Spot
Before you start pressure washing your RV awning, testing the pressure washer on a small spot is important. This will help you determine if the pressure is too high and could potentially damage the awning material.
To perform this test, choose an inconspicuous spot on the awning and apply a small amount of water using the pressure washer. If you notice any damage or tearing of the material, adjust the pressure accordingly before cleaning.
Testing the pressure washer also allows you to ensure that it is working properly and that there are no leaks or malfunctions. This will help prevent any accidents or damage to your RV.
Safety should always be a top priority when using a pressure washer. Wear appropriate protective gear, such as goggles and gloves, and read all instructions and warnings provided by the manufacturer.
Once you have successfully tested your pressure washer, you can mix your cleaning solution and apply it to the awning.
Step 3: Mix Cleaning Solution in the Detergent Tank
If you want to pressure wash your RV awning, a cleaning solution can help remove stubborn stains or dirt. Mixing the right cleaning solution ensures your awning is not damaged during pressure washing.
To mix the cleaning solution, you must fill the detergent tank of your pressure washer with a safe cleaning solution for use on awnings. Many commercial cleaning solutions specifically designed for RV awnings are available.
Alternatively, you can make your own cleaning solution by mixing warm water with mild soap or detergent. Avoid using harsh chemicals such as bleach or ammonia, as they can damage the fabric of your awning.
Once you have filled the detergent tank with the cleaning solution, follow the manufacturer’s instructions on how many solutions to use per gallon of water. Too much detergent can leave residue on your awning and cause damage over time.
It is also important to note that some pressure washers come with adjustable detergent settings. If your pressure washer has this feature, adjust it according to the manufacturer’s instructions for optimal performance.
Step 4: Apply Cleaning Solution to the Awning
When pressure washing your RV awning, applying the right cleaning solution is crucial to achieving a thorough and effective clean. Here are the steps you need to follow to apply the cleaning solution correctly:
- Choose the right cleaning solution: Many cleaning solutions are available on the market, but not all are suitable for use on RV awnings. Look for a cleaner specifically designed for use on awnings or outdoor fabrics.
- Mix the cleaning solution: After choosing it, mix it according to the manufacturer’s instructions. Some solutions may require dilution with water, while others may be ready-to-use.
- Apply the cleaning solution: Use a sprayer attachment on your pressure washer to apply the cleaning solution evenly across the entire surface of your RV awning. Be sure to cover every area thoroughly, paying extra attention to any areas with stubborn stains or dirt buildup.
- Let it sit: After applying the cleaning solution, sit for a few minutes (as directed by the manufacturer) before rinsing.
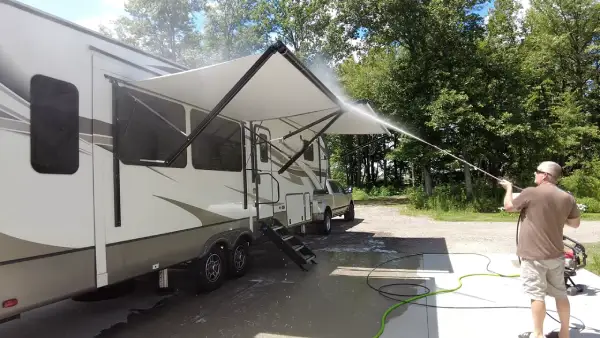
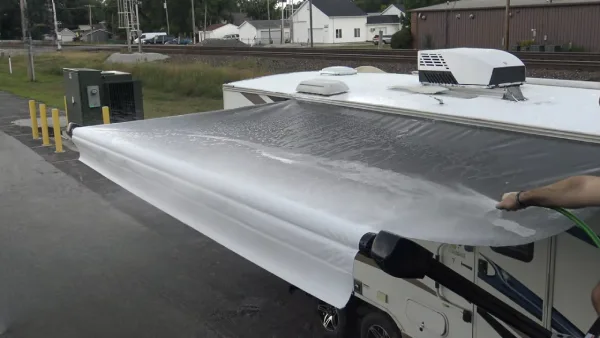
Step 5: Use a Low-Pressure Setting to Rinse the Awning
The final step of pressure washing an RV awning is just as important as the first. After applying the cleaning solution and rinsing with a high-pressure setting, it’s time to switch to a low-pressure setting for the final rinse. This will ensure that all soap residue and debris are completely removed from the awning.
Using a low-pressure setting will also prevent any damage to the fabric or material of the awning. High pressure can cause tears or holes in the material, which can be costly to repair or replace. Using a gentle stream of water, you can effectively clean your RV awning without causing any damage.
To use the low-pressure setting, simply adjust the nozzle on your pressure washer to a wider spray pattern and lower pressure. Start at one end of the awning and work your way across, rinse thoroughly between sections.
Be sure to pay extra attention to areas where dirt or debris may have accumulated, such as creases or folds in the fabric.
Once you’ve finished rinsing with the low-pressure setting, take a step back and inspect your work. If areas still need attention, repeat steps 3 and 4 until you’re satisfied with the results.
RV Awning Pressure Washing Tips
To pressure wash your RV awning effectively and without causing any damage, there are a few things to remember to ensure the job is done effectively and without causing any damage.
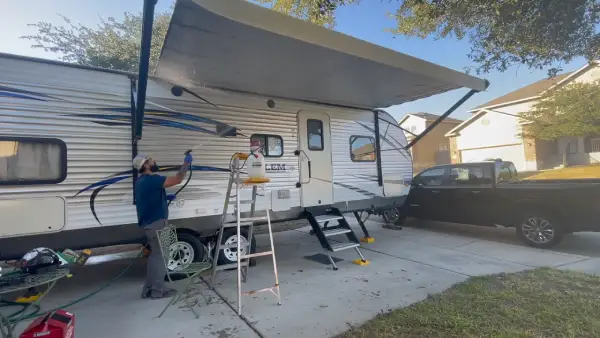
Tip 1: Start at the Top and Work Downward
When pressure washing an RV awning, starting at the top and working downward is important. This is because starting at the bottom can cause dirt and debris to run down onto areas that have already been cleaned. By starting at the top, you can ensure that all dirt and debris are removed systematically.
Starting at the top also allows you to see any areas requiring extra attention. For example, if there are stubborn stains or mold growth on the awning, you can spend more time cleaning those areas instead of wasting time cleaning areas that are already clean.
And starting at the top allows for a more efficient cleaning process. As you work your way down, you can adjust the pressure and angle of the spray depending on how dirty each section is. This helps to prevent damage to the awning while still achieving a thorough clean.
Tip 2: Use Proper Technique to Prevent Damage
Proper technique is essential when pressure washing RV awnings to avoid causing damage. Here are some tips to help you prevent any harm:
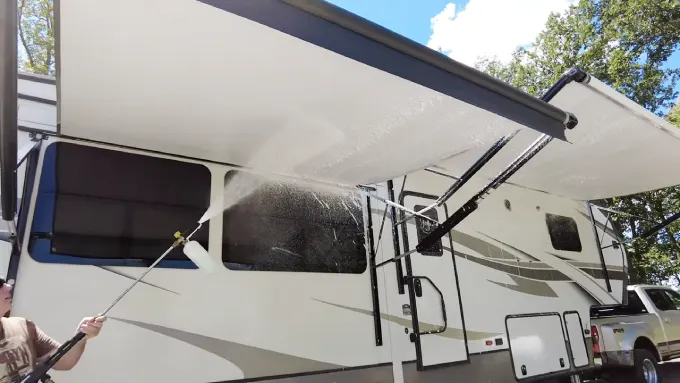
- Maintain a safe distance: Keep the pressure washer nozzle at least 18 inches away from the awning material. If the nozzle is too close, it can tear or puncture the fabric.
- Use low-pressure settings: Use the lowest possible pressure setting that still effectively cleans your awning. High-pressure settings can cause damage to your RV’s exterior and strip off the paint.
- Avoid spraying at an angle: Direct the spray straight onto the surface of the awning rather than at an angle. This will help prevent water from seeping under the fabric and causing mold or mildew growth.
- Work in sections: Divide your awning into manageable sections and work on one section at a time. This will ensure that each part of your awning gets cleaned thoroughly without missing any spots.
- Be mindful of seams and stitching: Avoid spraying directly onto seams and stitching as they are more delicate than other parts of your RV’s awning.
Tip 3: Rinse Thoroughly Between Sections
Be sure to rinse thoroughly between sections when pressure washing an RV awning. This helps ensure that all the cleaning solution and debris are removed from the awning before moving on to the next section. Failure to rinse properly can result in streaking or discoloration of the fabric.
To rinse thoroughly between sections, start by using a low-pressure setting on your pressure washer to remove any remaining cleaning solution from the previous section. Be sure to use a sweeping motion with the wand to cover as much surface area as possible.
Next, switch to a higher-pressure setting and begin rinsing the current section of the awning. Again, use a sweeping motion and work your way from top to bottom.
Once you’ve finished rinsing the current section, move on to the next one and repeat the process. Continue working this way until you’ve rinsed all awning sections.
It’s also important to note that if you’re using a cleaning solution that requires dilution, follow the manufacturer’s instructions carefully. Using too much or too little of the solution can result in ineffective cleaning or damage to the fabric.
Pros and Cons of Pressure Washing Your RV Awning
Pressure washing, including RV awnings, is a popular method for cleaning surfaces and objects. But before deciding to use this method on your RV awning, it’s essential to consider the pros and cons.
One of the main benefits of pressure washing your RV awning is that it can save you time and effort compared to traditional cleaning methods. With a pressure washer, you can easily remove dirt, grime, and other stubborn stains from your awning in minutes.
Also, pressure washing can help extend the lifespan of your RV awning by removing harmful substances that could cause damage over time.
On the downside, using a pressure washer on your RV awning may cause damage if not done correctly. The high-pressure water stream can tear or puncture the fabric or vinyl material used in RV awnings.
Moreover, if you’re not careful with the pressure setting or nozzle distance, you could inadvertently strip away any protective coating on the surface or even push water underneath the seams.
To avoid these potential problems when pressure washing your RV awning, it’s important to follow some essential tips. First and foremost, adjust the pressure setting on your washer to a lower level suitable for delicate surfaces like an RV awning.
You should also choose an appropriate nozzle attachment that disperses water evenly without causing damage.
How close should you hold the pressure washer wand to the RV awning?
Knowing how close to hold the wand is essential to clean your RV awning with a pressure washer effectively. Holding the wand too close to the fabric can cause damage, while holding it too far away may not provide enough cleaning power.
The recommended distance for holding the pressure washer wand when cleaning an RV awning is at least 2 to 3 feet away. This ensures that the pressure is not too strong and that damage to the awning is avoided. And the distance ensures the cleaning solution can reach every part of the awning.
How often should you pressure wash your RV awning?
The frequency of cleaning your RV awning will depend on how often you use your RV and the conditions it is exposed to. If you use your RV frequently or park it in areas with heavy pollution, bird droppings, or other sources likely to cause heavy soiling, cleaning your RV awning at least once every six months is recommended.
But, annual cleaning will suffice for RVs that are used sparingly or parked in areas with little pollution. Some factors that may determine the cleaning frequency include the awning’s color, the RV’s location, and the weather conditions experienced in the area.
It’s important to note that leaving dirt or debris to accumulate on the RV awning for extended periods can cause damage to the fabric, which may eventually lead to leaks, mold, and mildew. Therefore, frequently cleaning your RV awning is crucial to its longevity and overall appearance.
Choosing the Right Way to Clean Your RV Awning
The question of whether or not you can pressure wash your RV awning has been answered. While pressure washing can be a quick and efficient cleaning method, it’s important to understand the potential risks involved.
It’s essential first to consider the type of awning you have and the materials used in its construction. Some fabrics and components may not withstand the force of a pressure washer and could be damaged in the process.
Using gentle cleaners and soft-bristled brushes, traditional cleaning methods are always a safe bet. But if you use a pressure washer, follow proper safety procedures and adjust the nozzle to a low-pressure setting.
At the end of the day, keeping your RV awning clean is essential for aesthetic reasons and longevity. Regular maintenance will help prevent staining, fading, and other damage caused by dirt and debris buildup.

