Last Updated on April 20, 2023
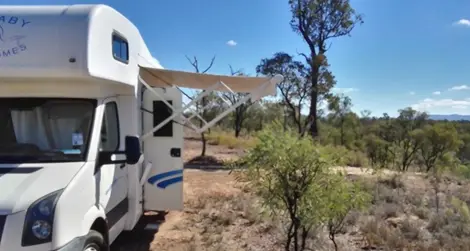
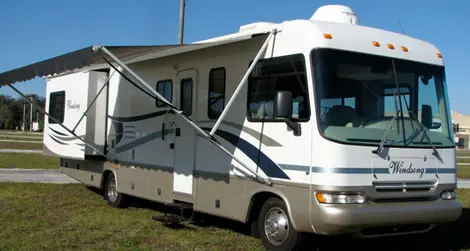
RV awnings come in a variety of sizes, but they all serve the same purpose: to provide shade and protection from the elements. However, there are times when it may be necessary to shorten an RV awning.
For example, if you are parked beneath trees or power lines, you may need to shorten your awning to avoid damaging it. If strong winds are forecasted, shortened awnings will be less likely to be damaged or torn from their moorings.
While it may seem like a hassle to shorten an RV awning, doing so can ultimately save you time and money by preventing damage. Hope we can solve your question, can you really shorten an RV awning?
Can You Shorten an RV Awning? Find Out the Answer
Though most RV awnings come in a set size, it is possible to shorten an RV awning. This can be done by trimming the fabric or cutting the support poles to size.
The process of shortening an RV awning is not a difficult task, but it is important to take care when cutting the fabric or support poles, as any mistakes could result in damage to the awning.
Aside from this, you should make sure that the shortened awning will still be able to provide adequate coverage and protection from the elements. Taking these factors into account, RV awning shortening can be a viable option for those who need a smaller awning for their RV.
We will show you the step-by-step process, which will enable you to reduce the size of your RV awning without damaging it.
Why Shorten an RV Awning?
An RV awning can be shortened for a number of reasons. Learning about the causes will allow you to comprehend the process more clearly. You will also be able to determine if shortening your awning is the best option for you.
By familiarizing yourself with the underlying causes, you may be able to avoid making a mistake that could cause damage to your awning. Below are a few circumstances in that you may find it necessary to shorten the RV awning. So, let’s take a closer look:
1. Damaged Material
High winds can damage awnings, particularly if they are left extended during severe weather. When an awning is extended, it acts like a sail, catching the wind and putting strain on the fabric and the supporting structure.
Over time, this can lead to tears, rips, and even complete failure. To avoid this type of damage, it is best to shorten your awning when bad weather is expected or when you will be away from your campsite for an extended period of time.
2. Incorrect Sizing
When you purchase an awning, you may discover that it is not the appropriate size for your RV. If the awning is too large, it can sag or even collapse, while an awning that is too small will leave part of the RV exposed.
The best way to avoid these problems is to shorten the awning to the correct size. Even though this may seem like a difficult task, it is actually quite simple. With a few basic tools and some patience, you can shorten your RV awning in no time.
3. Personal Preference
Some RV owners choose to shorten their awnings for aesthetic reasons. A shorter awning can give an RV a sleeker look, and it can also be easier to clean and maintain. In addition, a compact awning is less likely to catch in the wind and tear. However, the main reason many RV owners shorten their awnings is convenience.
An awning with a shorter height is easier to set up and take down, and it takes up less space when stored. For RVers who frequently travel, this can be a major advantage. In short, there are many good reasons to reduce the length of an RV awning. The decision ultimately comes down to personal preference.
Step By Step Instructions to Shorten an RV Awning
Now that we have gone over some of the reasons why your RV awning may need to be shortened, let’s learn how it’s done.
This process is not difficult, but it is important to follow the steps carefully so that you do not damage your awning. We will walk you through the process so that you can shorten your RV awning with ease. Just follow these simple steps:
Step 01: Collect the Tools and Materials You Will Need
To begin, gather the tools and materials you will need. In order to complete this project, it is necessary to have a measuring tape that is used to quantify the awning fabric and the new awning size. Furthermore, you will need a heavy-duty fabric scissor, a ruler, or straight edge, and a pencil for marking.
It is also necessary to have a step ladder in order to gain access to the awning. To cut and joint the awning hardware, you require a wrench or socket, cordless drill, hack saw, metal file, fasteners, new awning mounting hardware (if necessary), and exterior sealant.
After you have gathered all of the necessary supplies, you are ready to move on to the next step. This will ensure that you have everything you need to complete the job quickly and easily.
Step 02: Stow Your RV Awning
Before you can shorten your RV awning, you need to stow it. This involves retracting the awning so that it is completely rolled up.
Once the awning is stowed, you can proceed with the next stage. In order to stow the RV awning, please locate the awning’s manual release handle. This handle is usually located at the end of the RV awning roller tube.
When you have located the manual release handle, simply pull on it until the awning is completely rolled up. Once the awning is rolled up, you can continue.
Step 03: Disconnect the Awning
The awning is attached to the RV at two points. It is necessary to disconnect the awning from both of these points in order to shorten it.
A step ladder is required for reaching the awning’s connection points. Using a wrench or socket, loosen the bolts that connect the awning to your RV. The awning set can now be removed from the RV after the bolts have been loosened.
Step 04: Unwind and Remove Torsion Springs
As a next step, the springs should be unwound and removed. The torsion springs are located at either end of the awning roller tube.
To unwind the torsion springs, you’ll need to loosen the two set screws that hold the spring in place.
In the event that the set screws are removed, you can slowly unwind the spring until it is completely relaxed. With the spring removed, the awning will be much easier to work with.
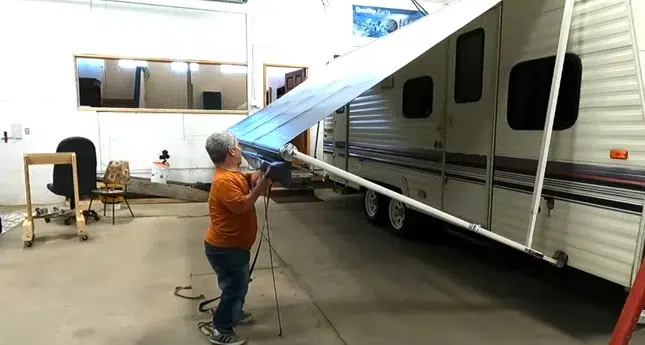
Step 05: Cut the Awning Tube to the Desired Length
Now that the awning is disconnected and the torsion springs have been removed, it is time to trim the awning tube to size.
Use a tape measure to determine how much shorter you want the awning to be. Then, use a ruler to mark where you will cut.
Be sure to use a pencil so that the cutting line is visible. Once the cutting line has been marked, the awning tube can be manually cut. Using a hacksaw, cut along the marked line. Always use a new blade for the best results.
Step 06: File Down Any Rough Edges
With the awning tube cut to size, the next step is to smooth out any sharp edges. You can do this with a metal file. It is advisable to wear gloves and eye protection while you are working.
Once you have filed down the edges, you should sand them smooth with finer grit sandpaper. This will help to prevent the RV awning fabric from fraying when you are installing it. Finally, wipe the tube down with a clean cloth to remove any dust. Once you are satisfied with the results, you can move on to the next step.
Step 07: Drill New Holes for the Mounting Hardware
In order to mount the hardware, new holes will need to be drilled after cutting the awning tube. This is necessary in order to reattach the RV’s awning.
When drilling the new holes, use a cordless drill and a drill bit of the appropriate size. Be sure to wear safety goggles while drilling to protect your eyes from flying debris. Also, be careful not to damage any nearby wires or cables. You should begin by drilling a pilot hole. This will make it easier to drill the final hole.
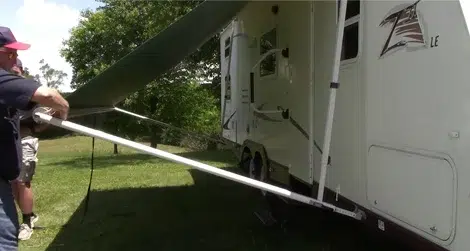
Step 08: Cut the Fabric to the Required Length
Having ensured that the awning tube has been successfully shortened, we can proceed to cut it to the desired size. In this manner, the fabric hangs evenly when the awning is extended.
Define the cutting line with a tape measure and a straight edge or ruler. A pencil should be used to clearly mark the cutting direction.
Cut along the drawn line using sharp scissors. When the fabric is cut on the side that holds the awning roller, stitch the raw edge to the awning roller.
Step 09: Reattach the Fabric to the Awning Roller
Having correctly cut the fabric, it is now necessary to reconnect it to the awning roller. One side of the fabric features a wire running along its length. This wire is used to attach it to the roller.
To reattach the fabric, simply slip the wire through the hole in the awning roller and twist it to secure it in place. By doing so, you can be certain that the replacement fabric is properly attached to the roller.
Step 10: Replace the Torsion Springs
With the new fabric in place, you can now proceed to reinstall the torsion springs. Begin by threading one spring end into the mounting bracket.
Then, thread the other end of the spring through the eyelet on the awning roller. Once both ends of the spring are in place, simply tighten the set screws. Be sure not to overtighten the set screws, as this can damage the awning.
Step 11: Reconnect the Awning to the RV
We’re almost finished. As soon as the awning has been shortened, all that’s left to do is to reconnect it to the RV. Take the step ladder and position it underneath the awning. Then, reconnect the awning arms to the RV.
When the arms are firmly in place, you can lower the awning until it reaches its maximum length. In order to fill in any gaps between the awning and RV, you can use sealant or caulking. That’s it. You’ve now successfully shortened your RV awning.
As you can see, shortening an RV awning is not a difficult task. With a few tools and a little bit of know-how, you can easily shorten your RV awning according to your needs.
So, if you find that your RV awning is too long, don’t hesitate to shorten it. It’s a relatively easy process that anyone can do.
How Do You Keep Your RV Awning in Good Condition?
If your RV awning is not properly maintained, you may experience a number of problems. One common issue is that the fabric may become torn or ripped.
This can occur if the awning is not properly secured to the roller or if there are any rough edges on the metal tubing. Additionally, if the torsion springs are not properly tensioned, the awning may become dislodged from the RV.
As such, it will be essential to regularly inspect the awning and make sure that all of the parts are in good working condition. As a result, we have provided you with a few tips to ensure your RV awning lasts as long as possible:
1. Inspect the Awning Regularly
Whether you’re using it or not, it’s important to check your awning regularly for signs of wear and tear. Look for rips, tears, or other damage that could cause the awning to fail.
Additionally, check that all RV accessories and components are in satisfactory functioning. This will help you catch any problems before they become serious. As needed, you can then perform awning repair.
2. Clean the Awning Routinely
Maintaining the integrity of your RV awning requires routine cleaning. Debris, dirt, and bird droppings can all damage the fabric. In addition, mildew and mold can build up over time, causing the fabric to deteriorate.
To clean the awning, start by using a broom or brush to remove any loose dirt. Then, mix a solution of water and soap and use a sponge or soft brush to clean the fabric. Be sure to rinse the awning thoroughly afterward to remove all traces of soap.
Finally, let the awning dry completely before rolling it up. By following these simple steps, you can help keep your RV awning in good condition for a long time.
3. Don’t Roll Up the Awning When Wet
If you fold the awning while it is still wet, you run the risk of mildew or mold growth. Additionally, the fabric may become discolored and stained if it is rolled up while wet.
Thus, it is imperative to allow the awning to dry completely before rolling it up. Be sure to check that your awning is completely dry before you roll it up. Failing to do so could result in permanent damage.
4. Lubricate the Moving Parts
Over time, the moving parts on your awning may become dry or sticky. This can lead to malfunction or even become damaged.
Due to this, it would be prudent to apply lubrication on a regular basis. Use a silicone-based lubricant on all of the moving parts, including the torsion springs and awning arms. This will help to keep the awning functioning properly.
Frequently Asked Questions:
There are a few common questions that people have about RV awnings. Here are a few of the most frequently asked questions with answers:
1. How Long Do RV Awnings Last?
Awnings on RVs can last anywhere from 5 to 15 years. An RV awning’s life expectancy depends on several factors, including the quality of the awning, the frequency of use, and the level of maintenance.
Those who use their RV awnings regularly should check for rips, tears, or other signs of wear and tear. Awnings that are made from high-quality materials and that are well-maintained are more likely to last for a longer period of time.
2. How Do I Know If My Awning Needs to Be Replaced?
If you have an RV awning that is sagging, has holes, or is otherwise not in good shape, then it is probably time to replace it. However, if your awning is still in decent condition, you may be able to shorten it instead. This can be a useful way to save money on a new awning, and it can also be a good way to keep your old awning in good shape.
3. What are the Different Types of RV Awnings?
There are several different types of RV awnings that are available on the market. Manual awnings are the most common type of awning on the market. These awnings can be opened and closed by hand. Electric awnings are another type that is in demand with RV owners. You can open and close the awning at the touch of a button.
As well as retractable awnings that can be retracted into the RV when they are not in use. All types of awnings can be made from different materials, such as fabric, vinyl, or aluminum. The type of material you choose should be based on your preferences and how often you plan on using the awning.
4. Are All RV Awnings Waterproof?
The majority of RV awnings are not waterproof. However, many are made with water-resistant fabric that will help to keep you dry in light rain or dew. If you’re planning to camp in an area with a high chance of severe weather, you may want to consider awnings that have a higher water resistance rating.
Some awnings are even made with fully waterproof material, which can provide added protection against heavy rain or snow. When choosing an RV awning, be sure to consider your needs and the expected weather conditions of your trip.
You can also waterproof your awning by using a water-repellant spray. With so many different options available, you’re sure to find the perfect awning for your next adventure.
Conclusion
RV awnings are a great way to protect your RV from the elements. Can you shorten an RV awning? We hope you are aware of the answer to this question.
You should simply follow the steps outlined above whenever you need to shorten your RV awning. Don’t forget to take care of your awning by cleaning and lubricating it regularly. As long as you maintain your awning properly, you can expect it to last a long time.

