
Last Updated on June 3, 2023
RV water heaters are notorious for developing a build-up of calcium and lime. If not regularly drained, this can cause the unit to run inefficiently and even fail. How often you need to drain your RV hot water heater will depend on the hardness of your water and how often you use the heater.
If you’re looking for a way to save money on your RV’s water heater, it might be time to drain the hot water tank. It may sound counterintuitive, but draining the tank can actually extend its life.
This article explains when you should drain your hot water heater, how to do it yourself, and when you might need to call a professional.
How Often Should I Drain My RV Water Heater Safely?
While draining your RV’s water heater does not need to be done regularly, some RV owners do it once a year. This is important if you live in an area where the water has high lime or calcium content. In these areas, the heater will see more build-up over time and may fail faster than one with low calcium levels.
To keep it safe, drain your hot water heater when you notice a decrease in heating performance. This could be when it takes longer to get the water to a usable temperature or if there seems to be less hot water available.
In areas where the calcium content is high, you may wish to drain the RV’s water heater every few months instead of waiting for it to cause problems.
It’s important to note that the guidelines and timeframes for this will vary depending on your specific model.
For example, while some may recommend draining every few months to keep sediment at bay, other companies advise against having any kind of drain plug in place at all since water will naturally evaporate.
If you plan to head out onto the road for an extended period during the dryer months, follow your owner’s manual. This will ensure the water heaters are still functioning properly upon your return.
Whenever you are having an issue or do not have a copy of the manual, call customer service. They will help you determine if it needs draining and how much lime build-up is acceptable.
This is especially the case if you plan on keeping your RV or trailer in storage throughout winter without use, as any trapped water will then evaporate.
It equipped some models with drain plugs allowing for this process to be done at any point in time.
If this is not the case with your unit, you’ll need to wait until your water heater is cold before draining it. They achieve this by waiting until the water is no longer hot to touch after running it, or with most models, simply wait overnight.
Why You Should Drain Your RV Water Heater Tank?
All RV water heaters operate best when their tanks are filled up with soft, clean, non-hard water, as they do with all water heaters generally.
When you turn on an RV hot water heater and find it’s brownish or yellowish, the cause is usually a build-up of calcium and lime inside your tank. It can be caused by hard water and several years of use without draining the tank.
If you don’t drain your tank once or twice a year (more often if you have extremely hard water), this lime buildup can eventually clog the heater’s internal parts and decrease its efficiency.
It may also weaken the metal over time leading to leaks and even catastrophic failure. Therefore, the best time to drain your tank is just before winterizing it.
This reduces the chance that water will freeze in the line during storage for several months, possibly causing damage.
How to Drain an RV Water Heater Tank?
If you’re comfortable working with your RV’s water system, it’s easy to drain the tank yourself. If not, call a professional when it comes time to do this. In the following paragraphs, you can find 11 steps that will guide you through draining the tank of an RV water heater.
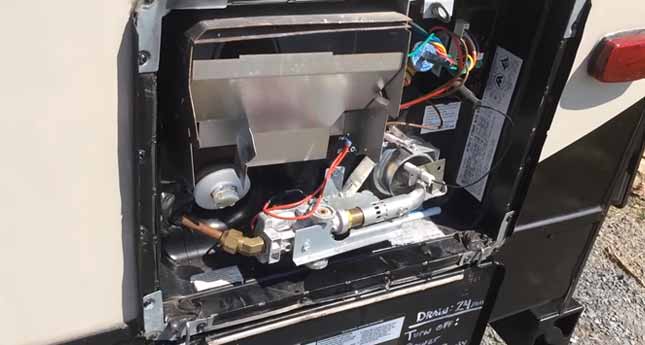
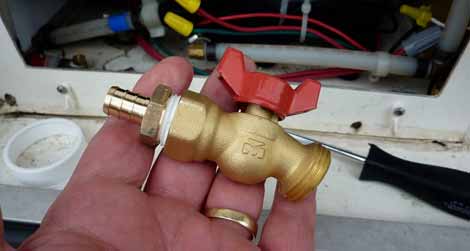
Disconnect the Drain Plug
The first step is to turn the pressure relief valve off. Then, turn the water intake off at the water pump or faucet by closing it with a wrench.
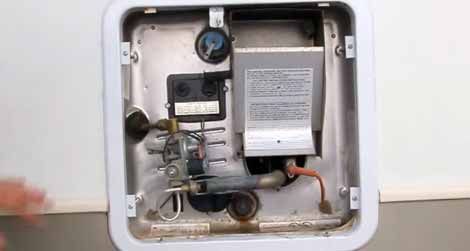
Open the Drain Valve
Open the drain valve (it looks like an open pipe). Be sure to use a bucket underneath to catch any excess water. Some older models will have two valves; if that’s your situation then will close one of them while you’re draining the rv hot water heater tank.
You can leave the other open while filling your RV after flushing out the RV’s water heater, but only if you’ll be flushing it out with clean water once drained. Otherwise, leave both closed and wait until your next proper draining time.
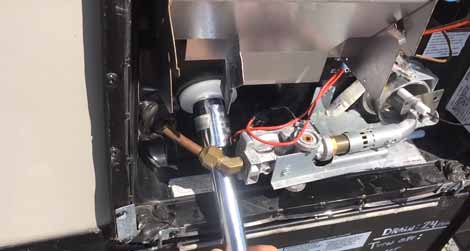
Attach a Hose to the Drain Valve
Attach a garden-type hose to the drain valve. Turn on the outside faucet (or attach your water source to the end of your hose if it has no spigot). Open up the outside faucet fully and allow all the water in your tank to drain out through this secondary opening.
Flush with Clean Water
You’ll want to flush out any remaining sediment left over after draining by running a clean, fresh water tank through it. On older models, you can do this by attaching another hose at the other end of your original one.
Insert this new opening down inside the drain valve and be sure to secure it with a hose clamp or bunghole cork. Turn on your faucet and allow the freshwater to run through for a minute or two, then close off this new opening.
This step will remove any sediment that escaped down your drainpipe when you first opened it.
Allow The Water to Cool Off
After you’ve finished flushing the tank, allow it to cool down before further handling. You might need a few minutes, depending on how hot water is coming out of your drain valve.
Disconnect the Hose and Close Up All Openings
Once cooled off, disconnect your hose from the drain plug and use an end wrench to tighten this hose clamp back shut again. Also, take a moment to be sure that it has tightened any other open spigots so as not to leak when you’re done for the day.
Then, secure your drain plug by reinserting it tightly into its proper location around the underside of your RV or trailer frame.
Turn the Water Pump Back On
Turn your water pump back on after you’ve properly secured all hoses and valves, then turn it on to flush any remaining sediment from the system.
As you just flushed out your tank with freshwater, the sediment will have nothing to cling to. The process should go relatively smoothly with only minimal risk of clogging things up as time goes on.
Check for Leaks
Check everything one last time before allowing your system to fill with rv water again by looking for any potential leaks around the drain plug, hose connections, spigots, valves, or fittings.
Also, check around these areas after filling up has been completed as another double-check before winterizing (or running) your RV.
Reconnect All Components
Reconnect both faucets using a wrench in the reverse order in which it originally disconnected them. You’ll want to snug them gently but don’t over-tighten just enough so there’s no leak when turning them by hand.
Finally, screw in your pressure relief valve back in place securely as well before closing up the outside access panel/lid of your tank if there is one.
Call a Professional if Needed
If you feel like any of the steps above are too complicated for you, such as if they’re unclear or just don’t sound right to you, then we recommend you call a professional in your area.
Turn on Your Water Supply Fully
Finally, turn on the water pump to allow any remaining air trapped in the heater to escape through the hot water faucet you detached.
When no more air comes out, you can turn off the pump and check for leaks at all faucets. Also, if there is a clog in your RV water heaters, it may be necessary to drain it.
Precautions of Drain My RV Water Heater
There are some precautions you should take before draining your RV water heaters:
- Never drain the tank when it’s hot or while your water pump is running, Doing so can lead to burns and even scalding if you’re not careful. Also, keep children away from the area for this same reason.
- Don’t pour any chemicals down into a system that’s still pressurized with heated water. This could cause a dangerous situation where the chemical causes a rapid expansion of boiling liquid leading to an explosion hazard instead.
- And never open your pressure relief valve after draining has begun because your side effect will create high pressure within the tanks which can also lead to dangerous consequences.
So make sure you turn off the water heater first before draining, and always use caution when carrying out this process.
The Benefits of Draining Your RV Water Heater
When it comes to the benefits of draining your RV hot water heater, there are several.
- Prevents sediment buildup and corrosion.
- Reduces the risk of leaks or bursts and waste energy because of leftover water from campsite trips.
- Extends your heater lifespan by removing any mineral deposits that would otherwise build up.
- Helps maintain optimal performance for both heating and hot water delivery.
Frequently Asked Questions
1. When Do I Need to Replace My RV Water Heater?
You should replace your RV water heater when it is old or damaged, in order to protect yourself.
2. Why is It Important to Keep Sediment Out of My RV Water Heater?
Keeping sediment out of your RV water heater is important in order to prevent corrosion and leaks.
3. What’s the best way to drain an RV’s water heater?
The best way to drain an RV water heater is by removing the drain plug and opening up a garden hose nozzle.
4. How Much Should a New RV Water Heater Cost Me?
The cost of a new RV water heater varies, depending on the features and size.
Final Thought
If you find yourself on the road for an extended period, follow these guidelines. Keeping your RV water heater drained can help prevent sediment buildup and corrosion which may lead to leaks or bursts if not dealt with promptly.
It’s also important to maintain this drainage system by following the steps listed in order to keep it clean and running optimally with no issues.

