
Last Updated on March 6, 2023
A Brake system is one of the most crucial safety features on your vehicle. It’s responsible for slowing and stopping your car, which is no small task.
If your brakes are not functioning correctly, they can be a massive threat to yourself and others on the road. You could end up in a serious accident if you neglect to think about this issue.
But many people don’t know how to adjust drum brakes on a trailer, and as a result, they can end up causing an accident.
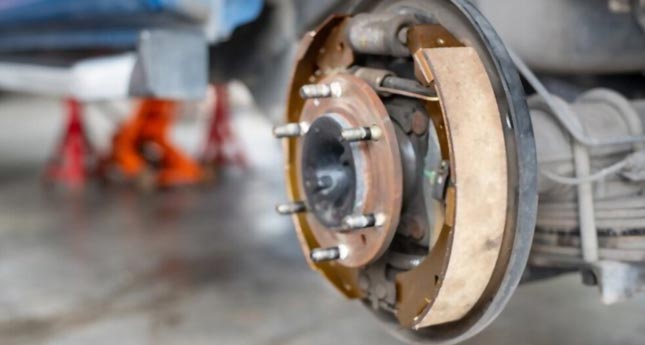
Drum brakes are a common type of brake found on trailers. They work by creating friction between two surfaces. If your trailer’s drum brakes are not working properly, there are a few steps you can follow to adjust them.
What are Drum Brakes and How Do They Work?
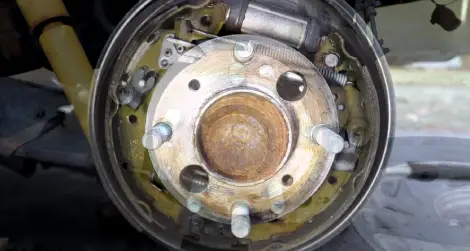
A drum brake is a standard braking system used on any vehicle. It works by creating friction caused by the shoes inside the drums to stop rotating parts, usually rotating drums or flywheels.
The shoes are pressed against one side of each drum, and then as they rotate due to inertia, their friction slows them down and consequently slows down any attached wheel. Drum brakes can be applied by a hand lever, as well as by a foot pedal.
How to Adjust Drum Brakes on a Trailer?
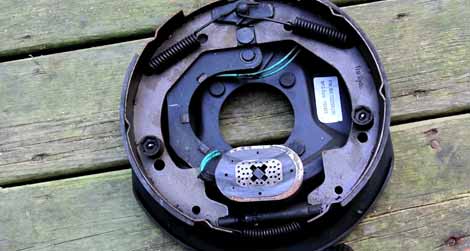
A drum brake works by creating friction between two surfaces. There is a brake pad on the inside of the drum that is pressed against the surface of the drum. This creates friction, which slows and stops the vehicle.
If the brake shoes are not pressing against the surface of the drum, the brakes will not work correctly. You will need to adjust the brakes so that they are pressing against the surface of the drum.
To adjust the trailer brake, you will need:
- A flat head screwdriver
- A Phillips head screwdriver
- A hammer
- A chisel
- A brake latency tester
- A rollaway jack or a bottle jack
- Gloves &
- Safety goggles
If your trailer’s drum brakes are not working properly, there are a few steps you can follow to adjust them.
Step 01. Park Your Trailer Level and Set the Parking Brake:
Before adjusting your trailer’s drum brakes, you need to make sure that it is parked on a level surface. This will ensure that the trailer does not roll away while working on it.
Set the parking brake on your trailer once you have found a level spot. This will help to keep the trailer in place while you are working.
Step 02. Place a Jack Under the Trailer and Raise It:
To adjust the brakes on your trailer, you will need to raise it up. You can do this using a jack.
There are two types of jacks that you can use: a rollaway jack or a bottle jack. A rollaway jack is easier to use, but a bottle jack is more powerful. Whichever type of jack you use, make sure that it is rated for the weight of your trailer.
Once you have chosen a jack, place it under the trailer and raise it until the wheels are off the ground.
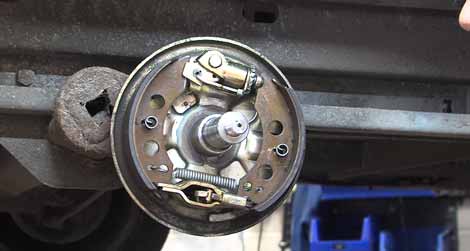
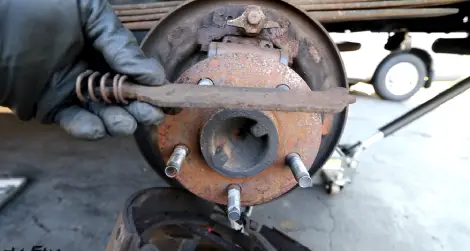
Step 03: Remove the Star Wheel:
Now that the trailer is raised up, you can remove the star wheel. To do this, use a flat head screwdriver to remove the lug nuts from the star wheel.
Once the lug nuts are off, use a Phillips head screwdriver to remove the hubcap. Then use a hammer and chisel to remove the tire from the rim.
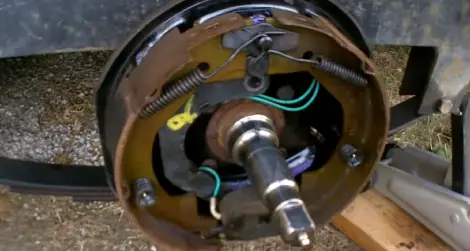
Step 04: Clean the Drum Brake Chamber:
Before adjusting the brakes, you will need to clean the brake drum chamber. To do this, use a wire brush to remove any dirt or corrosion from the surface of the drum.
Step 05: Check the Brake Latency:
The next step is to check the brake latency. This is the time it takes for the brakes to start working after they are applied.
To check the brake latency, use a brake latency tester. This tool measures the amount of time it takes for the brakes to start working. If the brake latency is too high, you will need to adjust the brakes.
Step 06: Loosen the Brake Adjustment Screws:
Now that you have checked the brake latency, you can adjust the brakes. To do this, you will need to loosen the brake adjustment screws.
There are two brake adjustment screws on each brake: a top screw and a bottom screw. Loosen both screws until they are loose enough to move.
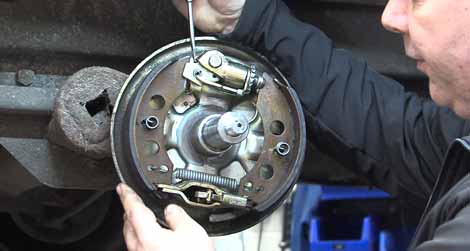
Step 07: Adjust the Brakes:
Once the screws are loose, you can adjust the brakes. To do this, turn the bottom screw clockwise to tighten the brakes. As you tighten the bottom screw, the top screw will loosen.
Continue turning the bottom screw until the brake shoe is pressing against the surface of the drum. Then turn the top screw until it is tight.
Step 08: Recheck the Brake Latency:
After adjusting the brakes, you will need to recheck the brake latency. To do this, use a brake latency tester. If the brake latency is still too high, repeat steps 6-8 until they are within an acceptable range.
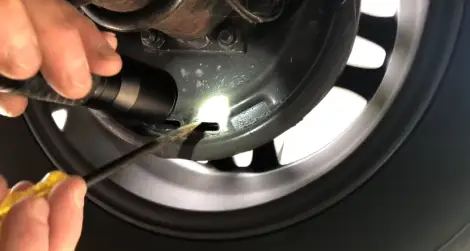
Step 09: Replace the Wheel and Lower the Trailer:
Once the brakes are adjusted, replace the wheel and lower the trailer. To do this, use a jack to raise the trailer up until the wheels are on the ground. Then replace the lug nuts and hubcap, and tighten them securely.
Finally, lower the jack and move your trailer to a safe location.
Now that you know how to adjust the drum brakes on your trailer, you can safely tow your car or boat. Remember to always check the brake latency before towing and adjust the brakes as needed.
Why is it Important to Maintain Your Drums Brakes?
Drum brakes are an essential part of your trailer’s braking system. They are responsible for stopping the wheels from turning, and they need to be appropriately maintained to work correctly.
If you do not maintain your drum brakes, they can become less effective over time. This can lead to longer stopping distances and increased wear on your trailer’s tires.
There are plenty of reasons to maintain your drum brakes that are:
01. Prevents Brake Fade:
When your brakes work harder, they can start to overheat. This can lead to brake fade when the brakes lose their ability to stop the trailer.
02. Keeps Your Tires in Good Shape:
Over time, the continuous use of worn-out brakes can cause excessive wear on your trailer’s tires. This can lead to premature tire failure and increased wear on other parts of your trailer.
03. Helps You Stop in an Emergency:
In an emergency, you will need your brakes to work correctly. If they are not properly maintained, they may not stop the trailer in time.
04. Improves Fuel Efficiency:
When brakes work more effectively, it takes less energy to stop the trailer. This can lead to improved fuel efficiency and reduced wear on your vehicle’s engine.
05. Saves Money in the Long Run:
Properly maintained drum brakes are more effective and last longer than brakes that are not adequately maintained. This means you will need to replace them less often, which can save you money in the long run.
06. Keeps You Safe:
Ultimately, the most important reason to maintain your drum brakes is safety. If your brakes are not working correctly, you may not be able to stop the trailer in time. This can lead to accidents and severe injury.
With so many benefits, it is clear why it is vital to maintain your drums brakes. Moreover, it is easy to do and does not require much time or money.
Common Mistakes When Adjusting Drums Brakes?
There are a few common mistakes that people make when adjusting drums brakes. Here are a few of them:
01. Not loosening the screws enough: One of the most common mistakes is not loosening the screws enough. This can make it difficult to adjust the brakes and can lead to damage to the brake shoe.
02. Turning the screws the wrong way: Another common mistake is turning the screws the wrong way. This can damage the brake shoe and make it difficult to adjust it.
03. Not checking the brake latency: Another mistake is not checking the brake latency after adjusting the brakes. This can lead to problems with stopping your trailer.
04. Not tightening the lug nuts enough: Another mistake is not tightening the lug nuts enough. This can lead to the wheel coming loose and damaging the brake shoe.
05. Adjusting the brakes when they are not needed: Sometimes, people adjust the brakes when not required. This can lead to unnecessary wear on the brake shoe and other brake system parts.
Pro Tips for Adjusting the Drum Brake on Your Trailer
Adjusting the drums brakes on your trailer can be a bit tricky, but with a little practice, you will be able to do it like a pro. Here are a few tips to help you get started:
01. Make sure to loosen the screws enough before adjusting the brakes.
02. Turn the screws in the right direction, or they will damage the brake shoe.
03. Check the brake latency after adjusting the brakes to ensure they are working correctly.
04. Make sure to tighten the lug nuts after adjusting the brakes.
05. Do not adjust the brakes when they are not needed. This can lead to unnecessary wear on the brake shoe and other brake system parts.
06. Practice adjusting the brakes a few times before doing it on the road. This will help you get used to the process and ensure correct.
You will adjust your drums brakes like a pro with a bit of practice. Follow these tips, and you will have safe and effective brakes every time you hit the road.
The Concept of Electric Drum Brakes
Electric drum brakes are brakes that use electrical power to apply the brakes. This can be done either by using an electric motor or a hydraulic system.
These electric brakes have many benefits over other types of brakes. They are easier to maintain, and they offer better stopping power. They are also more energy-efficient and offer a smoother ride.
They are an excellent choice for trailers with a large amount of stopping power. They are also perfect for trailers used frequently or for campers towed in hilly areas.
FAQs
Let’s take a look at some frequently asked questions about adjusting drum brakes:
01. How Often You Should Adjust Your Drum Brakes?
Our recommendation is to re-adjust newly installed brakes after 200 miles of use. Later, brakes should be adjusted every 3,000 miles to ensure that they are engaged correctly. An average drum brake requires adjustment every 10,000 miles or sooner until it needs to be replaced.
02. Are Trailer Drum Brakes Self Adjusting Brakes?
No, they are not self-adjusting. You must manually adjust the brakes to ensure that they are working correctly.
03. How Do I Know If My Drum Brakes Need to be Adjusted?
A few signs indicate that your drum brakes may need to be adjusted. If you notice that your trailer is not stopping as well as it used to, if the brakes are making noise, or if the brake pedal feels softer than usual, it is time to adjust the brakes.
04. How Long Does it Take to Adjust Trailer Brakes?
It is easy to complete the entire adjustment process by yourself, and It usually takes about 30 minutes to adjust the brakes on a trailer. However, this may vary depending on the brake system you are using.
In Conclusion
It’s not always easy to figure out how to adjust drum brakes on a trailer. But, with the right tips and tricks, you’ll be able to make those adjustments in no time at all.
Adjusting your trailer’s drum brakes can be a bit tricky, but with a little practice, you will be able to do it like a pro. By following these tips, you will have safe and effective brakes every time you hit the road.
And remember, practice makes perfect! So don’t be afraid to adjust your brakes a few times before hitting the road. After all, it’s better to be safe than sorry.

