
Last Updated on May 22, 2023
If you’re planning a long road trip with your RV, installing a propane tank can be a game-changer. Propane is essential for cooking, heating, and powering your fridge. However, installing a propane tank is not a task that should be taken lightly.
This process involves taking the necessary precautions, mounting the tank to your RV, and attaching the regulator and pigtails.
Read on to discover everything you need to hook up your propane tank to your RV safely and efficiently, whether you’re a seasoned expert or a complete newbie.
How to Hook Up a Propane Tank to an RV: 3 Easy Steps
A propane tank in your RV is important in preparing your vehicle for a trip. Here’s a step-by-step guide on how to install the propane tank on your RV:
Step 1: Propane Tank Installation Precautions
Propane gas is a highly flammable substance and can pose a significant risk if handled incorrectly. That’s why taking the necessary safety precautions before installing is crucial.
One of the first things you should do is ensure that the area where you’ll be working is well-ventilated. Propane gas can be extremely dangerous if inhaled in large quantities, so keeping the area clear of fumes is vital.
Additionally, it’s important to turn off all appliances and electrical devices in your RV that could create a spark.
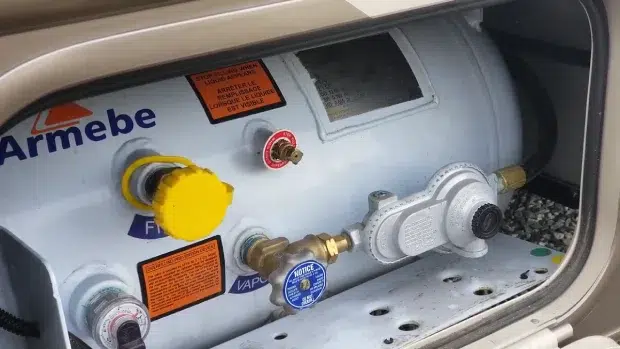
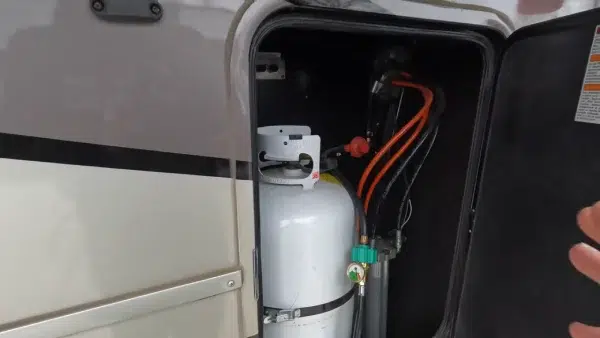
Step 2: Mounting the Propane Tank on Your RV
Once you’ve taken the necessary safety precautions, it’s time to mount the propane tank onto your RV. You’ll need to ensure that it is securely mounted in a safe location that won’t interfere with any other components or accessories on your RV.
Choose a suitable location for mounting the propane tank. It should be away from any heat sources or electrical components that could cause damage to the tank. The most common location for mounting a propane tank is on the tongue of your RV trailer.
Check with your local regulations to ensure that you comply with any laws or codes regarding propane tanks.
Now prepare the area where you will mount the tank by cleaning it thoroughly and removing any debris or rust. This will ensure no interference between the tank and its mounting surface.
Step 3: Attaching the Regulator and Pigtails
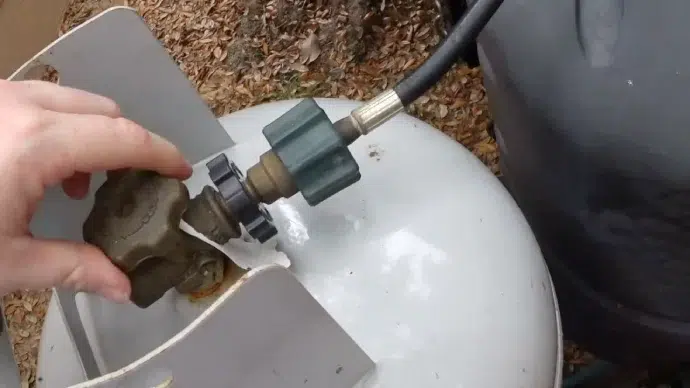
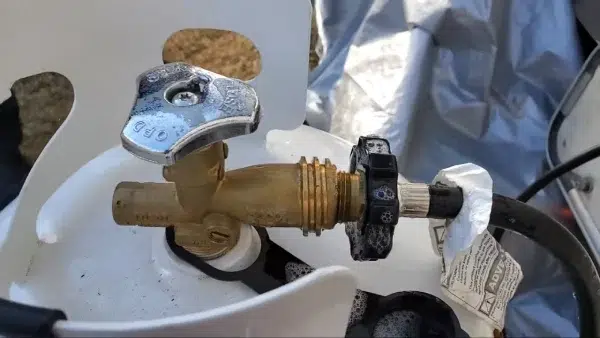
After the propane tank is securely mounted on your RV, attaching the regulator and pigtails is time. This will allow you to control the amount of gas that flows from the tank into your RV’s appliances.
Before attaching the regulator and pigtails, ensure all valves on the propane tank are closed. Then, remove its protective cap and locate the regulator’s inlet connection on top of the propane tank.
Attach one end of each pigtail to the regulator’s inlet connection by screwing them clockwise until they are tight. Make sure not to cross-thread them, as this can cause leaks in your propane system.
The other end of each pigtail should be attached to your RV’s propane system. One pigtail will connect to the high-pressure side of your RV’s propane system, while the other will connect to its low-pressure side. Refer to your RV owner’s manual for specific instructions on these connections’ locations.
You can attach the propane tank regulator as soon as both pigtails are connected. Align its outlet connection with the tank’s valve stem and screw it clockwise until it is tight. Use an adjustable wrench or a specialized tool to ensure a proper seal.
How to Choose the Right Propane Tank for Your RV?
There are a few factors to consider when choosing the right RV propane tank.
Size of the Propane Tank:
First, you must check your RV owner’s manual, which should specify the type and size of propane tank compatible with your vehicle.
The most common types of propane tanks for RVs are 20-pound, 30-pound, and 40-pound cylinders. Your size will depend on how much propane you use and how often you refill the tank.
Remember that larger tanks can be more difficult to transport and store, so make sure you have enough space in your RV before deciding.
Valve Type:
Another important consideration is the valve type. There are two main types of valves: ACME valves and POL valves. ACME valves are commonly used in newer RV models, while POL valves are found in older models. Ensure you choose a tank with the appropriate valve type for your RV.
Quality Of The Propane Tank:
It’s also important to consider the quality of the propane tank itself. Look for tanks made from high-quality materials and certified by organizations like the Department of Transportation (DOT) or Underwriters Laboratories (UL). This will help ensure that your tank is safe and reliable.
Cost:
Don’t forget about the cost of your propane tank. While it may be tempting to go for the cheapest option available, keep in mind that investing in a high-quality tank can save you money in the long run by reducing maintenance costs and ensuring that your system runs efficiently.
Does It Matter Testing a Propane System Hooked Up to An RV?
Once you’ve installed your propane tank, regulator, and pigtails, testing your system to detect potential issues and guarantee everything is functioning correctly is essential. Here are some vital points to consider when testing your propane system.
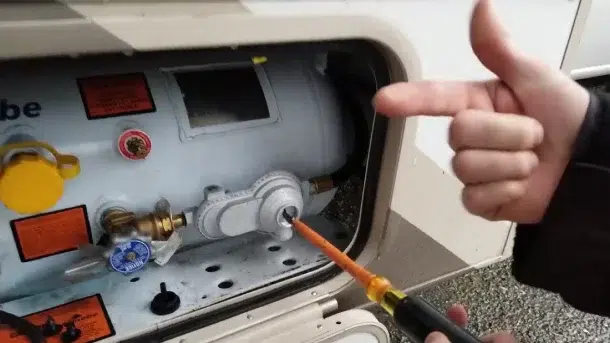
ONE: Checking For Leaks In the System
Before you begin testing for leaks, ensure all appliances are turned off, and no open flames or sparks are nearby. Then, mix a solution of equal parts water and dish soap in a spray bottle.
Using the spray bottle, apply the soapy solution to all connections and fittings in the propane system, including the regulator, pigtails, hoses, and valves. If you see bubbles forming anywhere along these connections, it indicates a leak.
If you do detect a leak, turn off the propane tank valve immediately and tighten or replace any loose or damaged fittings for hoses. It’s also a good idea to have a professional inspect your system if you suspect there may be a leak.
Once you’ve checked for leaks and made any necessary repairs, it’s time to purge the air from the system. You must turn on one of your RV’s gas appliances (such as a stove burner) for several minutes until you can smell gas coming through. Turn off each appliance and repeat until all the air is out.
TWO: Purging the Air from the System
Ensure the safe operation of your propane appliances by purging air from the system before use. If air is not removed, it can cause serious issues during installation or when changing tanks. Don’t take any chances and follow these crucial steps.
To purge the air from your RV’s propane system, follow these steps:
- Turn off all propane appliances: Before purging the air, ensure all propane appliances are turned off. This includes stoves, ovens, water heaters, and furnaces.
- Open the valves: Locate the valve on your propane tank and slowly turn it counterclockwise until it’s fully open. Then, go inside your RV and open all of the appliance valves one at a time until you smell gas coming out. Once you smell gas, close the valve.
- Repeat step 2: Repeat step 2 for each appliance in your RV until you’ve opened and closed every valve.
- Wait a few minutes: After closing all valves, wait a few minutes to allow any remaining air to escape from the lines.
- Test for leaks: Use a propane leak detector or soapy water solution to check for any leaks in your system. If you detect a leak, immediately turn off your propane tank and fix the issue before using your appliances.
THREE: Lighting Up Appliances
If you’re looking to light up your RV appliances, following a few steps to ensure everything is done safely and efficiently is important. Here’s a quick rundown of what you need to know to get started.
- Make sure all propane appliances are turned off before starting the process of lighting them up.
- Turn on the propane tank valve and check for any leaks in the system. You can do this by using a propane leak detector or spraying soapy water around the connections and watching for bubbles.
- Once you’ve confirmed no leaks, open the appliance valve and light it up according to its specific instructions. This may involve holding down a pilot light button until it ignites or pressing an ignition switch.
- Monitor the flame closely to make sure it’s burning blue and steady. If it’s flickering or yellow, this could indicate incomplete combustion, which can produce carbon monoxide, a dangerous gas.
- If you’re using an oven or stove, let it heat up for a few minutes before cooking anything. This will help ensure even heating and prevent food from burning.
- When you’re finished using your propane appliances, turn them off and close the propane tank valve.
How to Maintain Your RV’s Propane System?
Maintaining your RV’s propane system is crucial to ensure safe and efficient operation. Regular inspection of fittings and hoses is recommended to identify any signs of wear or damage.
#1. Regular Inspection of Fittings and Hoses
To ensure the safe and efficient operation of your RV’s propane system, it is essential to conduct regular inspections of fittings and hoses. Over time, these components can become worn or damaged, leading to gas leaks or appliance malfunctions.
To begin your inspection, check all visible fittings and hoses for any signs of wear or damage. Look for cracks, tears, or abrasions on the hoses and make sure that all fittings are securely attached to the tank and appliances.
Next, test the connections by applying soap and water to each fitting. If you see bubbles forming around a connection, this indicates a gas leak. In this case, turn off the propane supply immediately and tighten the fitting before testing again.
It is also important to check for any loose connections throughout your propane system. Use a wrench or pliers to tighten any loose nuts or bolts that may be present.
#2. Replacing Old or Damaged Parts
Inspect hoses, fittings, regulators, and valves regularly to prevent leaks and other hazards. Hoses should be replaced every five years or sooner if there are any signs of wear and tear, such as cracks or leaks.
Fittings should also be inspected for corrosion or damage and replaced as necessary.
Regulators are an important component of the propane system as they control gas flow from the tank to the appliances. It may be time to replace the regulator when your appliances are not receiving enough gas or a strong gas odor.
Valves should also be checked periodically for proper operation and replaced if they become difficult to turn or show signs of leakage.
It is important to use only high-quality replacement parts that are compatible with your RV’s propane system. Using inferior parts can lead to leaks, fires, and other safety hazards.
#3. Cleaning the Propane Tank
Cleaning your RV’s propane tank is crucial to propane system maintenance. Without proper cleaning, the accumulation of dirt, debris, and rust can lead to issues within the system. Follow these steps to effectively clean your propane tank:
- Turn off the propane supply: Before you start cleaning the propane tank, ensure the propane supply is turned off. This will prevent any gas from escaping while you are cleaning.
- Remove the tank from your RV: The first step in cleaning your propane tank is to remove it from your RV. You can do this by disconnecting the regulator and pigtails from the tank and then carefully lifting it out of its mounting bracket.
- Drain any remaining propane: Once you have removed the tank from your RV, drain any remaining propane. To do this, turn on one of your RV’s propane appliances and let it run until all of the gas has been used up.
- Clean the interior of the tank: To clean the interior of your propane tank, fill it with warm water and a small amount of dish soap or vinegar. Let this mixture sit in the tank for several hours before draining it out completely.
- Rinse thoroughly: After draining out all soapy water solution from inside, rinse thoroughly with water multiple times until no soap residue remains inside.
- Clean the tank’s exterior: After draining any remaining gas, use a damp cloth or sponge to clean the exterior of the propane tank. Use mild soap if necessary, but avoid harsh chemicals that could damage or corrode the metal surface.
- Dry completely: After rinsing the tank, let it dry completely before mounting it back onto your RV.
Are BBQ Propane Tanks Compatible With RVs?
It is good news that they are compatible with RVs, provided that the size is appropriate. Most BBQ grills require a 20-lb propane tank, which happens to be the same kind used by travel trailers and certain fifth wheels.
This means you can easily swap out tanks between your grill and RV. However, safety is key, so make sure your propane tank is properly secured and stored during transportation to avoid any potential hazards.
And as always, it’s best to consult your RV owner’s manual for any specific guidelines or restrictions on propane usage. With these precautions in mind, cooking with a BBQ propane tank in your RV can bring a new level of convenience and versatility to your outdoor meals.
Is a 20lb Propane Tank Enough to Power a Camper For a Long Time?
A standard 20-pound propane tank, with a capacity of 5 gallons (or 4.7 gallons actual), can last for a period ranging from three to seven days while boondocking in an RV. The number of propane-dependent components in the camper, such as the furnace, refrigerator, water heater, and cooktop, influences propane tank efficacy.
Essentially, using these components frequently can cause the propane tank to deplete quickly. Thus, while a 20lb propane tank can be an adequate power source for a camper, its longevity depends on how much it is used to energize these components.
Therefore, it is imperative to consider the propane consumption rate and the specific requirements of the camper before determining if a 20lb propane tank can power it for an extended period.
Check Your Propane System Before Hitting the Road
As you end up hooking up your RV’s propane tank, you may feel a mix of excitement and caution. After all, you’re looking forward to enjoying the warm comfort of your RV while exploring the great outdoors, but you want to ensure you’ve taken all necessary safety precautions.
Choosing the right tank and installing it correctly are important steps, but they’re not the only ones. Pre-testing your propane is essential for peace of mind, and regular maintenance will keep you safe and cozy on future trips.
With these tips in mind, you can confidently hit the road, knowing you’ve got everything you need for a successful camping adventure.

