Last Updated on May 4, 2023
If you’re a seasoned RVer, you know that having reliable power on the road is key to a comfortable and functional trip.
Solar energy is a great option for powering your RV’s electronic devices and appliances without relying on traditional power sources. Hooking up solar panels to your RV’s battery is fairly straightforward.
Before you start, you’ll need to gather the necessary tools and materials, including solar panels, mounting brackets, wires, a charge controller, and a battery monitor.
Once you have these items, you can mount the solar panels on your RV’s roof using the brackets. Be sure to choose a sunny spot on your roof that will maximize sun exposure.
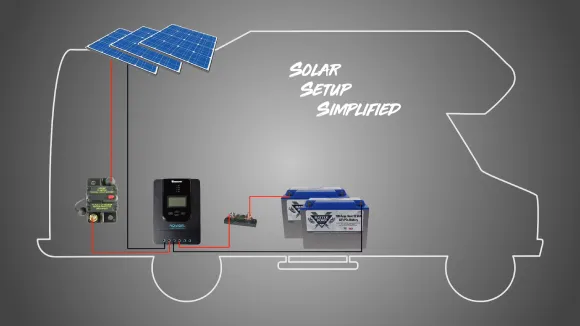
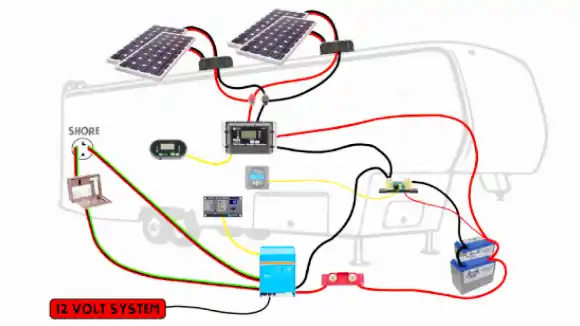
If you have multiple solar panels, you’ll need to wire them together in either series or parallel. Once you’ve mounted your solar panels and wired them together, you must connect them to your RV batteries using a charge controller.
Let us show you how easy it is to connect solar panels to a set of RV batteries in detail.
How to Hook Up Solar Panels to RV Batteries: 3 Steps
Ready to go green and harness the power of Mother Nature? Installing solar panels onto your RV battery is easier than you may think. Discover how with this simple step-by-step guide.
Gather the Necessary Tools and Materials
You must gather the necessary tools and materials to connect solar panels to RV batteries. Here is a list of items you will need:
- Solar panels: The number of solar panels needed depends on the size of your RV. It’s important to choose high-quality solar panels that are durable and efficient.
- Mounting brackets: You’ll need brackets to secure the solar panels to your RV roof. Make sure the brackets are sturdy enough to withstand wind and weather conditions.
- Wires: You’ll need wires to connect the solar panels to each other and to the charge controller. Use high-quality wires that are designed for outdoor use.
- Charge controller: The charge controller regulates the energy flow from the solar panels to the batteries. Choose a controller that works with your RV battery type (AGM, flooded, or gel) and has enough capacity for your power needs.
- Battery monitor: A battery monitor lets you track your battery’s health and charge level. This is especially important if you plan on using your solar-powered RV system for extended periods of time.
- Tools: You’ll need basic tools such as a drill, screwdriver, wire cutters, and pliers. You may also need a multimeter for testing electrical connections.
Once you have gathered all the necessary tools and materials, you can begin installing solar panels on your RV roof. Follow manufacturer instructions carefully and take safety precautions such as wearing gloves and safety goggles.
Mount the Solar Panels on the RV Roof
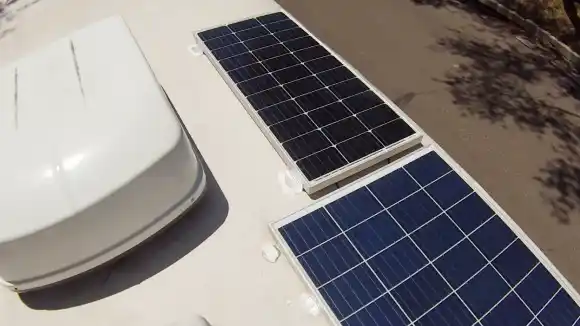
Mounting your RV’s solar panels is crucial in setting up your solar-powered system. Here are some important things to keep in mind when mounting your solar panels:
1. Choose the right location: The first step is to choose the best location for your solar panels. Ideally, you want to mount them on a flat surface that receives maximum sunlight throughout the day. Avoid areas that are shaded by trees or buildings.
2. Use appropriate mounting hardware: Once you have identified the ideal location, you need to use appropriate mounting hardware to secure the panels to your RV’s roof.
Different types of mounting hardware are available, including brackets and clamps, so make sure you choose one compatible with your solar panel and RV roof.
3. Ensure proper alignment: Proper alignment is key to maximum efficiency. Make sure they face the sun directly and are tilted at an angle that corresponds with your latitude.
4. Seal all penetrations: When installing any equipment on your RV’s roof, it’s essential to ensure no leaks or penetrations allow water to enter inside. Therefore, it’s crucial to seal all penetrations using appropriate sealants or caulking materials.
5. Consider wind resistance: Your solar panels should be mounted securely enough to withstand strong winds while driving down the highway. You can use additional braces or supports for added stability.
Wiring Multiple Solar Panels in Series or Parallel
When wiring multiple solar panels in your RV, you have two options: wiring them in series or parallel. Your chosen method will depend on your power needs and the type of solar panels you have.
Wiring in Series
Wiring solar panels in series means connecting the positive (+) terminal of one panel to the negative (-) terminal of another panel. This creates a chain that increases the voltage output while keeping the amperage constant.
For example, if you have two 12-volt solar panels with an output of 5 amps each, wiring them in series will give you a total voltage output of 24 volts and an amperage output of 5 amps. This is ideal for charging 12-volt batteries, as they require a higher voltage than what a single panel can provide.
To wire solar panels in series, follow these steps:
- Use a connector or wire to connect one panel’s positive terminal to another’s negative terminal.
- Repeat this process until all panels are connected.
- Connect the remaining positive terminal to your charge controller’s positive input and connect the remaining negative terminal to your charge controller’s negative input.
Wiring in Parallel
Wiring solar panels in parallel means connecting all positive and negative terminals together. The chain increases amperage output while keeping the voltage constant.
For example, if you’ve got two 12-volt solar panels with 5 amp outputs, wiring them parallel will produce 12 volts and an amperage output of 10 amps. This is ideal for directly powering appliances or charging devices requiring high amperage.
To wire solar panels in parallel, follow these steps:
- Connect all positive terminals together using a connector or wire.
- Connect all negative terminals with a wire or connector.
- Connect the positive and negative terminals to your charge controller’s positive and negative inputs.
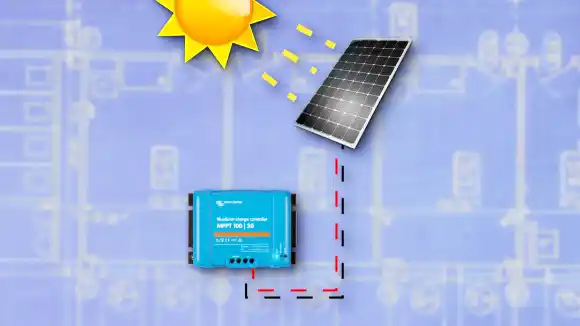
Connect the Solar Charge Controller to the Batteries
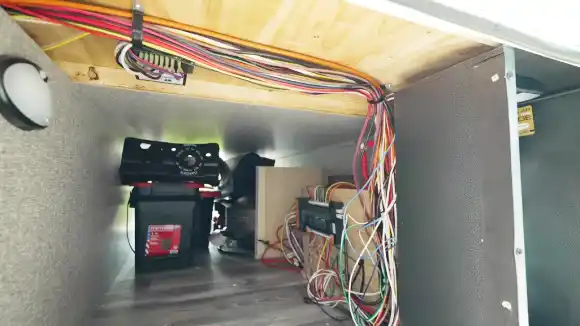
After wiring your solar panels either in series or parallel, you need to connect the charge controller to your RV batteries. This will allow the charge controller to regulate the flow of electricity and ensure that your batteries are not overcharged or damaged.
You will need a few tools and materials to connect the solar charge controller to your RV batteries. These include:
- Solar charge controller
- Battery cables (with appropriate connectors)
- Wire strippers/crimpers
- Screwdriver or drill (depending on mounting method)
Once you have gathered your materials, follow these steps:
- Locate a suitable location for the solar charge controller. It should be close to the batteries and easily accessible for monitoring and maintenance.
- Mount the solar charge controller using screws or other appropriate hardware.
- Connect the battery cables to the appropriate terminals on both the solar charge controller and battery bank. Be sure to match positive (+) with positive (+) and negative (-) with negative (-).
- Use wire strippers/crimpers to strip about ¼ inch of insulation from each wire end before connecting them.
- Once all connections are made, test your system by turning on your RV lights or other electrical devices powered by your batteries.
It’s important to note that different types of RV batteries may require different charging profiles, so it’s essential to select a solar charge controller that is compatible with your specific battery type.
What Should You Do to Maintain Your Solar-Powered RV System
Once you have successfully installed your solar panels on your RV and connected them to the batteries, it is important to maintain your system to ensure it continues to function properly. Here are some key maintenance tasks to help keep your solar-powered RV system in shape.
Cleaning and Maintaining Solar Panels:
Regular cleaning of your solar panels is essential for maintaining their efficiency. Dirt, dust, and debris can accumulate on the surface of the panels and reduce their ability to absorb sunlight.
Use a soft-bristled brush or sponge and a mild detergent solution to clean your solar panels.
Avoid using abrasive materials or harsh chemicals that could damage the panel surface. Rinse thoroughly with water and allow the panels to dry completely before reconnecting them to the system.
Checking Battery Water Levels:
If you have flooded lead acid batteries in your RV, checking their water levels regularly is important. Low water levels can cause irreversible damage to the batteries and shorten their lifespan.
Check the water levels at least once a month and add distilled water as needed. Be sure not to overfill the batteries, as this can cause electrolyte overflow.
Monitor Battery Health and Charge Level:
Monitor battery health and charge level to ensure optimal performance from your RV battery bank, and monitor their health regularly. Use a digital voltmeter or battery monitor to check each battery’s voltage level individually.
If one battery has a significantly lower voltage than the others, it may be failing or damaged and needs replacement.
Also, monitoring the charge level is crucial for ensuring enough power is stored in your batteries for when you need it most. Many solar charge controllers have digital displays showing the current charging status and battery voltage levels.
Troubleshooting Common Issues with RV Solar Systems
There are a few common problems you can run into with RV solar systems. Fortunately, most of these problems can be easily identified and resolved with a bit of troubleshooting. Here are some steps you can take to troubleshoot your RV solar system:
Identifying Faulty Components
One of the most common issues with RV solar systems is identifying faulty components. This can include a malfunctioning solar panel, charge controller, or battery. It’s important to regularly check your system for any signs of damage or malfunction.
One way to identify faulty components is to visually inspect your solar panels and wiring for any physical damage, such as cracks, breaks, or loose connections. If you notice any damage, it may be necessary to replace the damaged component.
Another way to identify faulty components is by monitoring your battery’s charge level and health. A healthy battery should maintain a steady charge level and not experience significant voltage drops.
If you notice that your battery is not holding a charge or experiencing significant voltage drops, it may be time to replace it.
Testing Electrical Connections
To ensure that your RV solar system works efficiently, it’s important to test the electrical connections regularly. This will help you identify any faulty components and prevent potential damage to the system.
To test the electrical connections, you’ll need a multimeter. A multimeter is a tool that measures voltage, current, and resistance in an electrical circuit. Here are the steps to follow:
- Turn off all power sources: Before testing any electrical connections, ensure all power sources are turned off. This includes disconnecting the RV from shore power and turning off any generators or inverters.
- Set up the multimeter: Set your multimeter to measure DC voltage. Make sure that the red probe is connected to the positive (+) terminal of the battery and the black probe is connected to the negative (-) terminal.
- Test each connection: Start by testing each connection individually. Touch the probes of your multimeter to each connection point and check for a reading on your multimeter display. A healthy connection should read between 12-14 volts.
- Check for voltage drops: If you notice a significant drop in voltage between two points, this could indicate a poor connection or damaged wire. Check for loose or corroded connections and replace any damaged wires to troubleshoot this issue.
- Test overall system voltage: After testing each individual connection point, test the overall system voltage by touching your probes to both terminals of your battery bank at once. The reading should be between 12-14 volts for a healthy system.
Replacing Damaged Equipment
After installing your solar panels and RV battery, regularly checking for any damaged equipment is important. If you notice any issues with your solar-powered RV system, it’s crucial to replace the faulty components as soon as possible to avoid further damage.
One common issue with solar systems is a malfunctioning charge controller. The charge controller regulates the amount of power that goes into the battery and prevents overcharging.
If your batteries are not charging properly or getting too hot, it may be time to replace the charge controller.
Another component that may need replacing is the inverter. The inverter converts DC power from the battery into AC power for your appliances. If you notice that your appliances are not receiving enough power or are not working at all, it could be due to a faulty inverter.
When replacing damaged equipment, it’s important to choose high-quality parts that are compatible with your system. Consult your manufacturer’s instructions or seek advice from a professional if you’re unsure about which parts to purchase.
Once you have obtained the necessary replacement parts, turn off all power sources before beginning any repairs. Follow the manufacturer’s instructions carefully and take extra precautions when working with electrical components.
How Many Solar Panels do You Need for Your RV?
To ensure that your RV’s electrical needs are met and your batteries are adequately charged, it is recommended to have a minimum of 600 watts of solar panel power if you have between 200 to 250 Amp Hours (AH) of battery storage capacity.
This calculation is based on the general rule of requiring 300 watts of solar panel power for every 100 Amp Hours of battery storage capacity.
Whether you have two 12-volt batteries or any combination of batteries that adds up to a total of 200 to 250 AH, having a solar panel output of at least 600 watts will provide sufficient power even during times when external sources of power are unavailable.
What type of solar panels are best for RV use?
Monocrystalline solar panels are ideal for RV use due to their high efficiency and ability to generate more power in limited space. They are also known for their durability and superior performance in challenging lighting conditions, which is essential when on the road.
Furthermore, monocrystalline panels offer a sleek and visually appealing appearance, which is imperative for RV owners who prioritize the overall look of their vehicle.
Since managing weight is a critical consideration for RV owners, the lightweight characteristics of monocrystalline panels make them even more attractive.
Also, these panels have a longer lifespan and require less maintenance compared to other types of solar panels, making them a practical and economical choice for RV use.
Harness the Sun’s Energy: Go Off-Grid Adventuring with Solar Power for Your RV
Hooking up solar panels to your RV batteries can be a great way to power your adventures off the grid. This process involves assessing your power needs, selecting the appropriate solar panel and battery, gathering the necessary tools, and installing the solar panels on your RV roof.
Maintaining your solar-powered RV system by cleaning and maintaining your solar panels, checking battery water levels, and monitoring battery health and the charge level is important.
By following these steps for preparing, installing, maintaining, and troubleshooting your RV solar system, you can ensure that you have a reliable power source on all of your outdoor adventures. So go ahead and hit the road confidently, knowing you have harnessed the sun’s power to fuel your travels.

