
Last Updated on February 9, 2022
The installation process of a kicker motor bracket is not always straightforward, and if you’re not careful, it’s easy to make mistakes that will lead to problems down the line.
Therefore knowing how to install a kicker motor bracket in the right way is essential for anyone. Installing a kicker motor bracket is both an art and a science, so it’s not something you want to do without the proper preparation.
This article will go through the steps of installing an outboard motor bracket so that your installation goes smoothly and without any issues. We’ll also give you some tips for avoiding common pitfalls along the way!
How to Install a Kicker Motor Bracket – Step-By-Step Procedures
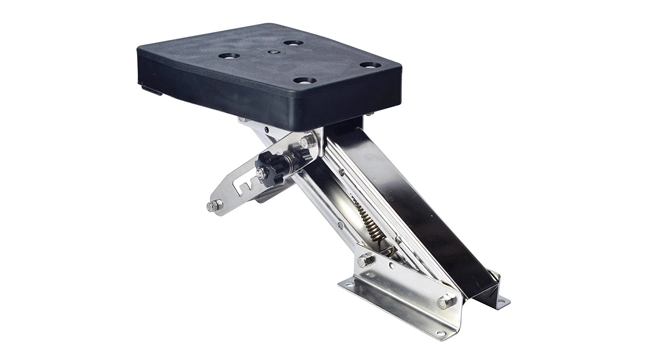
A kicker motor bracket is a popular and essential part of any outboard. It’s designed to hold the engine in place while it’s being worked on, without putting pressure on the kicker motor mounts or other parts that the weight could damage.
Most kickers are commonly mounted on the starboard side of the transom mounted sailboat rudder to facilitate easier tiller steering and throttle control while slow-trolling or slow-landing.
The brackets are usually installed before an engine has been removed from a boat, and they should always be used when you’re lifting out something heavy like an engine because they distribute the weight and prevent damage to your boat chassis.
The steps outlined below are what you need to do to install the bracket properly, but the first step is to have the necessary tools for the job. Installing a kicker motor requires you to have some essential tools also, such as:
- Kicker bracket kit
- Tape measure
- Shop rag
- Wrench set
- Razor-blade
- Permanent marker
- Drill motor
- Bit set
- Marine-grade adhesive
The installation processes are:
Step 1. Horizontal Measure
Once you have your tools, you first want to measure the horizontal distance between the cockpit sole and the transom. This will let you know how much material you need to cut for your kicker bracket’s beam.
Step 2. Vertical Measurement
Next, you’ll want to measure the vertical distance from the bottom of your hull to the top of the engine’s engine mount. Mark where you need to cut your main outboard motor bracket chassis with a permanent marker so that everything lines up when installed.
Step 3. Mark and Drill
You’ll need to mark where your screws will go on the bracket. You want to be sure that they’re far enough away from the tubing so that your motor doesn’t rub against it when it’s tilted up.
Once you’ve marked the screw holes, use a bit drill to make pilot mounting holes for your screws. You want to make sure that they will hold tightly in place when installed, so using a drill motor bit set with small bits will be necessary here.
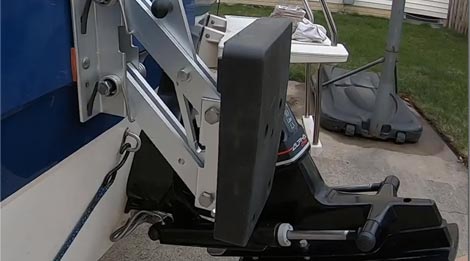
Step 4. Assemble Your Bracket

Your next step after drilling is to assemble your bracket. You can do this by following the directions on your specific motor mounting kit.
After assembling, you can attach one end to the transom and tighten it down. Ensure that your bracket is flush against the bottom of your boat’s hull for this step.
You might need an extra set of hands or a pry bar to hold everything in place while you’re tightening the bolts on the other side.
Step 5. Check for Adjustments
Make sure that the bracket looks level and flush against your hull before moving on to the next step! If it isn’t in the proper position, you can adjust it until it is.
This might take a little time and patience, but you’ll want to figure this out early so that you don’t make any mistakes when you’re ready to move on.
Step 6. Drill the Transom
You’ll need to drill your transom for your hardware, just like you did with the bracket itself in the previous step.
Measure out where everything will go and mark it with a permanent marker before drilling. Be sure that your mounting holes are big enough to have room for your hardware.
You can insert the mounting hardware and tighten it to secure everything. Once it’s all tightened down, sit back and admire your new bracket!
Step 7. Be Safe
Make sure that everything is securely fastened before using it on the water. You’ll want to check all of the connections periodically, too, so that you can be sure nothing is going to come loose.
Step 8. Mount the Motor
Your final step is to mount the motor in place and secure it tightly with screws that will hold fast to prevent slipping or damage. We recommend using marine adhesive only on the transom and not where the bracket meets the hull.
That’s it! Now you know how you can install an outboard motor bracket and save yourself some money in labor fees at your local marina or boat dealer. Follow these steps, and you’ll be out on the water quickly and safely with less chance of damage to your vessel.
Tips for a Successful Installation
Installing a kicker bracket can be a daunting task. If you want to install a kicker bracket, there are a few tips you will need to know:
01. Mounting holes: Be sure that the holes for mounting your motor bracket on the transom and transom are correct and in line.
02. Outboard motor bracket positioned correctly: Be sure that the outboard tiller motor bracket is positioned correctly under your boat.
03. Read mounting instructions properly: Before you start your installation, it is best to read thoroughly the instructions provided with the kit.
04. Use stainless steel hardware: You should use stainless steel hardware, which is corrosion-resistant and resists rust.
05. Re-tighten your hardware: After a few hours of use, you should re-tighten the mounting clamp to prevent any loosening & think about using an aluminum plate for the backing plate.
06. Choose the right size boat bracket: If you are using a powerboat, make sure that you choose an adjustable outboard motor bracket suitable for your boat.
Last Thaught
It’s essential to invest in a suitable motor bracket, which will be worth the investment. You’ll want to take your time installing one, especially if you’re not sure where you should drill holes for mounting hardware.
The better quality brackets are stainless steel for the backing plate, which resists rust and corrosion. They also come with an aluminum plate backing that prevents loosening or damage over time.
With the help of this article, we hope that installation becomes less daunting and more rewarding!

