Last Updated on May 13, 2023
As an RV owner, you know that proper maintenance is key to ensuring a smooth and stress-free trip. One of the most essential parts of your RV’s plumbing system is the holding tank valves and cables.
Over time, they can become stiff and difficult to operate, leading to unpleasant odors and messy backups. But how to lubricate rv holding tank valves and cables with ease?
To lubricate RV holding tank valves, you must close the valve, clean it, and apply lubricant. Then open and close the valve again to check for leaks.
For lubricating RV holding tank cables, locate their connections, clean them with a cloth or brush, and then apply lubricant. Be sure to work in the lubricant by moving the cable back and forth until fully saturated.
Here, we will walk you through everything you need about lubricating RV holding tank valves and cables so you can confidently hit the road on your next adventure.
Guides on How to Lubricate RV Holding Tank Valves and Cables
While lubricating your RV holding tank valves and cables is an important part of regular maintenance, it’s also fairly simple. Just follow these steps:
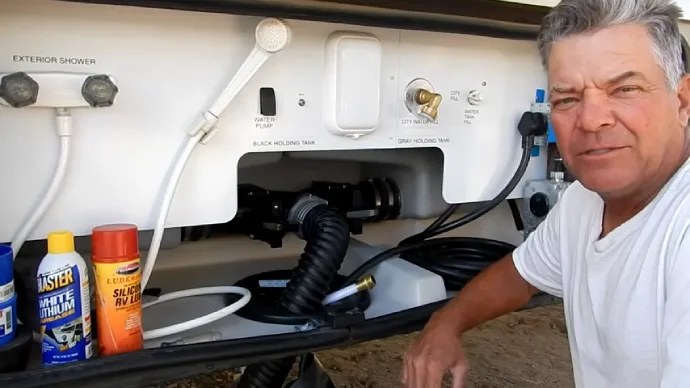
Materials Needed for Lubrication Process
You will need a few materials to properly lubricate your RV holding tank valves and cables. Using the right products and tools is important to ensure the process is effective and safe.
- Silicone spray lubricant: This type of lubricant is recommended for RV holding tank valves and cables because it does not attract dirt or debris, which can cause damage over time. It also dries quickly, reducing the risk of dripping or splattering.
- Lithium grease: This type of grease is recommended for cable systems because it provides long-lasting protection against rust and corrosion. It also has a high melting point, making it suitable for use in high temperatures.
- Rubber gloves: To protect your hands from any potential mess or exposure to chemicals during lubrication.
- Wrench: Depending on your RV model, you may need a wrench to remove the valve cap or access the cable system.
- Spray nozzle: A spray nozzle helps to control the flow of silicone spray lubricant and prevents overspray.
- Rags or paper towels: These are useful for cleaning up any excess lubricant or wiping down surfaces before applying lubricant.
Once you have gathered all of your materials and tools, it is time to prepare for the lubrication process. Before beginning any work on your RV’s waste management system, it is important to take proper safety measures. This includes wearing gloves and safety glasses to protect yourself from any potential hazards.
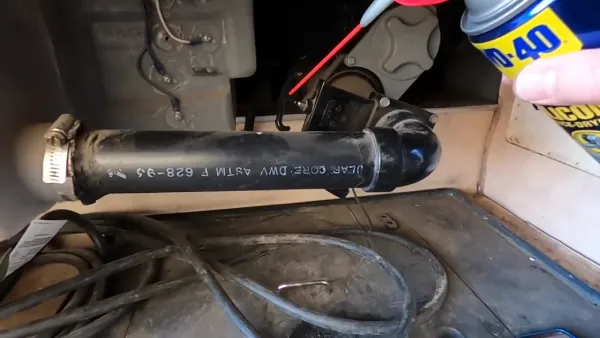
Lubrication Process for Black Water Tank Valve
Over time, debris and waste can accumulate on the valve, causing it to stiffen up and become difficult to operate. This can lead to leaks and unpleasant odors inside your RV. The first step is locating the valve itself, typically near the bottom of the holding tank. Once you have located it, follow these steps:
1. Close the valve: Before beginning any work on your RV holding tank, it’s important to ensure that all valves are securely closed. This will prevent any accidents or spills from occurring during the lubrication process.
2. Clean the valve: Use a soft-bristled brush or cloth to remove debris or waste around the black water tank valve. Wear gloves and protective clothing during this step, as waste materials can be hazardous.
3. Apply lubricant: Using a recommended lubricant such as silicone spray or petroleum jelly, apply a thin layer of lubricant around the edges of the black water tank valve. Be sure to cover both sides of the valve thoroughly.
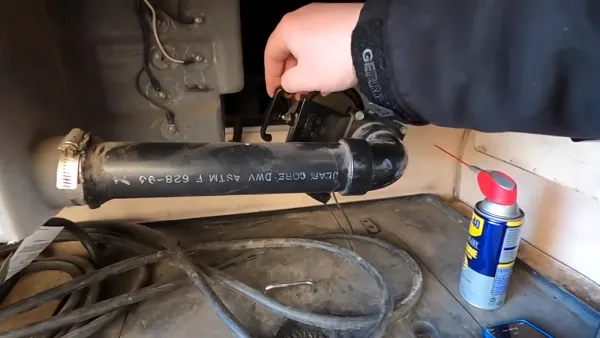
4. Open and close the valve: After applying lubricant, open and close the black water tank valve several times to distribute it evenly over its surface area. This will help ensure that it moves smoothly when in use.
5. Check for leaks: Once you have completed these steps, check for any leaks or drips around the black water tank valve area before reusing your RV’s waste disposal system.
Lubrication Process for Gray Water Tank Valve
You need to follow specific steps for each component to lubricate your RV holding tank valves and cables. This section will discuss the lubrication process for the gray water tank valve.
Before starting the lubrication process, ensure you have all the necessary materials and tools. For this task, you will need a recommended product such as silicone spray or WD-40, a pair of gloves, and a wrench or pliers.
Step 1. Locate the gray water tank valve on your RV. It is usually located near the rear tires on the driver’s side. Once you have found it, wear gloves to protect your hands from dirt or debris.
Step 2. Use a wrench or pliers to loosen the bolts that hold the valve in place. Be careful not to damage any surrounding components while doing so. After loosening the bolts, remove the valve cover by sliding it off.
Step 3. Now that you can access the valve mechanism, apply a generous amount of lubricant around its seals and moving parts. Make sure to cover all areas thoroughly for maximum effectiveness.
Step 4. After applying lubricant, slide the valve cover back onto its position and tighten up the bolts using your wrench or pliers. Ensure that they are tight enough but not too tight, as this can cause damage to other components.
Step 5. Test whether the gray water tank valve has smooth movement by opening and closing it several times. If there is still resistance when opening or closing it after lubrication, repeat these steps until it moves freely.
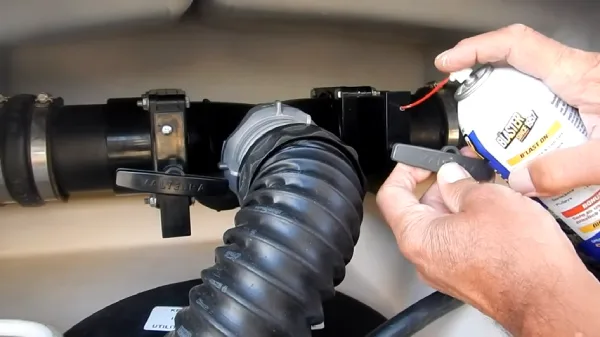
Lubrication Process for Cable System
The cable system controls the valves’ opening and closing, allowing waste to flow out of the tanks. Over time, debris and grime can accumulate on the cables, causing them to become stiff and difficult to move. This can lead to valve malfunctions and even damage to the entire system.
Here are some step-by-step instructions for lubricating your cable system:
1. Locate the cable connections: Locate where the cables connect to the valves. You may need to crawl under your RV or remove some panels to access them.
2. Clean the cables: Before applying any lubricant, clean off any dirt or debris accumulated on the cables using a rag or brush.
3. Apply lubricant: Apply a generous amount of RV-specific cable lubricant onto the exposed length of each cable by spraying it directly onto them or by using a brush applicator.
4. Work in the lubricant: Move each valve handle back and forth several times to work in the lubricant and ensure it reaches all parts of the cable.
5. Wipe off excess lubricant: Use a clean rag to wipe off any excess lubricant from both ends of each cable connection.
6. Test your valves: After completing this process, test your valves by pulling their handles back and forth several times to ensure they move smoothly without any stiffness.
Why lubricating your RV holding tank valves and cables is important?
Keeping your RV holding tank valves and cables lubricated is an essential maintenance task that should not be overlooked. Over time, these components can become stiff or stuck, making it difficult to empty your tanks properly.
One of the main benefits of lubricating RV holding tank valves and cables is that it prevents sticking. When these components are not properly lubricated, they can become stiff or even rusted. This can make it difficult to open or close the valves, which means that you may not be able to empty your tanks fully.
In some cases, this can lead to backups and other issues that are both unpleasant and potentially expensive to fix.
Another benefit of lubricating your RV holding tank valves and cables is that it extends their lifespan. When these components are allowed to dry out or become corroded, they are more likely to break down over time.
RV Holding Tank Valves and Cables: Tips for Maintaining Proper Function
Proper RV holding tank valves and cable maintenance is essential to ensure proper functioning. Here are some tips to help you maintain the functionality of the valves and cables in your RV holding tank:
- Keep the tanks clean: Regularly cleaning your black water and gray water tanks will prevent debris from building up in the valves and cables, which can cause them to malfunction.
- Use recommended lubricants: Always use recommended lubricants for your RV holding tank valves and cables. Using the wrong type of lubricant can cause damage to the valves and cables, leading to costly repairs.
- Inspect regularly: Inspect your RV holding tank valves and cables regularly for signs of wear and tear or damage. If you notice any issues, address them immediately before they worsen.
- Operate valves properly: Properly operating your RV holding tank valves is crucial to their longevity. Do not force them open or closed, as this can cause damage.
- Avoid harsh chemicals: Avoid using harsh chemicals when cleaning your tanks, as they can damage the seals in the valves and cables.
By following these tips, you can ensure that your RV holding tank valves and cables remain functional for a long time, reducing the need for costly repairs or replacements.
How often should you lubricate your RV holding tank valves and cables?
To maintain the proper functioning of your RV holding tank valves and cables, it is important to lubricate them regularly. But how often should you do this? The answer depends on several factors.
You need to consider the frequency of use of your RV. If you use it frequently, you may need to lubricate the valves and cables more often. On the other hand, if you only use your RV occasionally, lubricating once or twice a year might be sufficient.
Consider the type of environment in which you use your RV. If you frequently travel in dusty or dirty areas, debris can accumulate on the valves and cables over time, making them stiff and difficult to operate. In such cases, it is recommended that you lubricate them more often.
Watching for any signs of wear and tear on your valves and cables is important. If they are starting to show signs of damage or corrosion, then it may be time to replace them rather than just lubricating them.
How can you prevent lubricant buildup on the valves and cables?
Keeping your RV’s holding tank valves and cables properly lubricated is essential for optimal performance. But, over-lubricating your valves and cables can accumulate dirt and debris, causing more harm in the long run.
Therefore, applying lubricants sparingly and wiping away any excess with a clean and dry cloth is crucial. You can also use specialized lubricants formulated to resist dirt and debris build-up. By following these steps, you can ensure the smooth operation of your RV’s valves and cables.
What if my valves or cables are already damaged or stuck?
RV holding tank valve and cable damage or stiffness can sometimes occur if they haven’t been properly maintained over time. If you notice significant damage or stiffness that cannot be resolved with lubrication, it’s best to replace the affected components.
Replacing these components may be a complex and messy process, requiring specialized tools and knowledge. Therefore, consulting with a professional RV technician who can carry out repair or replacement tasks safely and efficiently is recommended.
Doing so ensures your RV’s holding tank valves and cables are working optimally and avoid further damage or inconvenience.
Keep Holding Tank Valves and Cables Lubricated and Inspected Regularly
Lubricating your RV holding tank valves and cables is crucial to maintaining your vehicle’s sanitation system. Not only does it prevent sticking valves and cables, but it also extends the lifespan of your tanks and valves.
With the various lubricant options available, including dry and wet lubricants, there is something for everyone’s preference.
Before starting the job, it is essential to ensure that you take all necessary safety precautions and gather the required supplies. This includes protective gear like gloves and goggles.
Once you have accessed the valve assembly, applying dry or wet lubricant to the valves and cables is a straightforward process that can be easily achieved with step-by-step instructions.Regular inspection of valves and cables is essential to maintain your RV holding tanks and valves properly. Also, proper disposal of contents in tanks will go a long way in preventing clogs that could lead to expensive repairs.

