
Last Updated on April 20, 2023
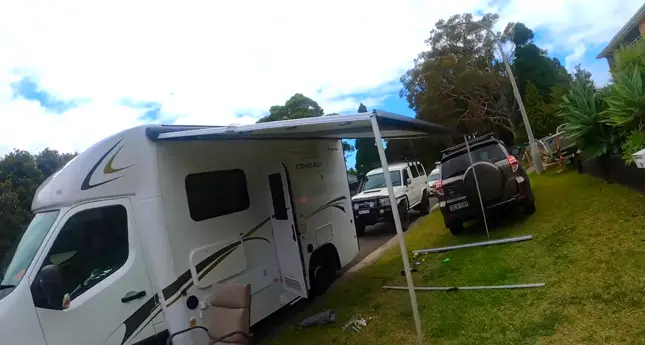
When camping or RVing, strong winds can quickly ruin a peaceful day. If your awning is flapping in the wind, the noise may be too loud and tear the awning itself.
Perhaps you do not know how to stop motorhome awning flapping. Here we discuss the detailed tips and tricks for stopping caravan awning movement. So keep reading to get the suitable method.
How to Stop Motorhome Awning Flapping in the Wind?
If you’re a motorhome owner, then you know that one of the most annoying things is when your awning starts to move in the wind. Not only is it noisy, but it can also damage the awning itself.
There are two types of awnings, manual and electric. The process of stopping the awning from flapping will be different depending on which type you have and the accessories.
A. Solution for Electric Awning:
If you have an electric awning, then there are three ways that it won’t flap in the wind.
Method 1: Using Awning Tie Down Kit
The first way is to use an awning tie down kit. You can attach straps and hooks to the awning before attaching the canopy to the ground.round.
Step 01. You will want to make sure that the awning is fully retracted. Once it is, you can start to attach the straps to it. There should be four straps, one for each corner of the awning.
Step 02. Start at one corner and thread the strap through the loop on the awning. Then, take the other end of the strap and hook it onto the anchor that is provided in the kit. You should do this for all four corners.
Step 03. Now, you will need to find something to attach to the other end. This could be a tree, a picnic table, or anything else that is sturdy and will not move. Once you have found something, hook the strap onto it and then pull it tight. Continue to do this until all four straps are tightened.
Method 2: Using Weighted Bar
Weighted bars can help to stabilize the awning, making it less likely to flap in strong winds. You attach them to the bottom of the canopy so it won’t blow away. Check the weight limit of your sunshade before using them.
- Firstly, you need to measure the width of your awning.
- Cut two pieces of PVC pipe that are slightly longer than the width of your awning.
- Drill holes into the PVC pipes, about 6 inches apart.
- Now, take some rope and thread it through the holes in the PVC pipes.
- Tie the rope tightly so that the pipes are securely attached to each other.
- Weigh down the PVC pipes with sandbags or bricks, so that they can act as anchors.
- Finally, attach the weighted bars to your awning using cord or bungee cords. Make sure that they are secured tightly so that they don’t come loose in strong winds.
If you don’t have a weighted bar, you can use sandbags or other heavy objects to weigh down the awning. Just be sure that whatever you use is securely attached so that it doesn’t blow away in the wind.
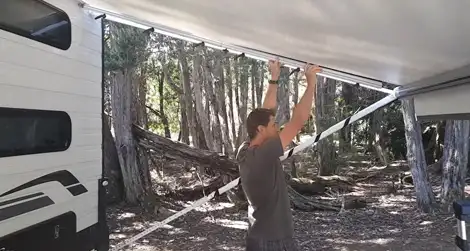
Method 3: Using Guy Lines
Guy lines are simply ropes or cords that you attach to the corners of the awning and stake into the ground. By doing this, you create a sort of “cage” around the tent that will hold it in place. Their strong, weather-resistant materials, such as nylon or polypropylene, prevent them from tearing in harsh weather conditions.
- First, make sure that the awning is retracted all the way. This will give you more slack to work with when attaching the guy lines.
- Next, locate the grommets along the edge of the awning fabric. These are usually located near the corners of the awning.
- Take one end of the guy line and thread it through a grommet. Then, wrap the guy line around a sturdy object such as a tree or pole. Make sure that the object is secure enough that it won’t move in windy conditions.
- Tie the guy line off and repeat this process for each grommet along the edge of the awning fabric.
- Once all of the guy lines are in place, test them by pulling on each one to make sure that they’re tight enough. The awning should be secure and not able to flap in the wind when properly secured with
You can also use a combination of these methods to prevent your awning from flapping. For example, you could use weighted bars and guy lines to create a more secure setup. Experiment to see what works best for you and your awning.
B. Solution for Manual Awning:
If you have a manual awning, there are several ways you can stop it from flapping in the wind. Here we will share some methods to stop manual awning flapping.
Method 1: Using Bungee Cords or Straps
A bungee cord or strap is a DIY anti flapper for a manual awning. You can use them to keep your awning tight against the side of your RV.
Step 01. Extend your awning all the way out and open it up fully.
Step 02. Find some sturdy points to anchor your bungee cords or straps to. These could be trees, poles, or posts. If you’re using straps, you’ll also need something to use as a ratchet, like a handle from a broom or mop.
Step 03. Loop the bungee cord around the awning tube, leaving enough slack to stretch over to your anchor point. Make sure the cord is taunt, then tie it off securely. Repeat on the other side.
Step 04. For straps, loop them around the awning tube and ratchet them tight. Again, make sure there’s no slack in the strap before you clip off the excess. You don’t want the strap to come loose while you’re away.
Step 05. Close and lock your rollout awning in place. This will prevent the awning from flapping in high winds.
Method 2: Using RV Awning Clamps
Awning clamps are designed to grip the fabric of your awning tightly, preventing it from flapping in strong wind. They are easy to install and remove. By following the steps below, you can safely secure your tent so that it will stay in place, even on windy days.
Step 01. Stretch your awning fully. Locate the two awning clamps near the base of the awning arms (If it is already extended, skip to step).
Step 02. Place one clamp on the awning fabric near its bottom arm, and thread the other clamp through the loop at the end of the first clamp.
Step 03. Pull the second clamp tight against the awning arm, and then use the thumbscrew to secure both clamps in place.
Step 04. Repeat steps 3 and 4 for the other awning arm. Test your awning by moving it back and forth to make sure that it is securely in place before using it on windy days.
Step 05. Lock up your awning when you’re not using it to help keep any high winds from catching under the awning and causing it to flap.
Method 3: Using De-flappers
De-flappers are simply strips of fabric that attach to the front and back of an awning, providing additional weight and surface area. This helps to keep the canopy stable in windy conditions, and it also minimizes noise. They work with both aluminum and fabric canopies.
Step 01. Begin by extending the awning fully and securing it in place.
Step 02. Attach the de-flapper brackets to the end of each awning arm.
Step 03. Once the brackets are in place, thread the de-flapper straps through the eyelets and adjust the tension until the fabric is taut.
Step 04. Secure the straps in place and check that the awning is securely fastened before retracting it.
Methods 4: Using Stabilizing Kit
A stabilizing bar kit consists of two or more bars and all of the necessary hardware that attaches to your awning frame and provides additional support. When it is windy, these bars will significantly reduce the movement and flapping of your cover.
Step 01. Start by fully extending the awning. This will give you more working space and make it easier to install the stabilizing kit.
Step 02. Connect the brackets to the awning according to the manufacturer’s instructions. Make sure that they are securely in place so that they can provide the necessary support.
Step 03. Once the brackets or straps are in place, retract the awning until it is tight. This will help to prevent excessive movement and keep the awning secure in high winds.
Methods 5: Using Tensioner and Clip
You can tighten your awning by using a tensioner and clip. Tensioners are installed on the frame’s arm. Clips are also used to secure the canvas fabric to the framework.
Step 01. Awnings should be properly tensioned. If the fabric is too loose, it will flap in the wind. Use the tensioner to tighten the fabric until it is snug but not too tight.
Step 02. Next, use the clip to secure the end of the fabric to the frame. They should be placed around about six inches from the edge of the fabric. It helps hold the fabric in place and reduces flapping.
Step 03. Adjust the angle of the awning to avoid facing directly into the wind. As a result, you can reduce the amount of wind that hits it and prevents it from flapping.
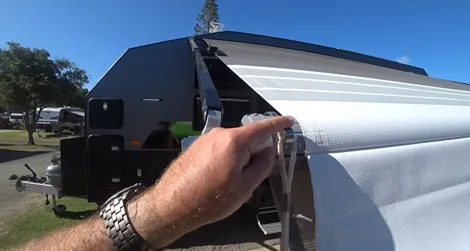
Methods 6: Using RV Awning Tape:
Using awning tape, you can attach the cover fabric to the metal arms. It has a waterproof film coating and an aggressive glue that will keep it in place. Also, it resists tearing in all directions.
Step 01. Clean the area where the RV awning tape will be applied. This will help ensure that the tape will adhere properly.
Step 02. Measure and cut the RV awning tape to the desired length.
Step 03. Peel off the backing and apply it to the awning fabric. Be sure to smooth out any wrinkles or bubbles as you apply them. Trim off any excess RV awning tape.
Precautions:
When handling awnings, take some precautions to prevent injury. Here are some tips to keep in mind:
- Wear gloves when working with awning fabric to prevent cuts and scrapes.
- Be careful when using power tools.
- One of the most common dangers is tripping over an awning leg. these legs are metal support rods that hold an awning or tarp up. These legs can be very sharp, causing serious injury if not handled correctly.
- Be sure to secure the awning rail before working on it so that it doesn’t come loose and fall on you.
- Make sure that your slide topper is properly installed and secured
- Inspect the fabric for rips or tears before applying RV awning tape. If the fabric is damaged, it will need to be repaired before applying the tape.
- Follow the manufacturer’s instructions when mounting a stabilizing kit or tensioner.
- Do not over-tighten the awning fabric. The wind damages the fabric and causes it to tear.
- Never leave an awning unattended in high winds.
Why Does My Awning Flap?
Awnings are generally made of lightweight, tear-resistant fabric. Most of them will have some type of reinforcement at the seams and corners. The entire awning is attached to the side of the RV with brackets, poles, and straps.
As the wind blows, it can catch under the awning and start to lift it up. Once it is lifted, the wind can catch under the fabric and start to flap it. The flapping makes a loud noise and can eventually tear the material if it continues long enough.
The awning can also be damaged if it’s not retracted in high winds. When you have an electric retractable awning, it’s best to retract it when the wind speeds get too high.
FAQs:
Q: Why Does My Awning Make Noise?
Metal supports can sometimes rattle against each other, especially in windy conditions. This can be prevented by tightening the bolts that hold the supports together. Additionally, the fabric of the awning can rub against the supports or frame, making a flapping sound. This is usually caused by loose fabric or incorrect tensioning of the awning.
Q: What is too Windy for an Awning?
Most awnings are designed to withstand wind speeds of up to 25 mph or 40 km/h, but gusts can occasionally reach much higher speeds. When this happens, the awning can be torn from its moorings or even uprooted entirely. In some cases, high winds can also cause the awning fabric to shred or tear.
Q: Should You Tie Down an RV Awning?
A manual awning should always be tied down. It can be damaged by strong winds. Its fabric can tear, and the frame can bend or break. If you secure it, you will help to protect it from wind damage. You should tighten up if you leave your RV unattended for an extended period. For an electric model, you need not bind it down, as the motor will keep it securely in place. Anchoring it can actually put unnecessary stress on the mechanism, leading to premature failure.
Q: Can an RV Awning Be Shortened?
Return the tent to its fully extended position. Release the fabric from the roller frame. Gently fold the cover in half and re-insert it into the roller tube. Use the adjustment straps or clamps to secure it. Secure the fasteners on the other side.
Conclusion:
When having trouble with your awning flapping in the wind, you may need to take some preventative measures. By following our tips and tricks above, you can help to keep your awning secure and in good condition.
Our methods on how to stop motorhome awning flapping will secure your awning and help extend its life. With just a little bit of effort, you can keep it working like new for a long time.
If your awning is not properly tensioned or secured, it can flap in the wind and cause damage. As soon as this happens, your camping will ruin, and you will be annoyed by the flapping sound. So, don’t wait for any further damage and take action now.

