
Last Updated on April 20, 2023
RV Battery Disconnect switches are a key component in any recreational vehicle. They ensure your battery won’t drain when your RV is not in use and protect the electrical system from accidental discharge.
However, RV enthusiasts have an age-old debate about where to put the disconnect switch on the positive or negative terminal. You can install an RV Battery Disconnect switch on the negative (-) or positive (+) lead, and it will effectively disconnect the whole circuit.
You can add extra safety by installing the device on the negative (-) lead. Today we’ll explore the pros and cons of both options to help you decide which one suits your needs best. So buckle up, and let’s dive right into it.
Should RV Battery Disconnect be on Positive or Negative: 3 Factors

There are two main options for placing an RV Battery Disconnect switch: on the positive or negative side of the circuit. The placement of this switch is an essential consideration for any RV owner. But why is this decision so critical?
The proper placement of the RV Battery Disconnect switch ensures that power is completely cut off from the electrical system when not in use, preventing unnecessary drain on the battery and increasing its longevity. Also, it provides a safety measure by allowing easy disconnection in an emergency.
Several factors must be considered when deciding on the RV Battery Disconnect switch placement.
- Firstly, you should remember the design of their electrical system. It’s essential to ensure that all components are compatible and that wiring is correctly installed before making any decisions about disconnect switch placement.
- Secondly, ease of access should be considered. If a problem arises with the electrical system, you want to be able to quickly and safely disconnect power without having to dig around in hard-to-reach areas.
- Lastly, personal preference should also play a role in deciding where to install the RV Battery Disconnect. Some owners may prefer one side over another based on their experience or comfort level with working on their RV’s electrical system.
Why do I need an RV Battery Disconnect switch on my RV?
Installing an RV Battery Disconnect switch is essential for any RV owner because it protects your batteries and safety. The switch lets you disconnect the electrical power, keeping your batteries from draining.
Over time, continuously drained batteries, even if not in use, eventually become damaged and may need to be replaced. Also, a battery disconnect switch provides a critical safety feature, ensuring that no electrical components still use the power that could lead to accidental shock or fire when the RV is not in use.
Therefore, adding an RV Battery Disconnect switch is a cost-effective and easy upgrade that can save a lot of hassle and costs in the long run.
What is the Primary Function of the RV Battery Disconnect Switch?
Its primary function is to provide safety and protection to individuals performing maintenance, repair, and inspection activities in different systems, such as electrical and mechanical.
In an RV electrical system, the disconnect switch acts as a safety mechanism for isolating the specific part of the circuit, which needs to be maintained or repaired without risking the safety of the person working on it.
The primary function of a disconnect switch is that it serves as a means of protection against electric shock, overload, or short circuits. It is also used as a service entrance to disconnect the main electrical supply from the building or a specific area.
Considerations when placing RV Battery Disconnect Switches
Several factors must be considered when deciding where to place the RV Battery Disconnect switch.
Electrical System Design
The location of the disconnect will depend on the type of electrical system installed in your RV.
If your RV has a negative ground system, installing the battery disconnect on the negative side is recommended. This is because disconnecting the negative cable will completely isolate the battery from the electrical system, preventing accidental discharge or short circuits.
Conversely, installing the battery disconnect on the positive side is best if your RV has a positive ground system. This is because most accessories and appliances in an RV are designed to work with a positive ground system. Disconnecting the positive cable will also prevent accidental discharge or short circuits.
Ease of Access
The disconnect switch should be located in a place that is easy to reach and operate in case of an emergency or routine maintenance.
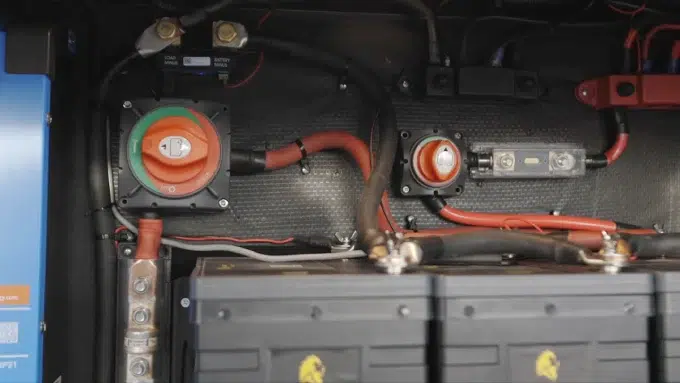
Ideally, the disconnect switch should be located near the battery but not too close so it can accidentally be turned off while working on it. It should also be easily visible and labeled clearly.
Some common locations for the disconnect switch include inside the RV near the entry door, outside in a compartment accessible from outside the RV, or under the hood of a motorhome.
Personal Preference
Some RV owners prefer disconnecting on the positive side, while others prefer it on the negative side. Both options have pros and cons, so it ultimately comes down to what the individual feels most comfortable with.
Installing the disconnect on the positive (+) side is a common choice among RV owners. One advantage of this placement is that it allows easy access in an emergency. For example, quickly disconnecting the positive cable can prevent damage and potential harm if there is a short circuit or another electrical issue.
However, one disadvantage of mounting the disconnect switch on the positive side is that some residual voltage is still present even when disconnected. This means that there is still a risk of shock or electrocution if not handled properly.
Alternatively, placing the disconnect on the negative side completely cuts off all power from the battery. This eliminates any risk of residual voltage and makes maintenance or repairs safer.
But one disadvantage of this placement is that it may be harder to access in an emergency since it requires removing additional cables before reaching the disconnect.
Pros and cons of placing RV Battery Disconnect on the positive or negative side
Each connecting option has its own set of advantages and disadvantages that should be carefully considered before making a decision.
Placing the Disconnect on the Positive Side
Placing the RV Battery Disconnect on the positive side has its advantages and disadvantages.
Advantages
- It is easier to install the switch since most RVs have electrical systems designed with a positive ground. This means that the negative terminal of the battery is connected to the frame of the RV, which is grounded.
- Placing the disconnect switch on the positive side ensures that all electrical components are disconnected from power at once, preventing any residual current from flowing through them.
Disadvantages
- One major disadvantage is that it can be dangerous if not installed properly or if it malfunctions. If there is a short circuit in any of the electrical components, there may be a spark when reconnecting power which could cause an explosion or fire.
Placing the Disconnect Switch on the Negative Side
Placing the RV Battery Disconnect switch on the negative side is a popular choice among RV owners. This is because it allows for easier installation and maintenance and provides an added layer of safety.
Advantages
- It is easier to install since most RVs have positive cables that are more accessible than negative ones.
- It protects against accidental short circuits as the positive cable is usually covered with a protective jacket.
Disadvantages
- One primary concern is that someone who accidentally touches a grounded metal surface while working on a live wire can receive an electric shock due to the current flow through their body.
Step-by-step installation guide for RV Battery Disconnect switch
Here is a step-by-step guide for installation:
- Choose the location: The first step in installing an RV Battery Disconnect is choosing the location. The disconnect can be installed on either the positive or negative side of the battery, but it’s essential to consider factors like electrical system design and ease of access.
- Disconnect the battery: Before beginning any work, it’s essential to disconnect the battery by removing both cables from the terminals.
- Mount the disconnect switch: Once you’ve chosen a location for the disconnect, mount it securely using screws or bolts.
- Connect wires: Next, connect wires from each battery terminal to their corresponding terminals on the disconnect switch.
- Reconnect battery cables: After all wiring connections have been made and secured, reconnect both cables to their respective terminals on the battery.
- Test operation: Finally, test that everything is working correctly by turning off and on the switch and checking that power is supplied or disconnected as expected.
Maintenance tips for your RV Battery Disconnect switch
Maintenance Tips for RV Battery Disconnect:
- Regularly check the disconnect switch’s connections to ensure they are tight and secure. Loose connections can cause electrical arcing, which can lead to overheating and damage to the system.
- Clean the battery terminals regularly to prevent corrosion buildup, which can interfere with the flow of electricity and reduce battery life.
- Store your RV battery in a cool and dry place when not in use. High temperatures can accelerate battery discharge and shorten its lifespan.
- Removing the battery from your RV altogether is recommended if you plan to leave your RV unused for an extended period. This will help prevent any unnecessary drain on your battery’s charge, ensuring it remains fully charged when you return.
Should the RV battery disconnect be on or off when plugged in?
The answer to this question depends on the individual requirement of the RV owner. However, when the RV is plugged into a shore power source, it is recommended to turn off the battery disconnect switch.
Turning off the battery switch is always a good practice when the RV is not in use, as batteries tend to discharge slowly even when not in use. Turning off the battery disconnect switch ensures that the battery is not drained needlessly and can significantly elongate the battery life.
Can I leave the RV battery disconnect switch terminal disconnected?
Leaving an RV disconnect switch terminal disconnected is not recommended when using your RV, as the batteries are designed to self-discharge over time. Over time, the discharged battery can suffer from reduced battery life and capacity.
Thus, it is recommended to either reconnect the battery disconnect switch, charge the battery, or completely remove it from the RV if it is not used for extended periods.
It is also possible to install a battery maintenance device in the RV, which monitors and maintains the batteries when the RV is not in use. The device ensures the battery does not lose its charge, elongating its life.
Secure Your RV: Properly Place a Battery Disconnect for Peace of Mind
Placing an RV Battery Disconnect is a crucial decision that requires careful consideration. While there are debates about whether it should be on the positive or negative side, what matters most is that it is installed correctly and safely.
Proper placement of an RV Battery Disconnect ensures that it functions efficiently, extends the life of your battery, and prevents accidents or damage caused by electrical surges.
It’s essential to consider factors such as your electrical system design, ease of access, and personal preference when deciding where to place your RV Battery Disconnect.
Although placing the disconnect on either side has advantages and disadvantages, it ultimately comes down to your specific needs and preferences.

