
Last Updated on July 10, 2023
As you prepare your RV for the next adventure, ensure you don’t forget about your water heater, which is an integral part of your water system. To keep it running smoothly, you must maintain the anode rod, which needs to be replaced every so often. But before you can do that, you need to know what size socket to use.
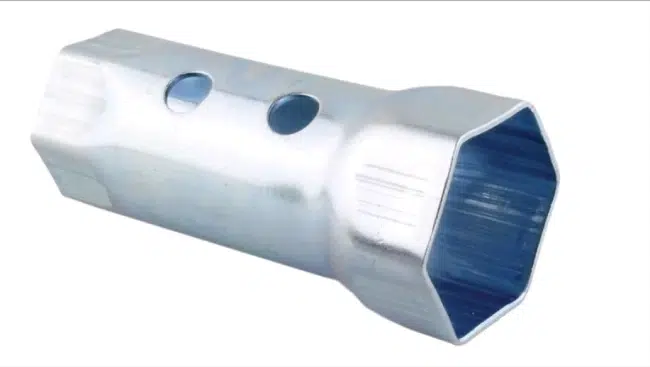
Generally, a 7/8 or 15/16-inch socket is suitable for Atwood and Dometic water heaters, while a 1-1/16” socket is commonly used for Suburban water heaters. But note that these sizes are not set in stone and may vary depending on your RV’s make and model.
This article aims to provide all the information you need regarding finding the right size socket for your RV water heater.
What Size Socket for an RV Water Heater is Suitable?
Regarding an RV water heater, you must know what size socket is suitable for removing the drain plug. Not knowing the correct socket size can lead to damage.
For Atwood and Dometic RV Water Heaters
A 7/8 or 15/16-inch socket is typically required to remove the drain plug for Atwood RV and Dometic RV water heaters. These sizes are commonly used and can be found at most hardware stores.
Note that some models may have different drain plug and heating element socket sizes. So, it’s recommended to consult your RV’s user manual for accurate information.
For Suburban Water Heaters
Suburban water heaters require a 1-1/16’’ socket to remove the drain plug or anode rod. This site is less commonly used than the sizes required for Dometic and Atwood water heaters. But it is still readily available at most hardware stores.
There may be a difference in the size of the drain plug and heating element sockets on some models of water heaters. For example, the heating element might need a 1-1/2″ socket.
What size socket fits an RV Water Heater anode rod?
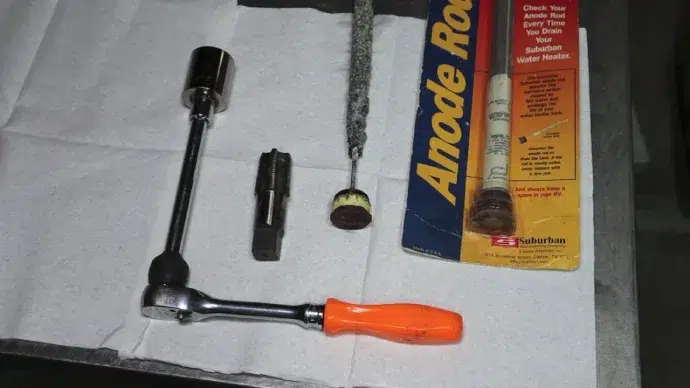
If you want to replace the anode rod in your RV’s water heater, ensure you have the right tool to remove and install the protective component easily. The right tool is a socket drive with a ¾” NPT size that fits the anode rod perfectly.
This size is standard for all RV water heaters, so you can easily find a socket drive of this size in any hardware store. To remove the old anode rod, you must use the socket drive to unscrew it from the water heater.
Make sure to turn it anti-clockwise to loosen it. Once the old anode rod is removed, inspect it for any signs of wear and tear. When installing the new anode rod, use Teflon tape to ensure it’s tightly secured in the water heater.
Use the socket drive to tighten the anode rod clockwise until it’s snug. Don’t over-tighten it, as this can damage the threads.
How to Determine the Socket Size for RV Water Heaters?

When determining the socket size for your RV water heater, there are several ways to ensure you have the correct sized socket:
#1 Consult the Manufacturer’s Documentation
Checking out the manufacturer’s manual can provide useful insights and guidance on the appropriate equipment for your RV. Manufacturers typically provide recommendations on the size socket required to remove the heating element from the RV water heater.
The documentation may also contain information on the specific tools you need to perform the task, such as wrenches or pliers.
#2 Measure the Nut Size
You’ll need to measure the nut for your replacement heating element to upgrade your RV’s warm shower system. This can be done using a socket wrench to determine the nut size on your current heating element. Use the correct size socket and apply moderate pressure to remove the nut.
Once the nut is removed, measure the diameter of the opening to determine the size of the nut. Measuring the nut size is crucial in finding the right replacement heating element for your RV water heater.
Why Do You Need the Proper-size Socket for an RV Water Heater?
Finding the proper size socket is crucial when maintaining your RV water heater. Using the wrong-sized socket can damage the anode rod and the water heater. Below are some reasons:
Ensuring Safety and Efficiency
Using the improper size socket can lead to stripped or damaged parts, which could cause further issues. Also, using the correct socket size will ensure you can easily and safely access the heater without any unnecessary force or stress.
Avoiding Damage to the Water Heater
One of the leading causes of damage is using the wrong size socket when removing or replacing the heating element. If the socket is too large or too small, it can cause the element to become stripped or damaged, leading to costly repairs or even the replacement of the entire unit.
What are the common socket sizes for RV water heaters?
RV water heaters’ most common socket sizes are 1-1/16 inch, 1-1/2 inch, and 1-7/8 inch. These sizes are used for different water heater parts, such as the drain plug and anode rod.
The anode rod, which prevents corrosion in the water heater, requires a 1-1/2-inch socket. This should be removed and replaced annually to ensure the water heater functions properly.
Finally, the 1-7/8 inch socket removes the water heater element. This component is responsible for heating the water in the tank and should be replaced if it’s no longer functioning.
How to Change the Old Socket in RV Water Heaters?
If you need to replace the old socket with a new one in your RV water heater, there are several steps you should follow:
Step 1. Disconnect the Power Source
Before attempting maintenance on your recreational vehicle’s hot shower system, disconnect the power source to ensure your safety. You can do this by unplugging the RV from its power source or turning off the circuit breaker that powers the water heater.
If you’re unsure which circuit breaker controls the water heater, you can turn off the main circuit breaker to be sure. Remember that the water in the heater can still be hot even if the power source is disconnected. So, waiting for the water to cool down would be best before proceeding further.
Step 2. Drain the Water Heater
Now that the power source has been disconnected, it’s time to move on to draining the water heater. This important step cannot be overlooked, as it prevents water from leaking and causing damage.
To do this, simply locate the drain valve at the bottom of the water heater and attach a garden hose to it. Ensure the other end of the hose is positioned in a safe location where the water can flow freely without causing harm or damage.
Once the hose is securely attached, open the drain valve and allow the water heater to drain completely. This may take a few minutes, depending on the size of your water heater. After the water has stopped flowing, close the drain valve and remove the hose.
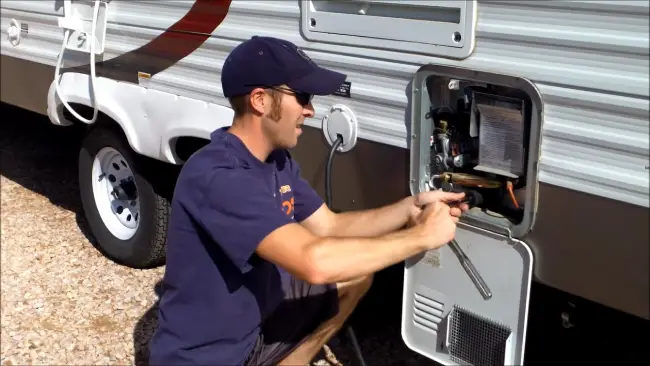
Step 3. Safely Remove the Old Socket
Now safely remove that old plug to move on to the exciting part of installing the new one. Before you start, ensure the water heater is completely drained to avoid accidents.
To remove the old socket, you’ll need a socket wrench that fits the size of the plug. Typically, RV water heaters have a 1 1/16-inch socket size, but it’s always better to double-check before starting. Once you have the correct size socket wrench, place it onto the plug and turn it counterclockwise to loosen it.
Use a breaker bar for extra leverage if the plug is stubborn and won’t budge. Be careful not to use too much force. Carefully remove the plug once it’s loose.
Step 4. Install the New Socket
Be gentle when removing the old plug, but now that it’s out of the way, let’s move on to installing the new socket and enjoying the hot shower. Ensure the new socket is the correct size for an RV water heater. It should fit snugly and securely into the opening.
Once you’ve verified the size, carefully insert the new socket into the hole and tighten it with a socket wrench. Be sure not to overtighten, as this can cause damage to the socket or water heater. With the new socket, you’re one step closer to a comfortable camping experience.
Step 5. Test for Proper Fit and Tightness
Ensure that your new installation is secure by testing for a proper fit, making sure you can enjoy a comfortable and stress-free camping experience. Check that the socket is snugly fitted onto the water heater. It shouldn’t wobble or move around easily. If it does, you may need to adjust the socket or use a different size.
Next, test the tightness of the socket. Use a wrench to tighten it firmly, but be careful not to tighten it over, as this can damage the threads and cause leaks.
Once the socket is secure, turn on the water heater and check for any signs of leakage. Congratulations if it appears to be working properly and you don’t notice any leaks. You’ve successfully installed a new socket for the RV water heater.
Protect Your Water Heater: Use the Right Socket Size
The socket size is crucial for removing the anode rod, which protects your water heater from corrosion and prolongs its lifespan. Using the wrong size socket can damage your water heater and lead to costly repairs.
Think of the socket as the key to your RV’s water heater. Just like you wouldn’t use the wrong key for your car, using the wrong size socket can have disastrous consequences.
So, take the time to measure and find the suitable size socket for the RV water heater. It may seem like a small detail, but it can make a big difference in maintaining the quality of your RV’s water heater.

